Set Up a Wireless Connection via Wi-Fi Protected Setup (WPS) on an RV Series Router
Available Languages
Objective
Wi-Fi Protected Setup (WPS) is a wireless security feature that allows devices to connect to the wireless network without having to key in the actual password. WPS was designed to help standardize the setup and configuration of wireless security by simply following any of the three ways below to connect your device to the router wirelessly via WPS:
- Clicking or pressing the WPS button on the client device and clicking the WPS icon on the WPS page of the router web-based setup utility.
- Entering the WPS Personal Identification Number (PIN) of the client device and clicking the Register button on the router web-based utility.
- Generating the Router WPS PIN on its web-based utility and entering the same PIN on the client device.
This article aims to show you how to set up a wireless connection on an RV Series router using WPS.
Applicable Devices
- RV Series
Software Version
- 1.0.0.17 — RV132W
- 1.0.0.21 — RV134W
- 1.0.3.22 — RV130W
- 1.0.0.16 — RV340W
Set Up WPS
Configure Basic Wireless Settings
Note: Images below are taken from the RV130W. Images may vary depending on the model of your device.
Step 1. Log in to the web-based utility and choose Wireless > WPS.

Step 2. In the WPS page, click Edit to select a wireless network to enable WPS. If you are configuring the RV340W skip to Step 3.

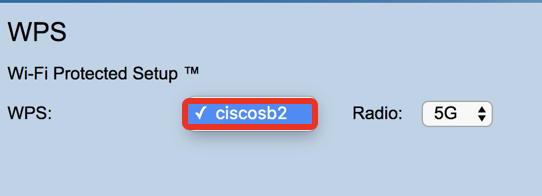
Step 3. If you are configuring the RV340W, choose an SSID from the WPS drop-down menu.
Note: In the example below, ciscosb2 is chosen.

Step 4. From the Radio drop-down menu, choose a radio band that users will use to connect. The options are 2.4G or 5G.
Note: In this example, 5G is chosen.

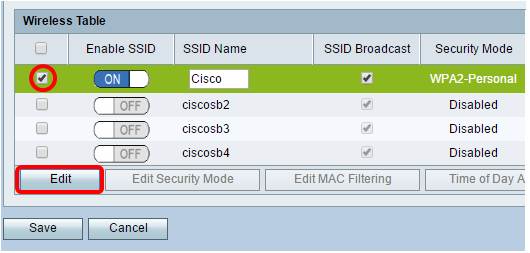
Step 5. Ensure that the WPS option is enabled or checked for the desired SSID. The router provides four virtual wireless networks, or four SSIDs and these are ciscosb1, ciscosb2, ciscosb3, and ciscosb4. By default, ciscosb1 has WPS enabled.

Step 6. (Optional) If the WPS of the desired SSID is not enabled, check the check box next to that SSID and then click Edit.
Note: In this example, WPS is enabled on the Cisco SSID name.

Step 7. Check the WPS check box to enable WPS and then click Edit WPS.

Step 8. Click Save.

Step 9. Navigate back to the WPS page and verify that the Wi-Fi Protected Setup Status area shows Configured.

You should now have enabled WPS to your desired SSID.
Connect Using the WPS Button
Note: Your client device must support WPS for this feature to work. The WPS push button might be called something else, depending on the brand of your client device. It is typically located somewhere around the Wi-Fi Settings. The images on this section are taken from an Android device.
Step 1. Log in to the web-based utility and choose Wireless > WPS.

Step 2. Click the WPS icon on the page.

Note: A window will appear showing that it is searching for your client device.
Step 3. Locate the WPS option on the client device.
Step 4. Tap the WPS push button on the client device to start searching for the RV Series Router.

Step 5. Tap OK to continue when your client device has successfully connected.

Step 6. Back on the router web-based utility, the prompt below will pop up. Click OK.

You should now have connected to the network using the WPS button.
Connect Using the WPS PIN of the Client Device
Note: Your client device must support WPS for this feature to work. The WPS push button might be called something else, depending on the brand of your client device. It is typically located somewhere around the Wi-Fi Settings. The images on this section are taken from an Android device.
Step 1. Locate the WPS PIN entry option on your client device.
Step 2. Tap WPS PIN entry to get the WPS PIN.

Step 3. Take note of the PIN.
Note: In this example, the PIN is 37807467.

Step 4. On your computer, log in to the web-based utility of your router and navigate to Wireless > WPS.

Step 5. In the WPS page, enter the WPS PIN of the client device.
Note: In this example, 37807467 is entered.

Step 6. Click Register. The page should automatically refresh when it is connected.

Step 7. On the client device, tap OK to continue when it has successfully connected to the wireless network.

You should now have connected your wireless client device to the network using its WPS PIN.
Connect Using the WPS PIN of the Router
Step 1. If a client device requires a PIN when connecting via WPS, log in to the web-based utility of the router to obtain its PIN. Alternatively, you may check the label of the router for the WPS PIN. It must be the one beside the WPS icon on the label.
Step 2. Navigate to Wireless > WPS.

Step 3. Click Generate and take note of the newly generated PIN.
Note: In this example, the PIN is 47108509 is entered.

Step 4. (Optional) From the PIN lifetimedrop-down menu, choose the desired validity of the key. When the time expires, a new key is negotiated.
Note: In this example, 20 Minutes is chosen.

Step 5. On your client device, view the available network connections and choose your SSID.
Note: In this example, the client device will be connecting to ciscosb1.

Step 6. Enter the PIN that the router generated.
Note: In this example, 47108509 was generated.

Step 7. Click Next.

Step 8. Check and confirm that the client or wireless device has successfully connected to the network.

You should now have connected your client device to the network using the WPS PIN of the router.
Revision History
| Revision | Publish Date | Comments |
|---|---|---|
1.0 |
11-Dec-2018 |
Initial Release |
 Feedback