Port Range Forward Configuration on the RV016, RV042, RV042G, and RV082 VPN Routers
Available Languages
Objective
Port Range Forwarding is used to forward requested public services to other devices provided on a network. It is similar to the call forward option in mobile devices. The total range of the port is forwarded to other devices as assigned. When users from the Internet make certain requests to the network, the router can forward the requests to computers that are equipped to handle the requests. The objective of this article is to assist the user with the configuration of port range forwarding on the RV016, RV042, RV042G, and RV082 VPN Routers.
Applicable Devices
• RV016
• RV042
• RV042G
• RV082
Software Version
• v4.2.1.02
Port Forwarding Configuration
Step 1. Log in to the web configuration utility and choose Setup > Forwarding. The Forwarding page opens:
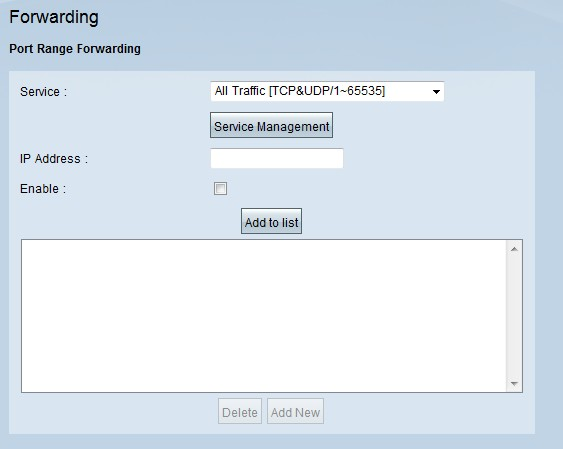
Step 2. In the Port Range Forwarding area, choose the appropriate service from the Service drop-down list.
Note: If the service needed is available, skip to Step 12.
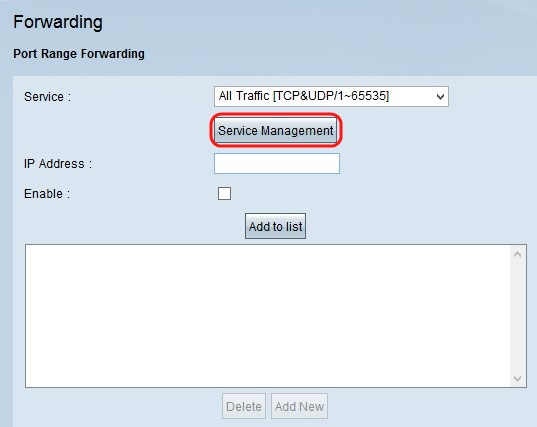
Step 3. If the appropriate service is not available, click Service Management. This opens a new window. In this window, you can add a new service to the list or delete a service from the list or change the configurations of available service.
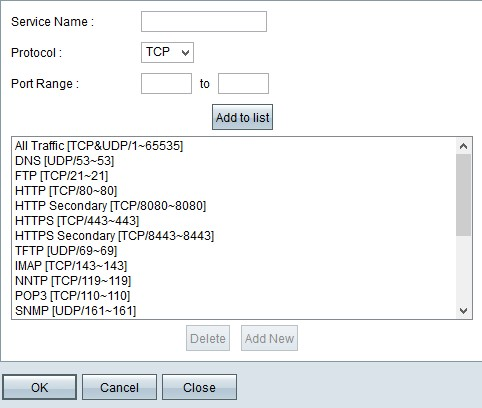
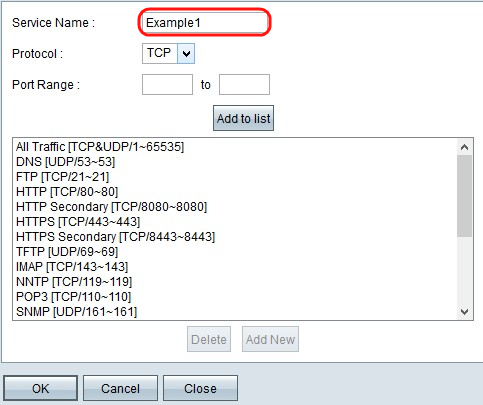
Step 4. Enter a service name in the Service Name field.
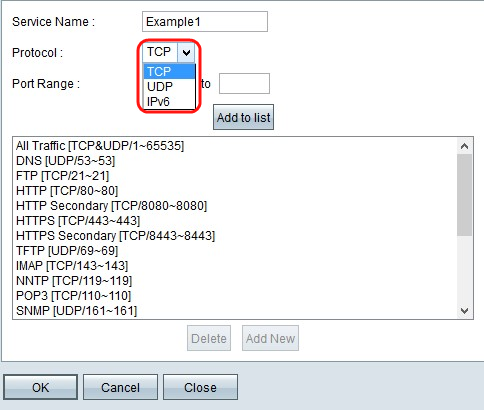
Step 5. Choose the appropriate protocol type from the Protocol drop-down list.
• TCP (Transmission Control Protocol) — A transport layer protocol used by applications that require guaranteed delivery.
• UDP (User Datagram Protocol) — Uses datagram sockets to establish host to host communications. It won't guarantee delivery.
• IPv6 (Internet Protocol version 6) — Directs Internet traffic between hosts in packets that are routed across networks specified by routing addresses.
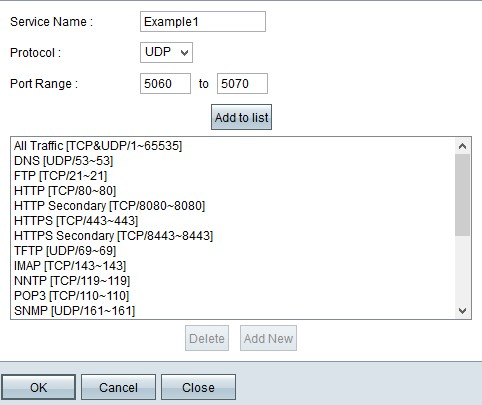
Step 6. Enter the port range in the Port Range fields. The range depends on the protocol chosen in the above step.
Step 7. Click Add to list. This adds the service to the Service drop-down list.
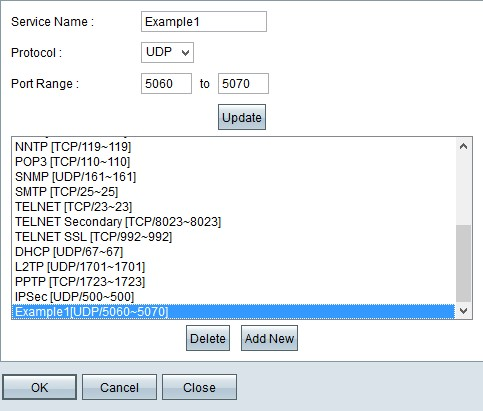
Step 8. (Optional) If you want to delete a service from the service list, choose the service from the service list and click Delete.
Step 9. (Optional) If you want to update the service entry, choose the desired service from the service list and click Update.
Step 10. (Optional) To add another new service to the list click Add New. If you want to add a new service follow Steps 6 through 9.
Step 11. Click OK. This closes the window and takes the user back to the Forwarding page.
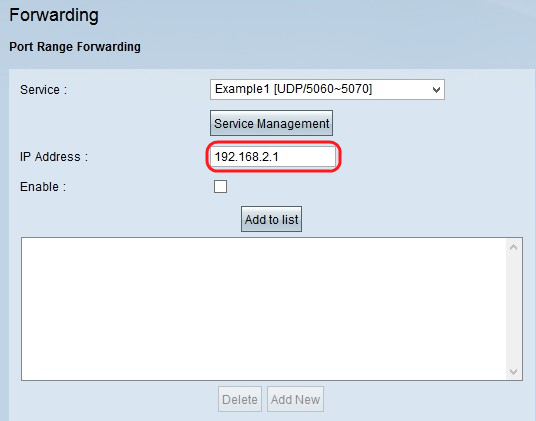
Step 12. In the IP Address field, enter the LAN IP address. The port forwards the port range to another device whose IP address is entered in this field.
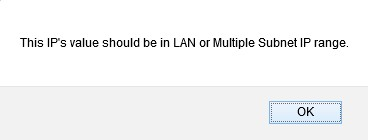
Note: The entered IP address should be within the LAN range or multiple subnet IP range otherwise an error message window appears as follows:
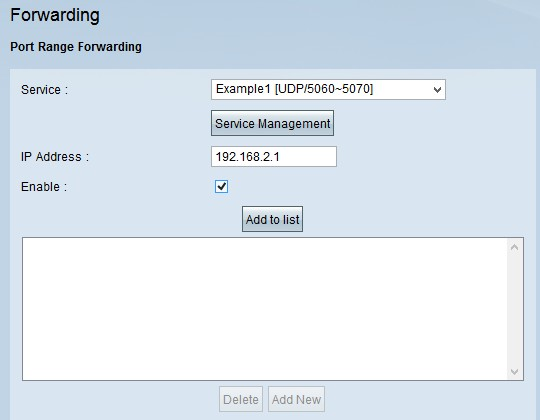
Step 13. Check Enable to enable port range forwarding to the IP address.
Step 14. Click Add to list to forward as many services as required. The list updates with the newly added port range forwarding range.
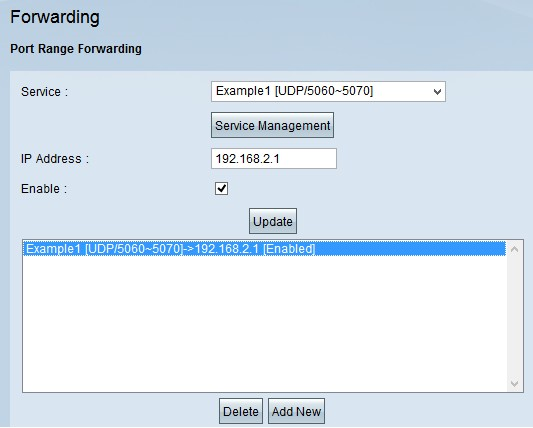
Step 15. (Optional) If you want to delete a port range entry from the service list choose the entry from the port range forwarding list and click Delete.
Step 16. (Optional) If you want to update the port range entry, choose from the entry from the port range forwarding list and click Update.
Step 17. (Optional) To add another new range to the list click Add New. If you want to add a new service follow Steps 2 through 14.
Step 18. Click Save at the end of the page to save all the changes made on the forwarding page.
Revision History
| Revision | Publish Date | Comments |
|---|---|---|
1.0 |
10-Dec-2018 |
Initial Release |
 Feedback