Configuration of Port Triggering on the RV016, RV042, RV042G, and RV082 VPN Routers
Available Languages
Objective
Port Triggering provides for a more secure environment by closing off ports when they are not in use and are also used for special applications that can request a port to be opened on demand. Port triggering allows the computers behind a NAT-enabled router to access a special server or use a special application on the Internet.
The objective of this document is to guide the user to set up port triggering on RV016, RV042, RV042G, and RV082 VPN Routers.
Applicable Devices
• RV016
• RV042
• RV042G
• RV082
Software Version
• v4.2.1.02
Port Triggering
Step 1. Log in to the Router Configuration Utility and choose Setup > Forwarding. The Forwarding page opens:

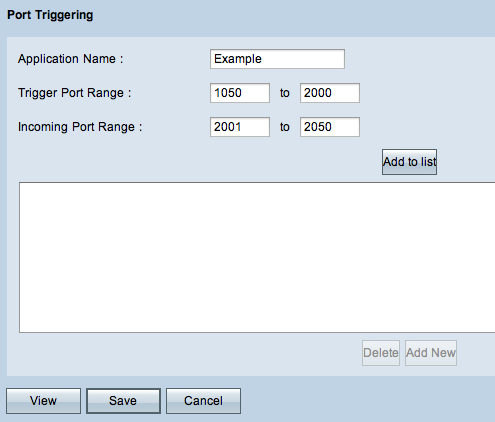
Step 2. Enter the application name in the Application Name field.
Step 3. Enter the range of the ports that will trigger the ports in the Trigger Port Range field. For example, when data is sent from the Trigger Port Range (1050 - 2000) the incoming data is received in the Incoming Port Range (2001- 2050).
Step 4. Enter the range of the incoming ports that will be forwarded when the rule is triggered in the Incoming Port Range field.
Step 5. Click Add to list to trigger as many ports as required.

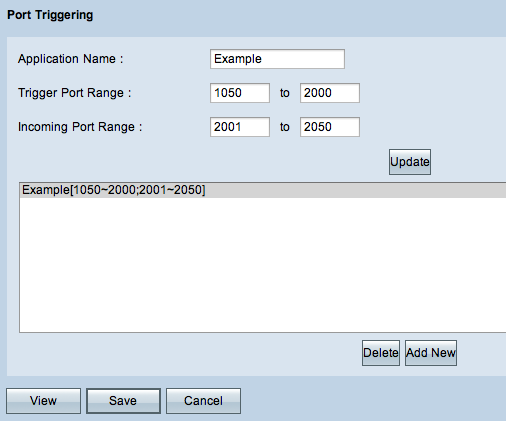
Step 6. (Optional) To delete a port range entry from the service list, choose the entry from the port triggering list and click Delete.
Step 7. (Optional) To update the port range entry, choose from the entry from the port triggering list, click Update, and edit the desired fields.
Step 8. (Optional) To add another new range to the list, click Add New. If you want to add a new service follow Steps 2 through 4.
Step 9. Click Save to save all the configuration settings.
Revision History
| Revision | Publish Date | Comments |
|---|---|---|
1.0 |
11-Dec-2018 |
Initial Release |
 Feedback