Connect the Cisco IP Phone 8861 to a Wireless Network
Available Languages
Objective
The Cisco Internet Protocol (IP) Phone 8861 is equipped with a wireless feature that allows a user to stay connected anywhere in the vicinity of the network. The 8861 provides you the option to connect to a visible or hidden wireless networks. One benefit of having a hidden network is that it reduces the chances of being found by users and attempting to join the network.
The objective of this document is to show you how to connect to a Wireless Local Area Network on a Cisco IP Phone 8861.
Note: To use the phone in a Wi-Fi network, you must use a power adaptor to power the phone.
Applicable Devices
- CP-8861
Software Version
- 11.0
Connect to a Wireless Network
Connect to a Broadcasted Network
Step 1. If the phone is wired, unplug the Ethernet cable and plug in the power adaptor.
Step 2. On the Cisco IP Phone, press the gear button to access the Information and settings menu.

Step 3. In the Information and settings menu, navigate to Network Configuration by using the circle navigation button  and press Select.

Step 4. In the Network configuration menu, navigate to Wi-Fi configuration and press Select.
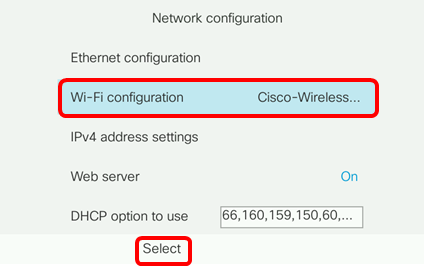
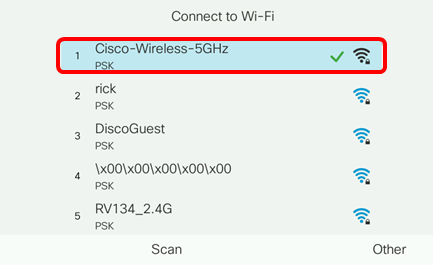
The phone conducts a wireless scanning process to search for networks in the area.

Step 5. Choose the applicable Service Set Identifier (SSID) of the network. Press the center navigation key to select. If you want to connect to a hidden SSID network, skip to the Connect to a Hidden Network section.
Note: In this example, the SSID chosen is Cisco-Wireless-5GHz.
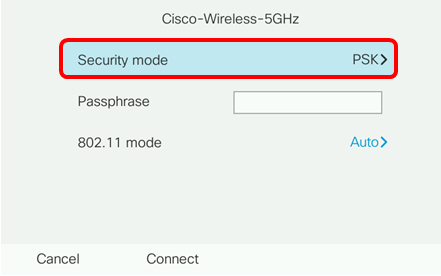
Step 6. (Optional) In the Configuration menu of the SSID, which in this case is Cisco-Wireless-5Ghz, choose the mode in which the network uses to encrypt passwords and authenticate clients.
Note: In this example, PSK is chosen and only because it is the only option available in the chosen network.
Step 7. Enter the passphrase or password of the chosen network in the Passphrase field.
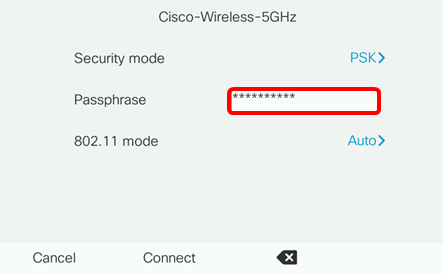
Step 8. (Optional) Choose an 802.11 mode by pressing the navigation  button. The options are:
- Auto — IP Phone will scan both 2.4 GHz and 5 GHz channels and attempt to associate to the access point with the strongest signal.
- 2.4 GHz — IP Phone will scan only for 2.4 GHz channels and display 2.4 GHz channels after associating.
- 5 GHz — IP Phone will scan only for 5 GHz channels and display 5 GHz channels.
Note: In this example, 5 Ghz is chosen.

Step 9. Press Connect.

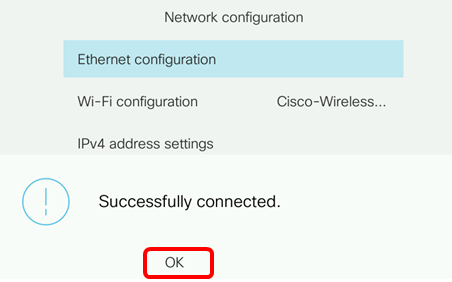
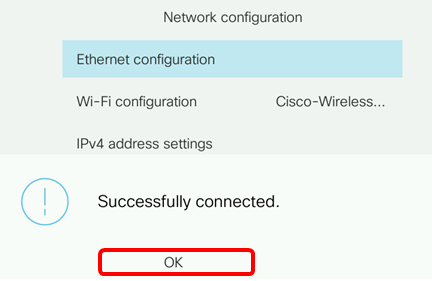
Step 10. A message will appear to inform you that you have successfully connected to the wireless network. Press OK to return to the Network configuration menu.
Note: If your phone was previously connected to a wireless network, it will disassociate from the SSID and the phone will reboot.
Step 1. In the Connect to Wi-Fi menu, choose Other to connect to a hidden SSID network.

Step 2. Choose the appropriate Security mode of the SSID network. A list of security modes appear. Below is a list of the available security modes supported and the key management and encryption types that can be used for each mode.
- EAP-FAST — Extensible Authentication Protocol-Flexible Authentication via Secure Tunneling (EAP-FAST) is an authentication framework rather than a specific authentication mechanism. You will be required to enter a User ID and Password.
- PEAP-GTC — Protected Extensible Authentication Protocol-Generic Token Card (PEAP-GTC) is a Cisco proprietary method as a substitute to PEAP-MSCHAPv2. You will be required to enter a User ID and Password.
- PEAP-MSCHAPv2 — Protected Extensible Authentication Protocol-Microsoft Challenge Handshake Authentication Protocol version 2 (PEAP-MSCHAPv2) is a protocol that encapsulates the EAP within an encrypted Transport Layer Security (TLS) tunnel. You will be required to enter a User ID and Password.
- WEP — Wired Equivalent Privacy security mode requires that the static WEP key (password) must be entered. This option is the least secure.
- PSK — Pre-shared Key must be configured. Enter a hexadecimal formatted password.
- None — Choose this security mode if the network does not have security measures enforced.
Note: In this example, PSK is chosen.
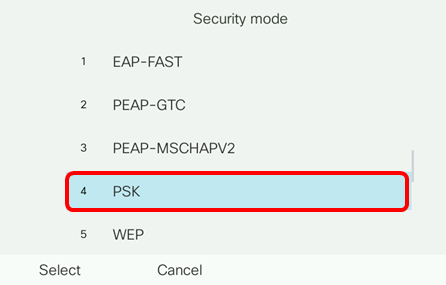
Step 3. Press Select.

Step 4. Enter the name of the SSID network in the Network name (SSID) field.
Note: In this example, Morty is used.
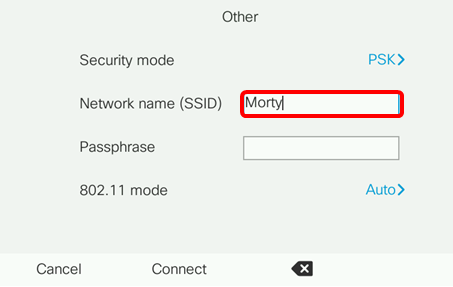
Step 5. Enter the passphrase or password of the chosen network in the Passphrase field.

Step 6. (Optional) Choose an 802.11 mode by pressing the navigation  button. The options are:
- Auto — IP Phone will scan both 2.4 GHz and 5 GHz channels and attempt to associate to the access point with the strongest signal.
- 2.4 GHz — IP Phone will scan only for 2.4 GHz channels and display 2.4 GHz channels after associating.
- 5 GHz — IP Phone will scan only for 5 GHz channels and display 5 GHz channels.
Note: In this example, Auto is used.
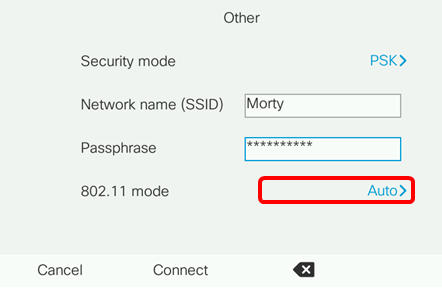
Step 7. Press Connect.

Step 8. A message will appear to inform you that you have successfully connected to the wireless network. Press OK to return to the Network configuration menu.
Note: If your phone was previously connected to a wireless network, it will disassociate from the SSID and the phone will initialize and reboot.
 Feedback