Introduction
This document describes how you can define custom URL categories work in Web security Appliance (WSA).
Contributed by Shikha Grover and Edited by Yeraldin Sanchez, Cisco TAC Engineers.
Prerequisites
Requirements
Cisco recommends that you have knowledge of these topics:
- Beginner level understanding of Cisco Web Security Appliance
Components Used
This document is not restricted to specific software and hardware versions.
The information in this document was created from the devices in a specific lab environment. All of the devices used in this document started with a cleared (default) configuration. If your network is live, ensure that you understand the potential impact of any command.
Background Information
The category that a URL falls into is determined by a filtering categories database. The Web Security appliance collects information and maintains a separate database for each URL filtering engine. The filtering categories databases periodically receive updates from the Cisco update server and is maintained by Cisco TALOS. Talos, Cisco’s Security Intelligence and Research Group, constantly track a broad set of attributes to evaluate conclusions about a given host.
There might be situations when you want to classify a URL/ domain/Ip address differently and have customized classification local to your box. You can achieve this with Custom URL Categories.
When the URL filtering engine matches a URL category to the URL in a client request, it first evaluates the URL against the custom URL categories included in the policy group. If the URL in the request does not match an included custom category, the URL filtering engine compares it to the predefined URL categories.
Configure
Allow URLs
If you trust the website, you can allow it with the following process.
Create a new Custom URL
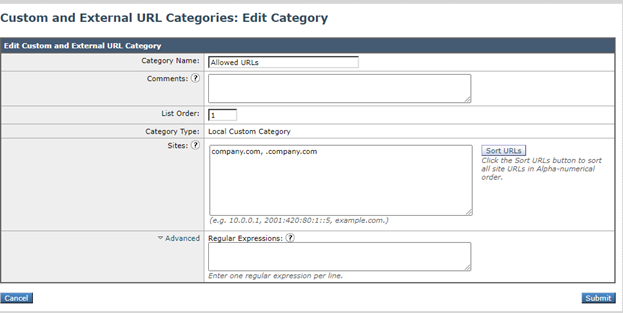
- Create a new custom URL category, navigate to GUI > Web Security Manager > Custom URL Categories > Add Custom Category Name: Allowed URLs.
- Add the sites that you wish to control in the sites section (company.com,.company.com).

- Please note that “domain.com” will only match “domain.com”, not www.domain.com or “host.domain.com”. In order to allow a site and all sub-domains, it will need two entries under the “sites” section: “. domain.com, domain.com”.
- Click Submit.
Edit the Global Access Policy
- Open Web Security Manager > Access Policies> Global Policy > URL Filtering.
- Click on Select Custom Categories.
- Click on Allowed URLs drop-down arrow, choose Include in policy, and click Apply.
- Place a checkmark in the box for Allow.
- Click Submit and Commit Changes.

Block URLs
If you don’t trust the website, you can block it with the following process.
Create a new Custom URL
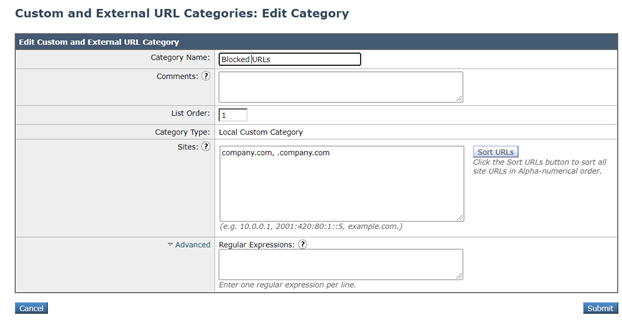
- Create a new custom URL category, navigate to GUI > Web Security Manager > Custom URL Categories > Add Custom Category Name: Blocked URLs.
- Add the sites that you wish to control in the sites section (company.com, .company.com).

- Please note that “domain.com” will only match “domain.com”, not www.domain.com or “host.domain.com”. In order to block a site and all sub-domains, it will need two entries under the “sites” section: “. domain.com, domain.com”.
- Click Submit.
Edit the Global Access Policy
- Open Web Security Manager > Access Policies> Global Policy > URL Filtering.
- Click on Select Custom Categories….
- Click on Blocked URLs drop-down arrow, choose Include in policy and click Apply.
- Place a checkmark in the box for Block.
- Click Submit and Commit Changes.

Note: The above changes can be made to any access policy and not just the Global Policy. The same procedure can be applied to decryption policies.
Please check this guide for a widely deployed use case.
