Introduction
This document describes how to configure your Secure Network Analytics Manager (SNA) to use Amazon Web Services Simple Email Service (AWS SES).
Prerequisites
Requirements
Cisco recommends knowledge of these topics:
Components Used
The information in this document is based on these software and hardware versions:
The information in this document was created from the devices in a specific lab environment. All of the devices used in this document started with a cleared (default) configuration. If your network is live, ensure that you understand the potential impact of any command.
Configure
Review AWS SES configuration
Three bits of information are required from AWS:
- AWS SES location
- SMTP Username
- SMTP Password
Note: AWS SES located in the sandbox is acceptable but be aware of the limitations for sandbox environments: https://docs.aws.amazon.com/ses/latest/dg/request-production-access.html
In the AWS console, navigate to Amazon SES, then select Configuration and click Verified Identities.
You must have a verified domain. A verified email address is not required. Refer to AWS documentation https://docs.aws.amazon.com/ses/latest/dg/creating-identities.html#verify-domain-procedure
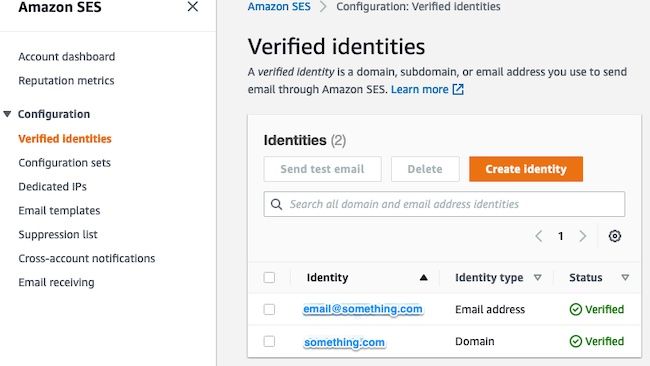
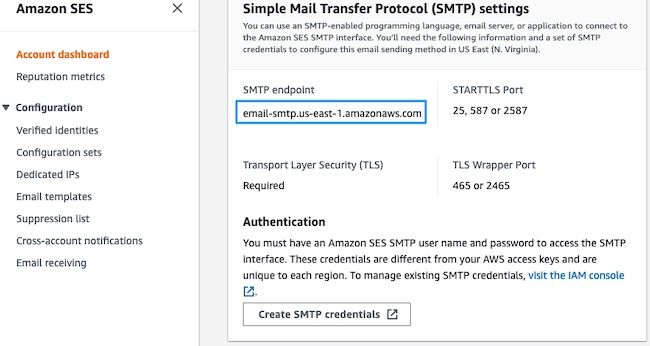
Note the location of your SMTP endpoint. This value is needed later.
Create AWS SES SMTP Credentials
In the AWS console, navigate to Amazon SES, then click Account Dashboard.
Scroll down to the " Simple Mail Transfer Protocol (SMTP) settings" and click Create SMTP Credentials when you are ready to complete this configuration.
Older, unused credentials (approximately 45 days) do not seem to error as invalid credentials.
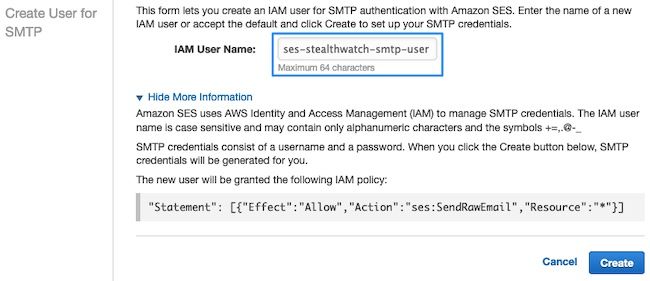
In this new window, update the username to any value and click Create.
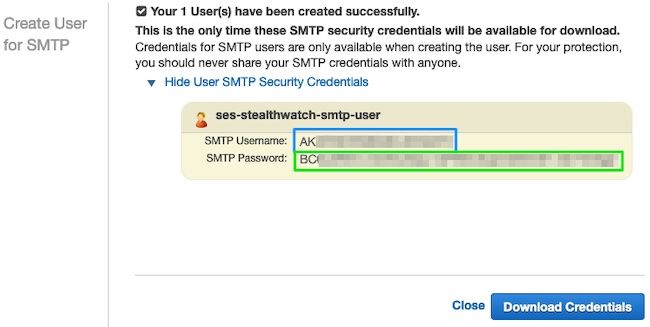
When the page presents the credentials, save them. Keep this browser tab open.
Configure SNA Manager SMTP Configuration
Login to the SNA Manager, and open SMTP Notifications section
- Open
Central Management > Appliance Manager.
- Click the
Actions menu for the appliance.
- Select
Edit Appliance Configuration.
- Select the
General tab.
- Scroll down to
SMTP Configuration
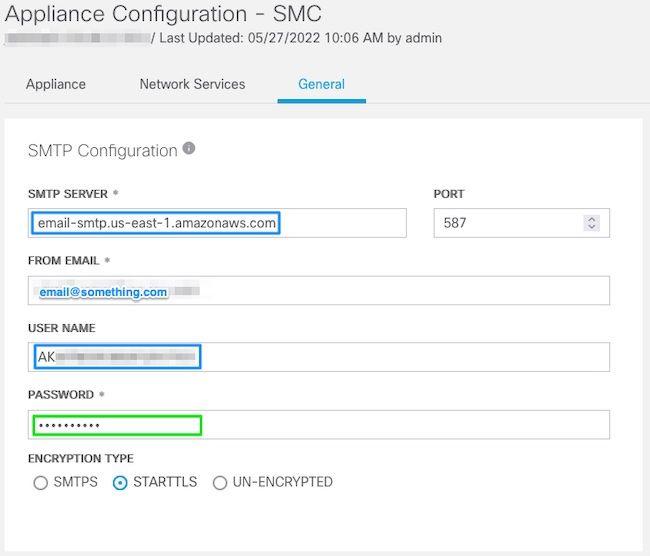
- Enter the values gathered from AWS
SMTP Server: This is the SMTP Endpoint location gathered from the SMTP Settings from the AWS SES Account Dashboard page Port: Enter 25, 587, or 2587 From Email: This can be set to any email address that contains the AWS Verified Domain-
User Name: This is the SMTP user name that was presented on the last step in the Review AWS SES Configuration section
-
Password: This is the SMTP password that was presented on the last step in the Review AWS SES Configuration section
Encryption Type: Select STARTTLS (If you select SMTPS, edit the port to 465, or 2465)
- Apply the settings and wait for the
SNA Manager to return to an UP state in Central Management
Gather AWS Certificates
Establish an SSH session to the SNA Manager, and login as the root user.
Review these three items
- Change the SMTP endpoint location (for example email-smtp.us-east-1.amazonaws.com)
- Change the port used (for example default of 587 for STARTTLS)
- The commands have no STDOUT, the prompt is returned upon completion
For STARTTLS (default port of 587):
openssl s_client -starttls smtp -showcerts -connect email-smtp.us-east-1.amazonaws.com:587 <<< "Q" 2>/dev/null > mycertfile.crt awk 'split_after == 1 {n++;split_after=0} /-----END CERTIFICATE-----/ {split_after=1} {print > "cacert" n ".pem"}' < mycertfile.crt for i in `ls -t1 *.pem`; do cp $i $(awk -F "CN=" '/s:/ {gsub(/ /,x ); print $NF}' $i).pem ; done ; rm -f cacert* mycertfile.crt
For SMTPS (default port of 465):
openssl s_client -showcerts -connect email-smtp.us-east-1.amazonaws.com:465 <<< "Q" 2>/dev/null > mycertfile.crt awk 'split_after == 1 {n++;split_after=0} /-----END CERTIFICATE-----/ {split_after=1} {print > "cacert" n ".pem"}' < mycertfile.crt for i in `ls -t1 *.pem`; do cp $i $(awk -F "CN=" '/s:/ {gsub(/ /,x ); print $NF}' $i).pem ; done ; rm -f cacert* mycertfile.crt
The certificate files with the pem extension is created created in the current working directory, take not of this directory (output from pwd command / last line)
sna_manager:~# openssl s_client -starttls smtp -showcerts -connect email-smtp.us-east-1.amazonaws.com:587 <<< "Q" 2>/dev/null > mycertfile.crt
sna_manager:~# awk 'split_after == 1 {n++;split_after=0} /-----END CERTIFICATE-----/ {split_after=1} {print > "cacert" n ".pem"}' < mycertfile.crt
sna_manager:~# for i in `ls -t1 *.pem`; do cp $i $(awk -F "CN=" '/s:/ {gsub(/ /,x ); print $NF}' $i).pem ; done ; rm -f cacert* mycertfile.crt
sna_manager:~# ll
total 16
-rw-r--r-- 1 root root 1648 May 27 14:54 Amazon.pem
-rw-r--r-- 1 root root 1829 May 27 14:54 AmazonRootCA1.pem
-rw-r--r-- 1 root root 2387 May 27 14:54 email-smtp.us-east-1.amazonaws.com.pem
-rw-r--r-- 1 root root 1837 May 27 14:54 StarfieldServicesRootCertificateAuthority-G2.pem
sna_manager:~# pwd
/root
Download the files created on the SNA Manager to your local machine with the file transfer program of your choice (Filezilla, winscp, etc), and add these certificates to the SNA Manager trust store in Central Management.
- Open
Central Management > Appliance Manager.
- Click the
Actions menu for the appliance.
- Select
Edit Appliance Configuration.
- Select the
General tab.
- Scroll down to
Trust Store
- Select
Add New
- Upload each of the certificates, recommed to use the filename as the
Friendly Name
Configure Response Management Email Action
Login to the SNA Manager, and open the Response Management section
- Select the
Configure tab in the main ribbon along the top of the screen
-
Select Response Management
-
From the Response Management page, select Actions tab
-
Select Add New Action
-
Select Email
-
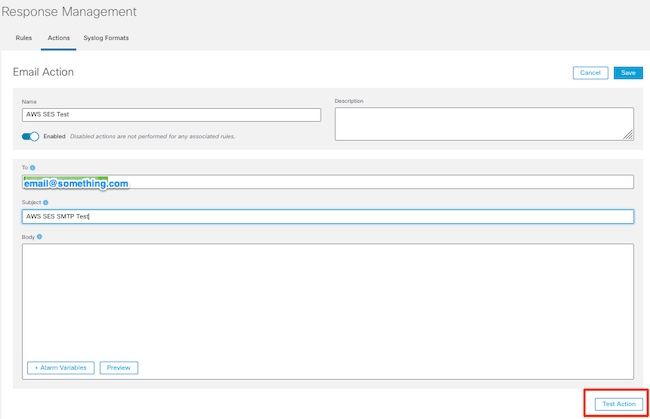
Provide a name for this Email action
-
Enter the recipient email address in the "To" field (note this must belong to the domain verified in AWS SES)
- The subject can be anything.
- Click
Save
Verify
Login to the SNA Manager, and open the Response Management section:
- Select the
Configure tab in the main ribbon along the top of the screen
- Select
Response Management
- From the
Response Management page, select Actions tab
-
Select the ellipsis in the Actions column for the row of the email action you configured in the Configure Response Management Email Action section, and select Edit.
- Select
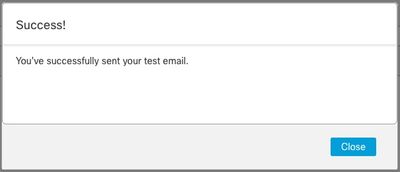
Test Action and if the configuration is valid, a success message is presented, and an email is delivered.
In the email header amazonses is shown in the " Received" field, and amazonses, along with the verified domain in the ARC-Authentication-Results (AAR) Chain

- If the test was unsuccessful,a banner is presented at the top of the screen - continue to the troubleshoot section
Troubleshoot
The /lancope/var/logs/containers/sw-reponse-mgmt.log file contains the error messages for the test actions. The most common error, and the fix is listed in the table.
Note, that the error messages listed in the table are just a portion of the error log line
|
Error
|
Fix
|
|
SMTPSendFailedException: 554 Message rejected: Email address is not verified. The identities failed the check in region US-EAST-1: {email_address}
|
Update the "From Email" in the SNA ManagerSMTP Configuration to an email that belongs to the AWS SES verified domain
|
|
AuthenticationFailedException: 535 Authentication Credentials Invalid
|
Repeat sections Create AWS SES SMTP Credentials and Configure SNA Manager SMTP Configuration
|
|
SunCertPathBuilderException: unable to find valid certification path to requested target
|
Confirm all AWS presented certificates are in SNA Manager trust store - perform packet capture when Test Action is performed and compare server side presented certificates to trust store contents
|
|
SSL routines:tls_process_ske_dhe:dh key too small
|
See addendum
|
|
Any other error
|
Open TAC case for review
|
Addendum: DH key too small.
This is an AWS side issue, as they use 1024 bit keys when DHE and EDH ciphers are used (logjam susceptible) and the SNA Manager refuses to continue the SSL session. The command output shows the server temp keys from the openssl connection when DHE/EDH ciphers are used.
sna_manager:~# openssl s_client -starttls smtp -connect email-smtp.us-east-2.amazonaws.com:587 -cipher "EDH" <<< "Q" 2>/dev/null | grep "Server Temp"
Server Temp Key: DH, 1024 bits
sna_manager:~# openssl s_client -starttls smtp -connect email-smtp.us-east-2.amazonaws.com:587 -cipher "DHE" <<< "Q" 2>/dev/null | grep "Server Temp"
Server Temp Key: DH, 1024 bits
sna_manager:~# openssl s_client -starttls smtp -connect email-smtp.us-east-2.amazonaws.com:587 <<< "Q" 2>/dev/null | grep "Server Temp"
Server Temp Key: ECDH, P-256, 256 bits
The only available workaround is to remove all DHE and EDH ciphers with the command as the root user on the SMC, AWS selects a ECDHE cipher suite and the connection succeeds.
cp /lancope/services/swos-compliance/security/tls-ciphers /lancope/services/swos-compliance/security/tls-ciphers.bak ; > /lancope/services/swos-compliance/security/tls-ciphers ; echo "TLS_AES_128_GCM_SHA256:TLS_CHACHA20_POLY1305_SHA256:TLS_AES_256_GCM_SHA384:TLS_AES_128_CCM_SHA256:ECDHE-ECDSA-AES128-GCM-SHA256:ECDHE-RSA-AES128-GCM-SHA256:AES128-GCM-SHA256:ECDHE-ECDSA-AES256-GCM-SHA384:ECDHE-RSA-AES256-GCM-SHA384:ECDHE-ECDSA-CHACHA20-POLY1305:ECDHE-RSA-CHACHA20-POLY1305:AES256-GCM-SHA384" > /lancope/services/swos-compliance/security/tls-ciphers ; docker restart sw-response-mgmt
Related Information


 Feedback