CSM TACACS Integration with ISE
Available Languages
Download Options
Bias-Free Language
The documentation set for this product strives to use bias-free language. For the purposes of this documentation set, bias-free is defined as language that does not imply discrimination based on age, disability, gender, racial identity, ethnic identity, sexual orientation, socioeconomic status, and intersectionality. Exceptions may be present in the documentation due to language that is hardcoded in the user interfaces of the product software, language used based on RFP documentation, or language that is used by a referenced third-party product. Learn more about how Cisco is using Inclusive Language.
Contents
Introduction
This document describes the procedure to integrate Cisco Security Manager (CSM) with Identity Services Engine (ISE) for administrator users authentication with TACACS+ Protocol.
Prerequisites
Requirements
Cisco recommends that you have knowledge of these topics:
- Cisco Security Manager (CSM).
- Identity Services Engine (ISE).
- TACACS protocol.
Components Used
The information in this document is based on these software and hardware versions:
- CSM Server version 4.22
- ISE version 3.0
The information in this document was created from the devices in a specific lab environment. All of the devices used in this document started with a cleared (default) configuration. If your network is live, ensure that you understand the potential impact of any command.
Background Information
By default, Cisco Security Manager (CSM) uses an Authentication mode called Ciscoworks to authenticate and authorize users locally, in order to have a centralized authentication method you can use Cisco Identity Service Engine through the TACACS protocol.
Configure
Network Diagram

Authentication Procedure
Step 1.Log into the CSM application with the credentials of the Admin User.
Step 2. Authentication process triggers and ISE validates the credentials locally or through Active Directory.
Step 3. Once authentication is successful ISE sends a permit packet to authorize access to the CSM.
Step 4. CSM maps the username with the local user role assignment.
Step 5. ISE shows a successful authentication live log.
ISE Configuration
Step 1. Select the three lines icon located in the upper left corner and navigate to Administration > Network Resources > Network Devices.

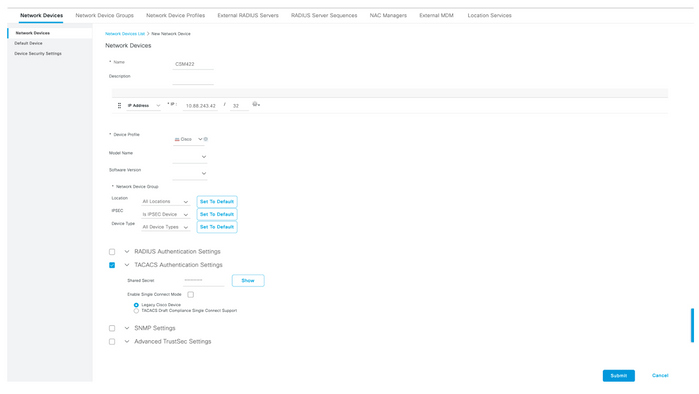
Step 2. Select the +Add button and enter the proper values for Network Access Device Name and IP Address, then verify the TACACS Authentication Settings checkbox and define a shared secret. Select the Submit button.
Step 3. Select the three lines icon located in the upper left corner and navigate to Administration > Identity Management > Groups.
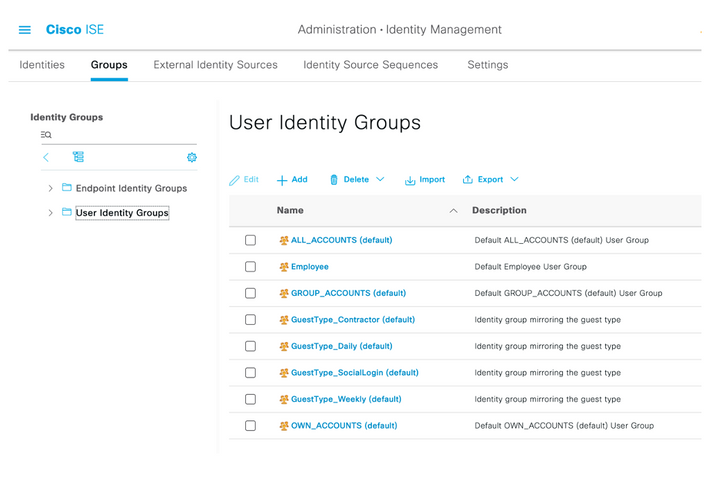
Step 4. Navigate to the User Identity Groups folder and select the +Add button. Define a name and select Submit button.

Note: This example creates CSM Admin and CSM Oper Identity groups. You can repeat Step 4 for each type of Admin Users on CSM
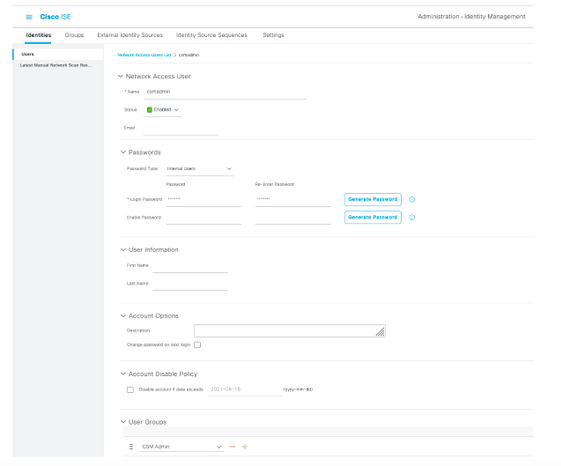
Step 5. Select the three lines icon and navigate to Administration > Identity Management >Identities. Select the +Add button and define the username and password, then select the group where the user belongs to. In this example, creates the csmadmin and csmoper users and assigned to CSM Admin and CSM Oper group respectively.

Step 6. Select and navigate to Administration > System > Deployment. Select the hostname node and enable Device Admin Service

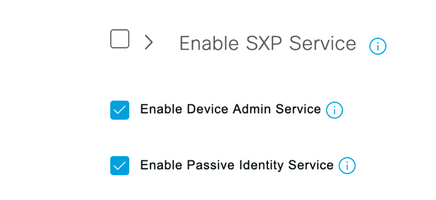
Note: In case of Distributed Deployment, select the PSN node that handles TACACS requests
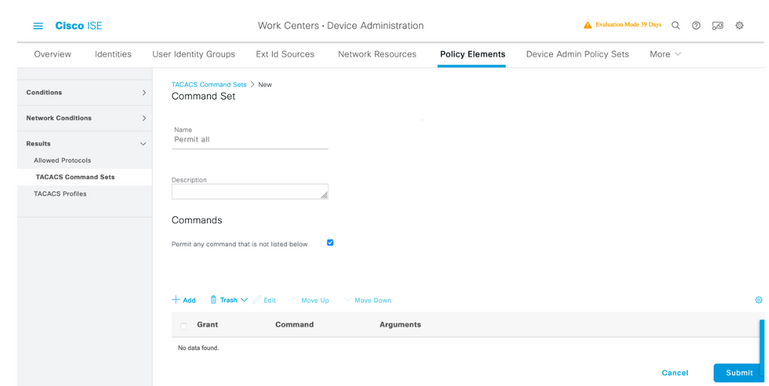
Step 7. Select the three lines icon and navigate to Administration > Device Administration > Policy Elements. Navigate to Results > TACACS Command Sets. Select +Add button, define a name for the Command Set and enable the Permit any command that is not listed below the checkbox. Select Submit.
Step 8. Select three lines icon located in the upper left corner and navigate to Administration->Device Administration->Device Admin Policy Sets. Select  located below Policy Sets title, define a name and select the + button in the middle to add a new condition.

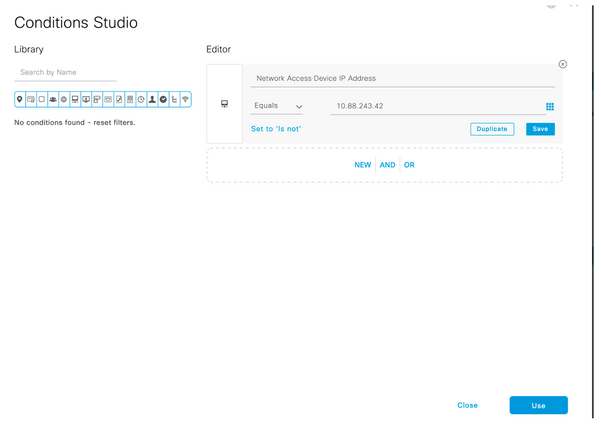
Step 9. Under Condition window, select add an attribute and then select Network Device Icon followed by Network access device IP address. Select Attribute Value and add the CSM IP address. Select Use once done.
Step 10. Under allow protocols section, select Device Default Admin. Select Save

Step 11. Select the right arrow  icon of the Policy Set to Define authentication and authorization policies
Step 12. Select  located below Authentication Policy title, define a name and select the + in the middle to add a new condition. Under Condition window, select add an attribute and then select Network Device Icon followed by Network access device IP address. Select Attribute Value and add the CSM IP address. Select Use once done
Step 13. Select Internal Usersas the Identity Store and Select Save

Note: Identity Store can be changed to AD store if ISE is joined to an Active Directory.
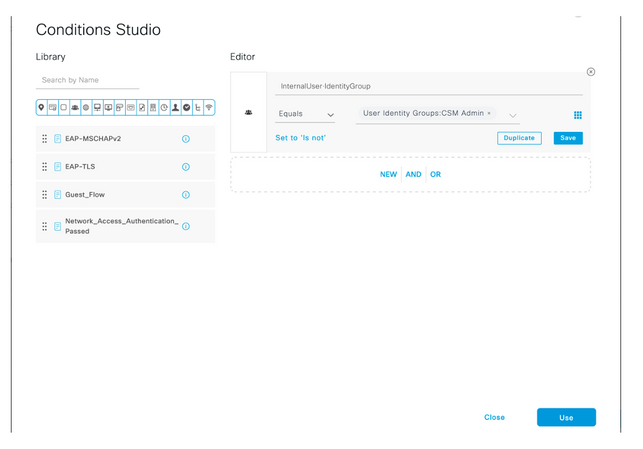
Step 14. Select  located below Authorization Policy title, define a name and select the + button in the middle to add a new condition. Under the Condition window, select add an attribute and then select the Identity Group icon followed by Internal User: Identity Group. Select the CSM Admin Group and select Use.
Step 15. Under Command Set, select Permit all command set created in Step 7 and then select Save
Repeat Step 14 and 15 for the CSM Oper group

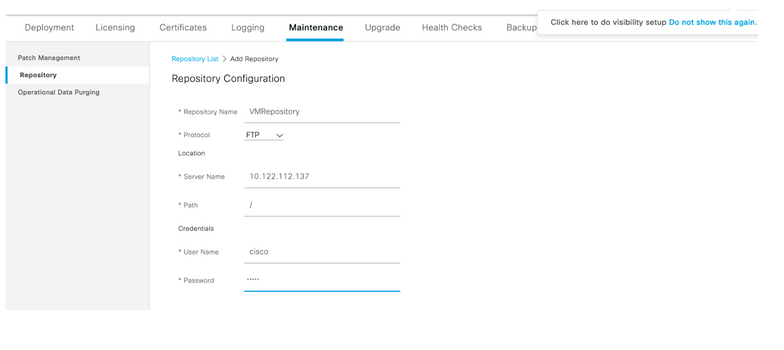
Step 16 (Optional). Select three lines icon located in the upper left corner and Select Administration>System>Maintenance>Repository, select +Add to add a repository that is used to store TCP Dump file for troubleshooting purposes.
Step 17 (Optional). Define a repository Name, protocol, Server Name, path and Credentials. Select Submit once done.
CSM Configuration
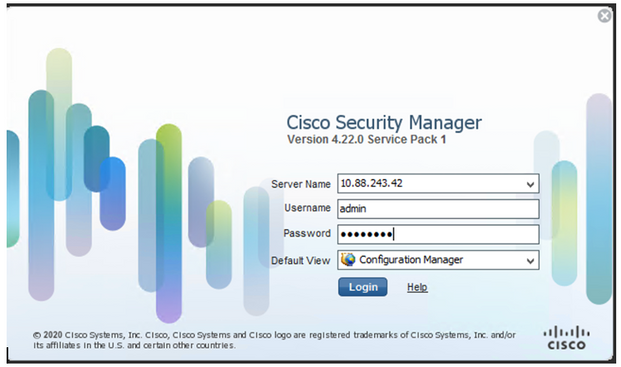
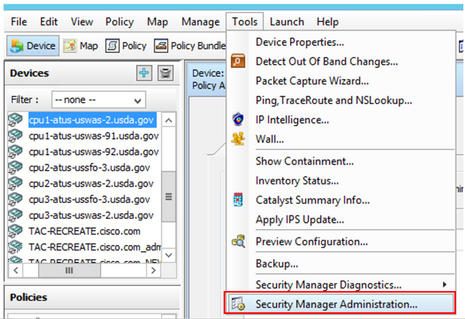
Step 1. Log in to the Cisco Security Manager Client application with the local admin account. From the menu navigate to Tools > Security Manager Administration
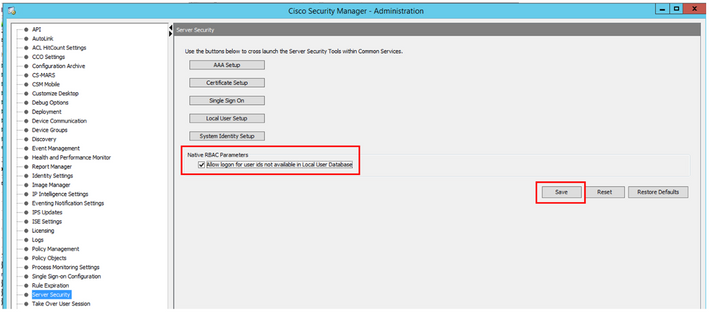
Step 2. Check the box under Native RBAC Parameters. Select Save and Close
Step 3. From the menu select File > Submit. File > Submit.
Note: All changes must be saved, in case of configuration changes those need to be submitted and deployed.
Step 4. Navigate to CSM Management UI and type https://<enter_CSM_IP_Address and select Server Administration.

Note: Steps 4 to 7 show the procedure to define the default role for all administrators that are not defined on ISE. These steps are optional.
Step 5. Validate the authentication mode is set to CiscoWorks Local and Online userID is the local admin account created on CSM.
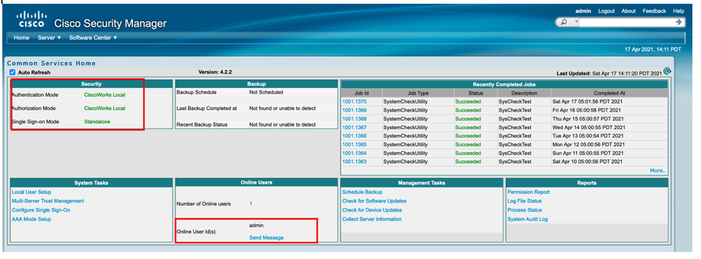
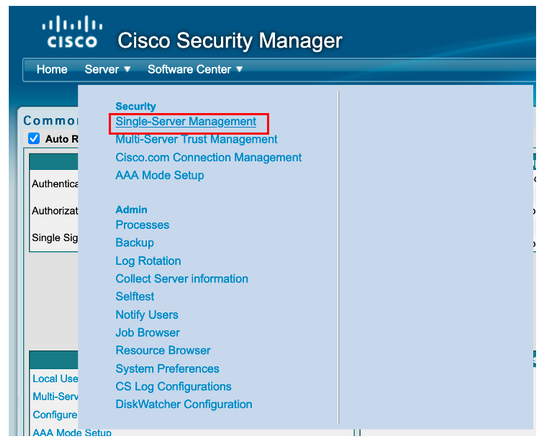
Step 6. Navigate to Sever and select Single-Server Management
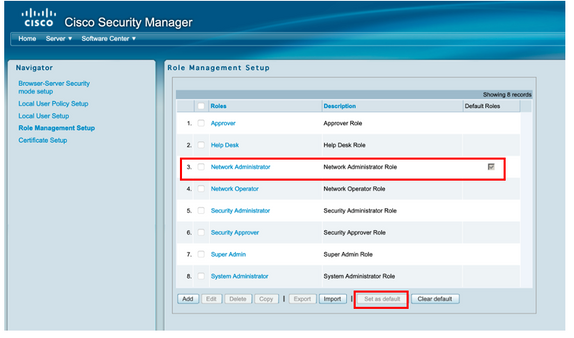
Step 7. Select Role Management Setup and select the default privilege all admin users receive upon authentication. For this example, Network Administrator is used. Once selected select set as default.
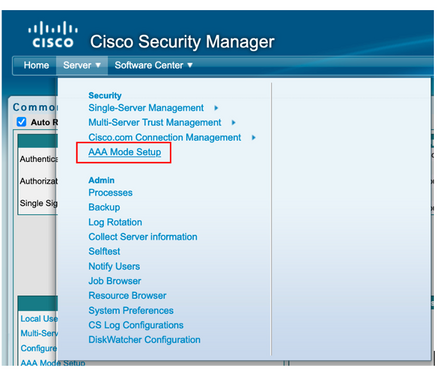
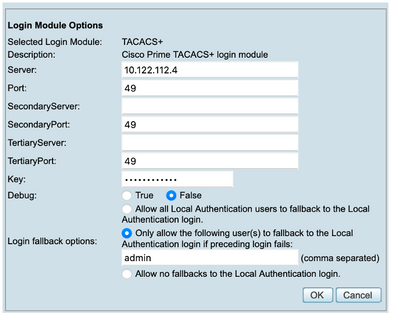
Step 8. Select Sever>AAA Mode Setup Role and then select TACACS+ option, finally select change to add ISE information.
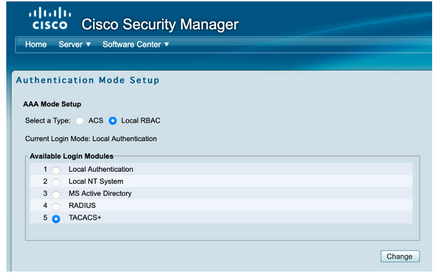
Step 9. Define ISE Ip address and Key, optionally you can select the option to allow all local authentication users or only one user if the log in fails. For this example, the Only admin user is allowed as a fallback method. Select Ok to save the changes.

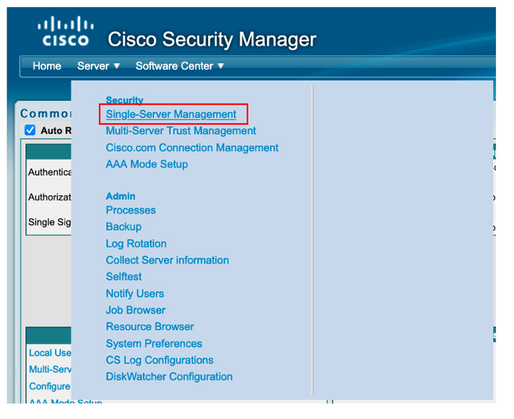
Step 10. Select Server> Single Server Management, then select Local User Setup and select add.
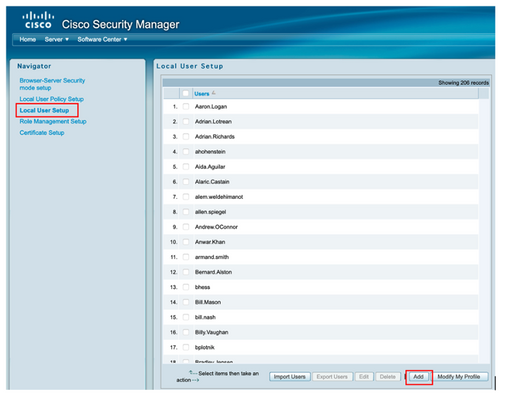
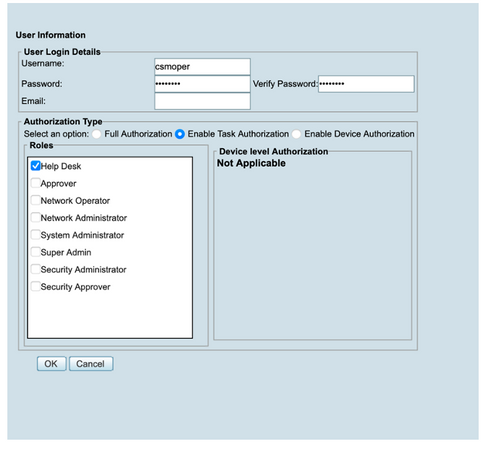
Step 11. Define the same username and password created on ISE on step 5 under the ISE configuration section, csmoper and Help Desk task authorization roles are used in this example. Select OK in order to save the admin user.
Verify
Cisco Security Manager Client UI
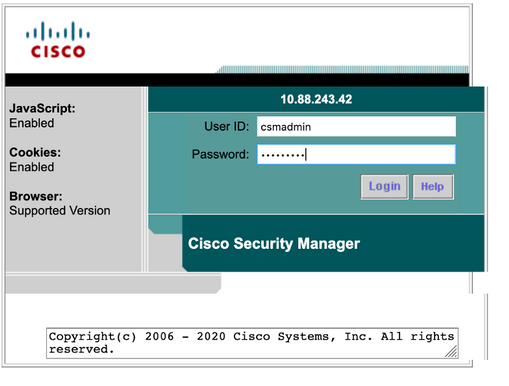
Step 1. Open a new window browser and type https://<enter_CSM_IP_Address, use csmadmin username and password created on step 5 under the ISE configuration section.
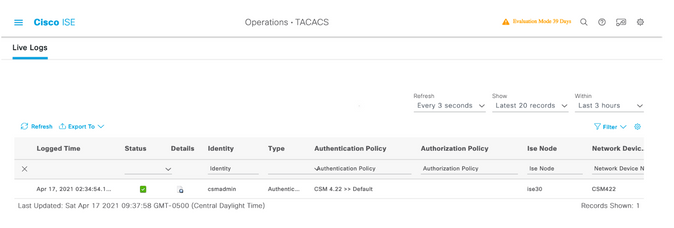
Successful log in the attempt can be verified on ISE TACACS live logs
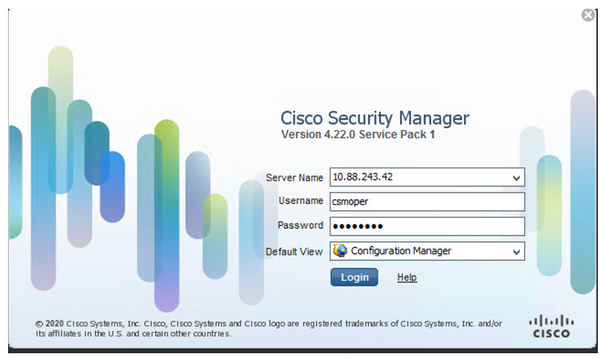
Cisco Security Manager Client application
Step 1. Log in to the Cisco Security Manager Client application with the helpdesk admin account.
Successful log in the attempt can be verified on ISE TACACS live logs

Step 2. From the CSM client application menu select Tools > Security Manager Administration, an error message indicates lack of privilege must appear.
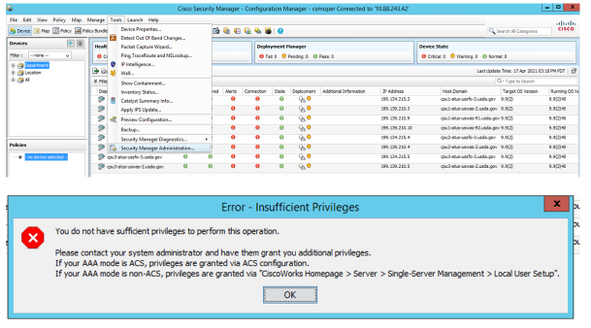
Step 3. Repeat steps 1 to 3 with csmadmin account to validate the proper permissions have been provided to this user.
Troubleshoot
This section provides the information you can use to troubleshoot your configuration.
Communication validation with TCP Dump tool on ISE
Step 1.Log in on ISE and navigate to the three lines icon located in the upper left corner and select Operations>Troubleshoot>Diagnostic Tools.
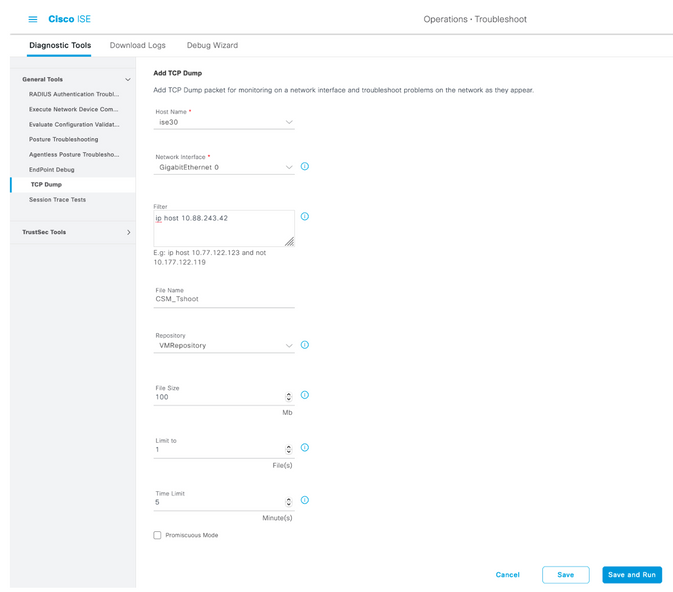
Step 2. Under General tools select TCP Dumps and then select Add+. Select Hostname, Network Interface File Name, Repository, and optionally a filter to gather only CSM IP address communication flow. Select Save and Run
Step 3. Log in on CSM client application or Client UI and type the admin credentials.
Step 4. On ISE, Select the Stop button and verify the pcap file has been sent to the defined repository.

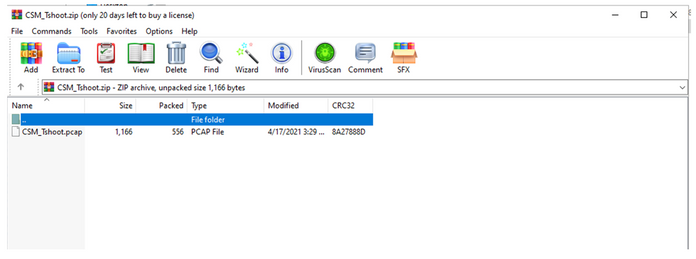
Step 5. Open the pcap file to validate the successful communication between CSM and ISE.
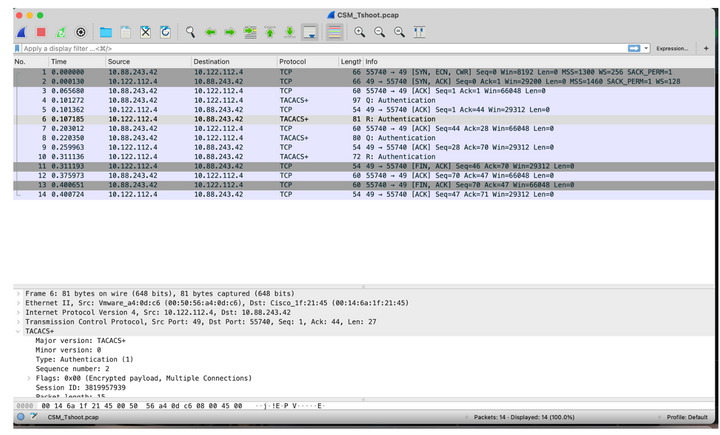
If no entries are shown on pcap file validate the following:
- Devices Administration service is enabled on ISE node
- Right ISE IP address has been added on CSM configuration
- In case of a firewall is in the middle verify port 49 (TACACS) is permitted.
Contributed by Cisco Engineers
- Emmanuel CanoCisco Security Consulting Engineer
- Berenice GuerraCisco Technical Consulting Engineer
Contact Cisco
- Open a Support Case

- (Requires a Cisco Service Contract)
 Feedback