Configure Posture Agentless
Available Languages
Download Options
Bias-Free Language
The documentation set for this product strives to use bias-free language. For the purposes of this documentation set, bias-free is defined as language that does not imply discrimination based on age, disability, gender, racial identity, ethnic identity, sexual orientation, socioeconomic status, and intersectionality. Exceptions may be present in the documentation due to language that is hardcoded in the user interfaces of the product software, language used based on RFP documentation, or language that is used by a referenced third-party product. Learn more about how Cisco is using Inclusive Language.
Contents
Introduction
This document describes how to configure Posture Agentless in ISE and what is required in the endpoint to run Agentless script.
Prerequisites
Requirements
Cisco recommends that you have knowledge of these topics:
- Identity Services Engine (ISE).
- Posture.
- PowerShell and SSH
- Windows 10 or later.
Components Used
The information in this document is based on these software and hardware versions:
- Identity Services Engine (ISE) 3.3 version.
- Package CiscoAgentlessWindows 5.1.6.6
- Windows 10
The information in this document was created from the devices in a specific lab environment. All of the devices used in this document started with a cleared (default) configuration. If your network is live, ensure that you understand the potential impact of any command.
Background Information
ISE Posture performs a client-side evaluation. The client receives the posture requirement policy from ISE, performs the posture data collection, compares the results against the policy, and sends the assessment results back to the ISE.
ISE then determines whether device is complaint or non-compliant based on Posture Report.
Agentless posture is one of posture methods that gathers posture information from clients and automatically removes itself upon completion without requiring any action from the end user. Agentless Posture connects to the client using administrative privileges.
Getting Started
Prerequisites:
-
The client must be reachable through its IPv4or IPv6address, and that IP address must be available in RADIUS accounting.
-
The client must be reachable from the Cisco Identity Services Engine (ISE) through its IPv4 or IPv6 address. Additionally, this IP address must be available in RADIUS accounting.
-
Windows and Mac clients are currently supported:
-
For Windows clients, port 5985 to access powershell on the client must be open. Powershell must be v7.1or later. The client must have cURL v7.34 or later.
-
For MacOS clients, port 22 to access SSH must be open to access the client. The client must have cURL v7.34 or later.
-
-
Client credentials for shell login must have local admin privileges.
-
Run the posture feed update to get the latest clients, as described in the configuration steps. Please check:
-
For MacOS, ensure that this entry is updated in the sudoers file to avoid certificate installation failure on the endpoints: Please check:
<macadminusername> ALL = (ALL) NOPASSWD: /usr/bin/security, /usr/bin/osascript -
For MacOS, the user account that is configured must be an administrator account. Agentless posture for MacOS does not work with any other account type, even if you grant more privileges.To view this window, click theMenuicon (
 ) and chooseAdministration > System > Settings > Endpoint Scripts > Login Configuration > MAC Local User.
 -
In case of changes in port-related activities in Windows clients due to updates from Microsoft, you must have to reconfigure the agentless posture configuration workflow for Windows clients.
Supported Posture Conditions
-
File conditions, except the conditions that use the USER_DESKTOP and USER_PROFILE file paths
-
Service conditions, except System Daemon and Daemon or User Agent checks on macOS
-
Application conditions
-
External Data Source conditions
-
Compound conditions
-
Anti-malware conditions
-
Patch management condition, except theEnabledandUp To Datecondition checks
-
Firewall conditions
-
Disk encryption conditions, except the encryption location-based condition check
-
Registry conditions, except the conditions that use HCSK as root key
Unsupported Posture Conditions
-
Remediation
-
Grace period
-
Periodic Reassessment
-
Acceptable Use-policy
Configurating ISE
Update Posture Feed
It is recommend to update Posture Feed before starting to configure Posture.
In the Cisco ISE GUI, click theMenuicon ( ) and choose Work Centers > Posture > Settings > Software Updates > Update Now.
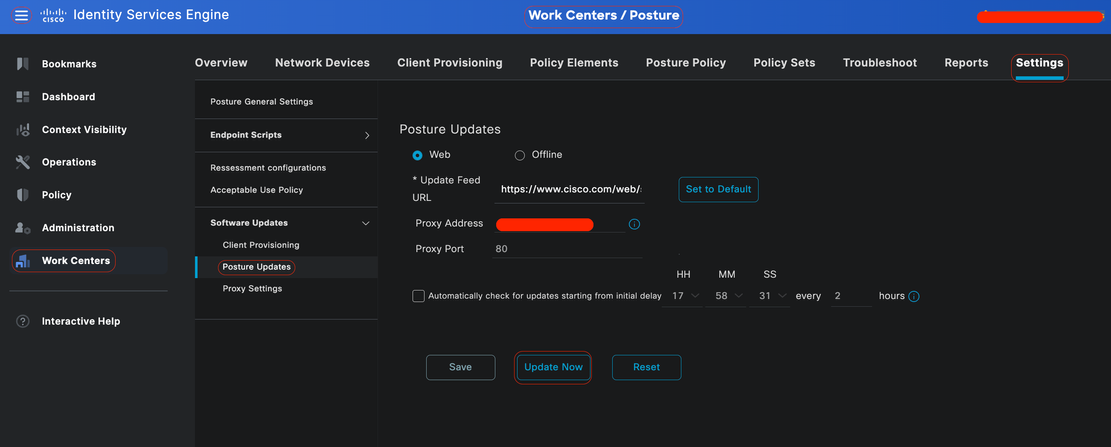 Updating Posture Feed
Posture Agentless Configuration Flow
Posture Agentless must be configured in order as the first configuration is going to be required for the next one and so on. Noticed that Remediation is not in the flow; however, later this document is going to cover an alternative for configuring Remediation.
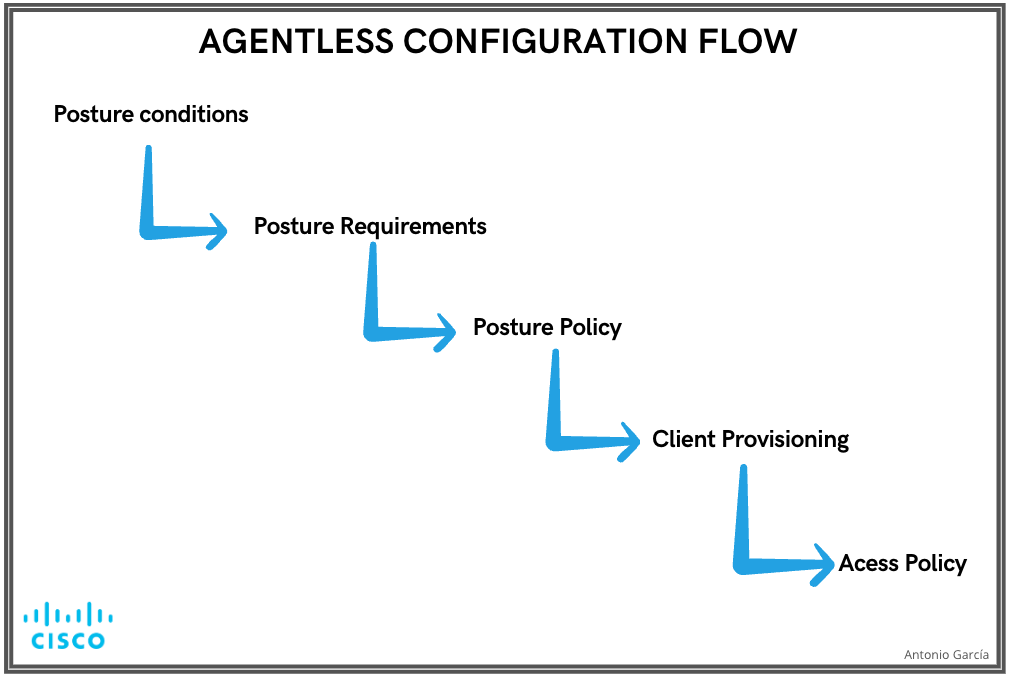 Agentless Config Flow
Agentless Posture Configuration
Posture Condition
Posture conditions are the set of rules in our security policy that define a compliant endpoint. Some of these items include the installation of a firewall, anti-virus software, anti-malware, hotfixes, disk encryption and more.
In the Cisco ISE GUI, click theMenuicon ( ) and choose Work Centers > Posture > Policy Elements > Conditions, Click on Add ,and create one or more Posture Coditions that use Agentless posture to identify the requirement. Once the Condition is created, click Save.
In this scenario, an Application Condition named "Agentless_Condition_Application" was configured with these parameters:
• Operating System: Windows All
This condition applies to any version of the Windows operating system, ensuring broad compatibility across different Windows environments.
• Check by: Process
The system monitors processes within the device. You have the option to select either Process or Application; in this case, Process was chosen.
• Process Name: Wired AutoConfig
The Wired AutoConfig process is the process Compliant Module is going to check in the device. This process is responsible for configuring and managing wired network connections, including IEEE 802.1X Authentication.
• Application Operator: Running
The Compliance Module verifies whether the Wired AutoConfig process is currently running on the device. You have the option to select either Running or Not Running. In this instance, Running was selected to ensure that the process is active.
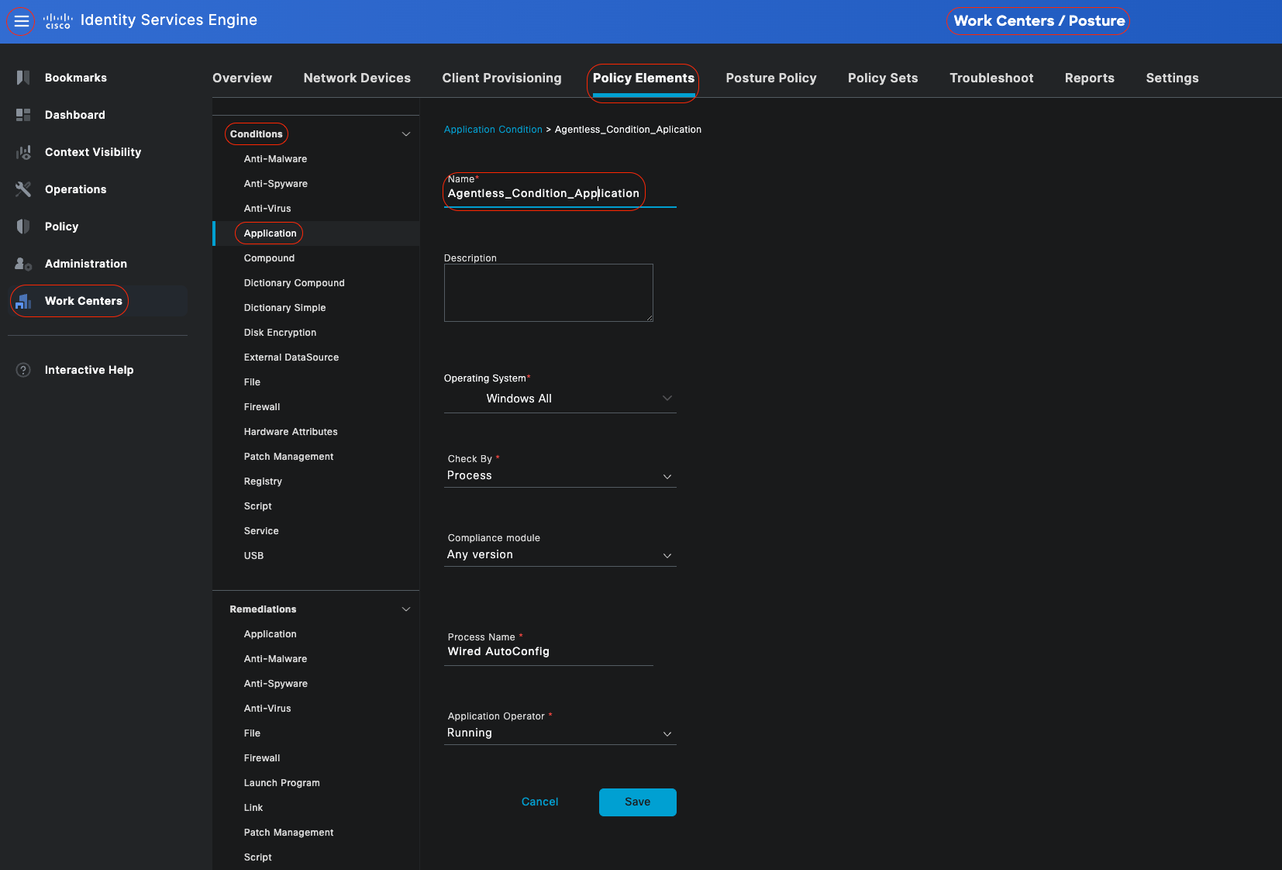 Agentless Condition
Posture Requirement
A posture requirement is a set of compound conditions or just one condition that can be linked with a role and an operating system. All the clients connecting to your network must meet mandatory requirements during posture evaluation to become compliant on the network.
In the Cisco ISE GUI, click theMenuicon ( ) and choose Work Centers > Posture > Policy Elements > Requirement. Click the down arrow and select Insert new Requirement, and create one or more PostureRequirement that use Agentless posture. Once the Requirement is created, click Done and then Save.
In this case, an Application Requirement named "Agentless_Requirement_Application" was configured with these criteria:
• Operating System: Windows All
This requirement applies to any version of the Windows operating system, ensuring it is applicable across all Windows environments.
• Posture Type: Agentless
This configuration is set for an Agentless environment. Available options include Agent, Agent Stealth, Temporal Agent, and Agentless. In this scenario, Agentless was selected.
• Conditions: Agentless_Condition_Application
This specifies the condition that the ISE Posture Module and Compliance Module are going to check within the device's processes. The selected condition is Agentless_Condition_Application.
• Remediation Actions:
Since this configuration is for an Agentless environment, Remediation Actions are not supported, and this field is grayed out.
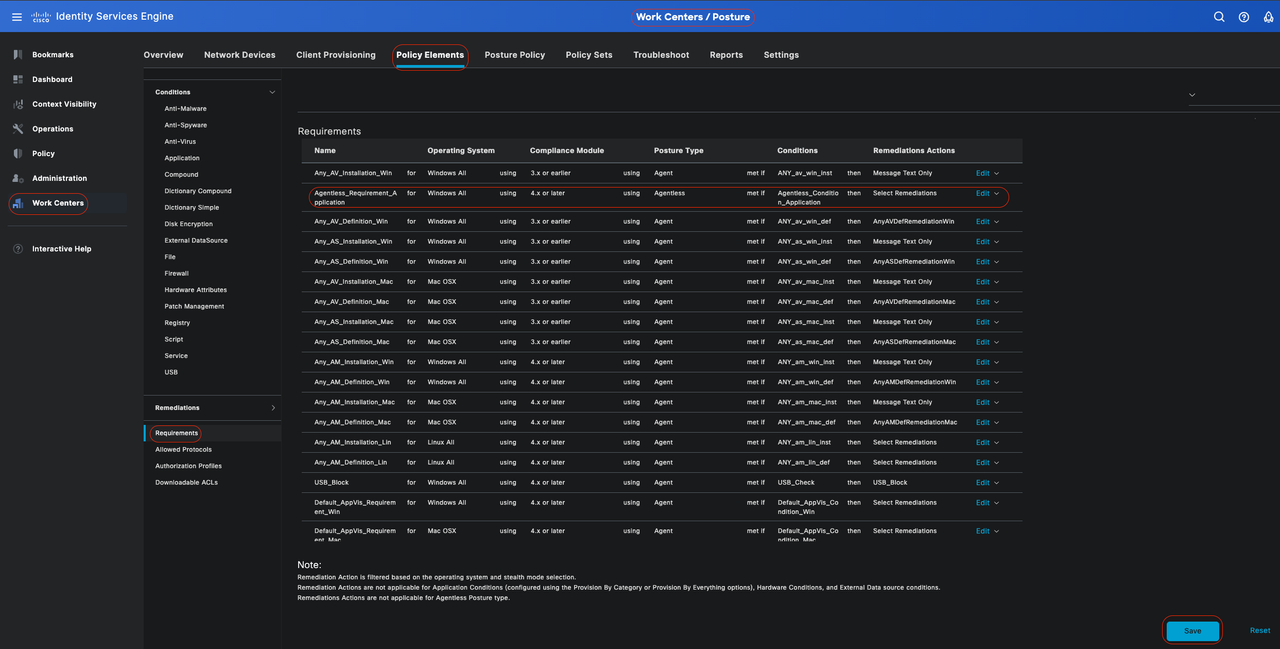 Agentless Requirement
Posture Policy
In the Cisco ISE GUI, click theMenuicon ( ) and chooseWork Centers > Posture > Posture Policy. Click the down arrow and select Insert new Requirement, and create one or more supported Posture Policy rules that use Agentless posture for that Posture Requirement. Once the Posture Policy is created, click Done and then Save.
In this scenario, a Posture Policy named "Agentless_Policy_Application" has been configured with these parameters:
• Rule Name: Agentless_Policy_Application
This is the designated name for the Posture Policy in this configuration example.
• Operating System: Windows All
The policy is set to apply to all versions of the Windows operating system, ensuring broad compatibility across different Windows environments.
• Posture Type: Agentless
This configuration is set for an Agentless environment. Available options include Agent, Agent Stealth, Temporal Agent, and Agentless. In this scenario, Agentless has been selected.
• Other Conditions:
In this configuration example, no additional conditions have been created. However, you have the option to configure specific conditions to ensure that only targeted devices are subject to this Posture Policy, rather than all Windows devices on the network. This can be particularly useful for network segmentation.
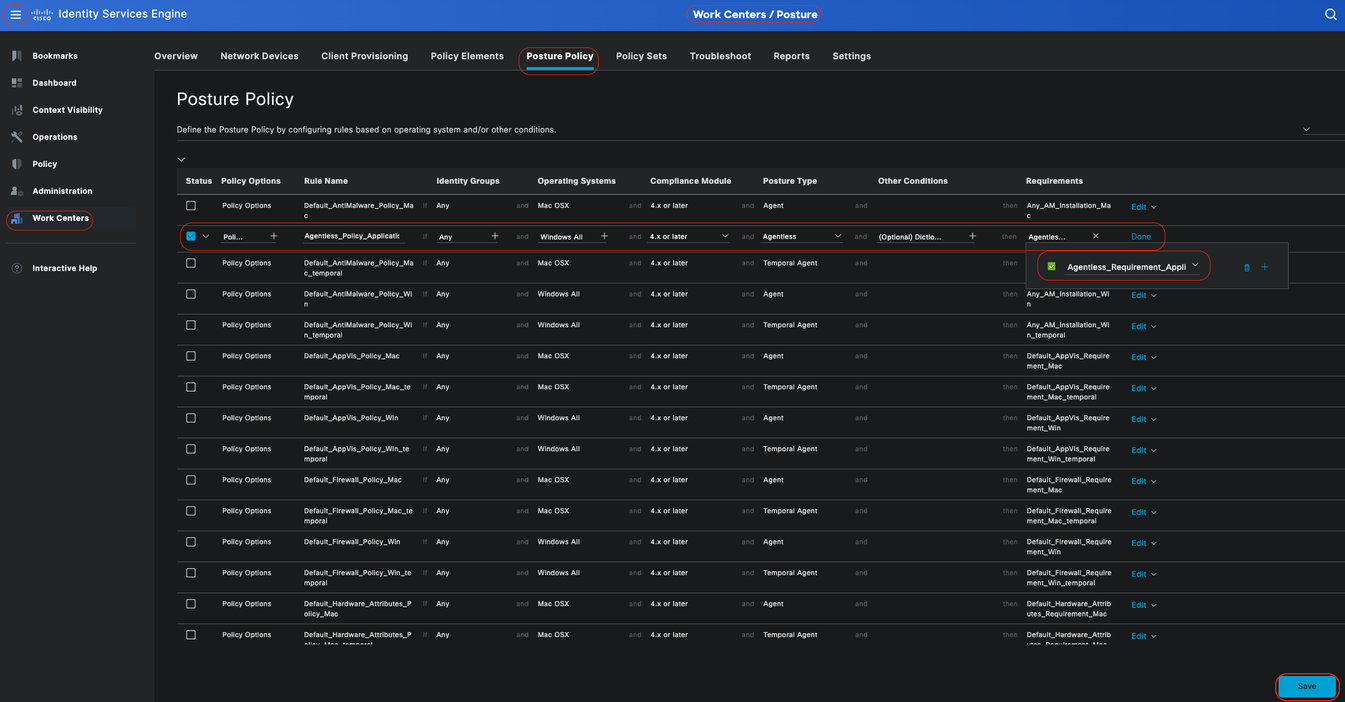 Posture Agentless Policy
Client Provisioning
Step 1- Downloading Resources
To start configuring Client Provisioning, you must first download the required resources and have them available in ISE so you can later use them in the Client Provisioning Policy.
There are two ways to add resources to ISE, Agent Resources from Cisco site and Agent Resources from Local disk. Since you are configuring Agentless, you are required to go through Agent Resources from Cisco site to download.

Note: To use this Agent Resources from Cisco site, ISE PAN needs internet access.
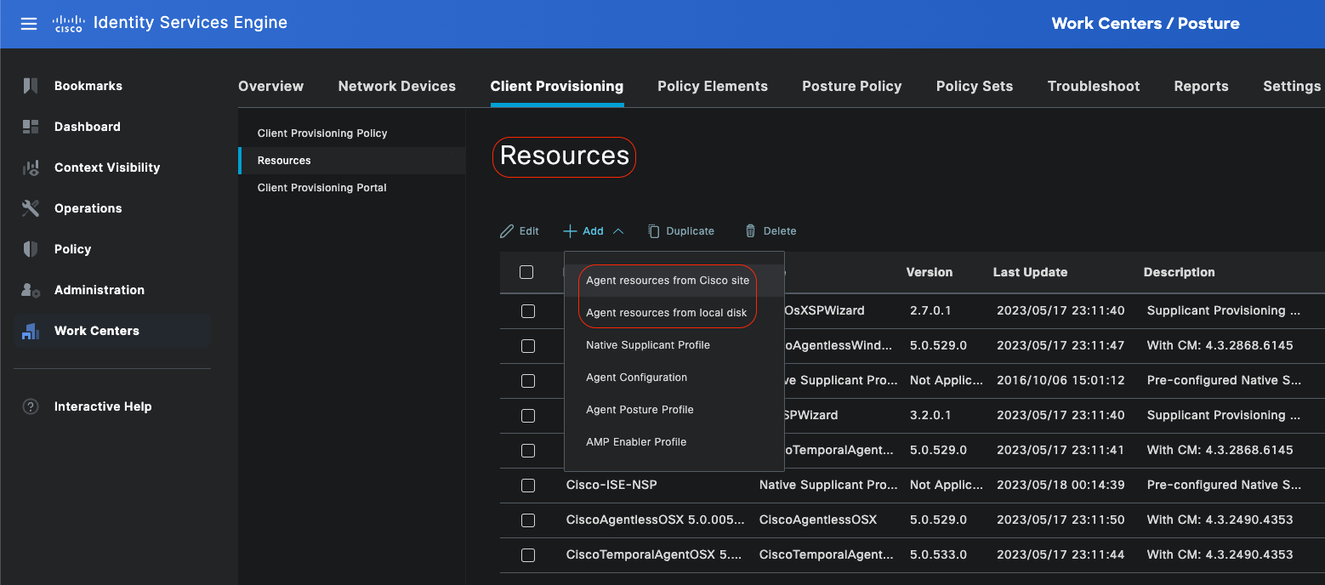 Resources
Agent Resources from Cisco site
In the Cisco ISE GUI, click theMenuicon ( ) and choose Work Centers > Posture > Client Provisioning > Resources. Click Add , Select Agent Resources from Cisco site, click Save.
From Cisco site, you can only dowload Compliance Module. System shows the two most recent Compliance Modules to download. Resource package CiscoAgentlessWindows 5.1.6.6 is selected for this configuration example, this is only meant for windows devices.
.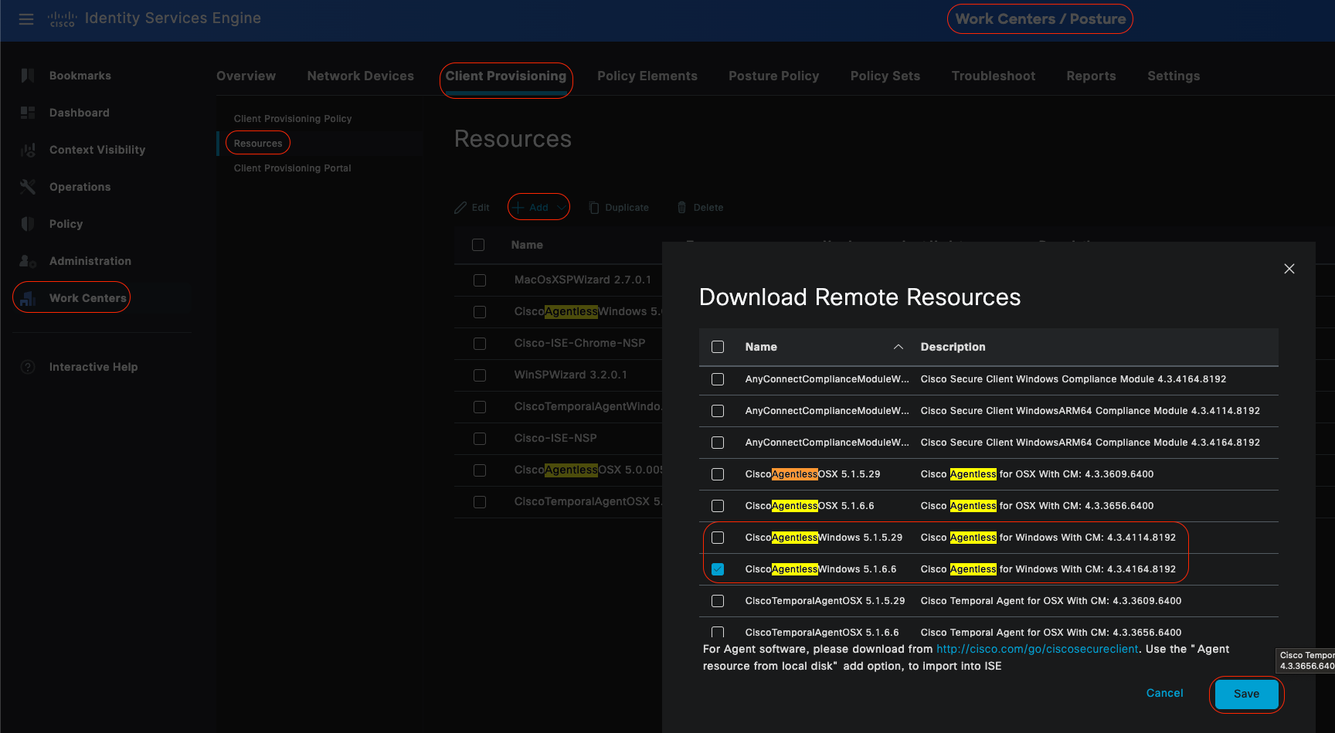 Agent Resources from Cisco site
Step 2- Configuring Client Provisioning Policy
When configuring Posture Agent, you need two different resources (AnyConnect or Secure Client and Compliance Module),
Map both resources under Agent Configuration along with the Agent Posture Profile so you can use this Agent Configuration in your Client Provisioning Policy.
However, when configuring Posture Agentless, there is no need to configure Agent Configuration or Agent Posture Profile, instead you only download Agentless package from Agent Resources from Cisco site.
In the Cisco ISE GUI, click theMenuicon ( ) and choose Work Centers > Posture > Client Provisioning > Client Provisioning Policy. Click on down arrow and select Insert new policy above or Insert new policy below, Duplicate above or Duplicate below:
- Rule Name: Agentless_Client_Provisioning_Policy
This specifies the name of the Client Provisioning Policy.
- Operating System: Windows All
This ensures that the policy applies to all versions of the Windows operating system.
- Other Conditions: No specific conditions are configured in this example. However, you can configure conditions to ensure that only the desired devices match this Client Provisioning Policy, rather than all Windows devices in the network. This is particularly useful for network segmentation.
Example: If you are using Active Directory, you can incorporate Active Directory groups into your policy to refine which devices are affected.
- Results: Select the appropriate package or configuration agent. Since you are configuring for an agentless environment, choose the package CiscoAgentlessWindows 5.1.6.6, which you have previously downloaded from the Agent Resources from Cisco site. This agentless package contains all necessary resources (Agentless Software and Compliance Module) required for Posture Agentless to run.
• Click Save
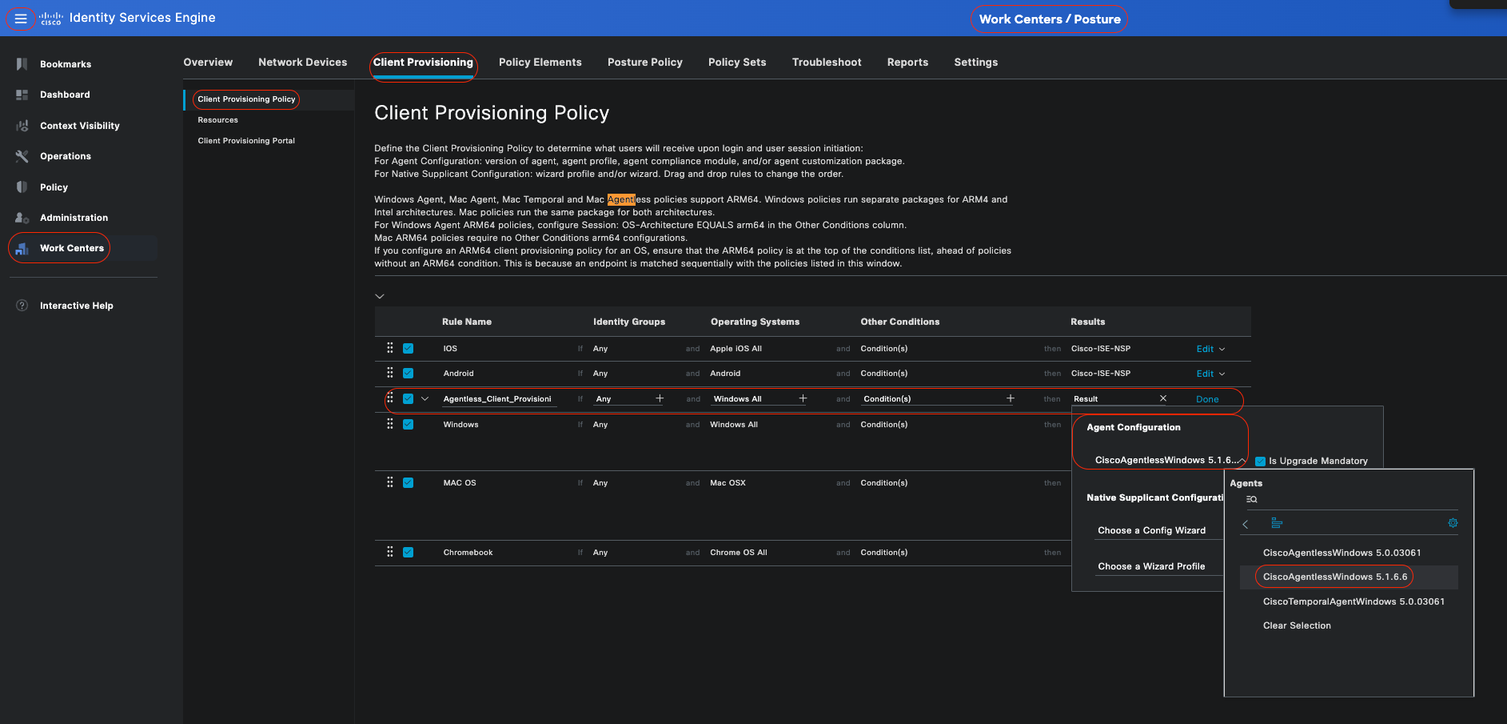 Agentless Client Provisioning Policy

Note: Ensure that only one Client Provisioning Policy satisfies the conditions for any given authentication attempt. If multiple policies are evaluated simultaneously, it can lead to unexpected behaviors and potential conflicts.
Agentless Authorization Profile
In the Cisco ISE GUI, click theMenuicon ( ) and choosePolicy > Policy Elements > Results > Authorization > Authorization Profilesand create an Authorization Profile that evaluates the results from Agentless Posture.
-
In this configuration example, named Authorization Profile as Agentless_Authorization_Profile.
-
Enable Agentless posture in the authorization profile.
-
Use this profile only for Agentless Posture. Do not also use this for other posture types.
-
CWA and Redirect ACL is not required for Agentless posture. You can use VLANs, DACLs, or ACLs as part of your segmentation rules. To keep it simple, just a dACL (allowing all ipv4 traffic) is configured besides the Agentless Posture check in this configuration example.
-
Click on Save.
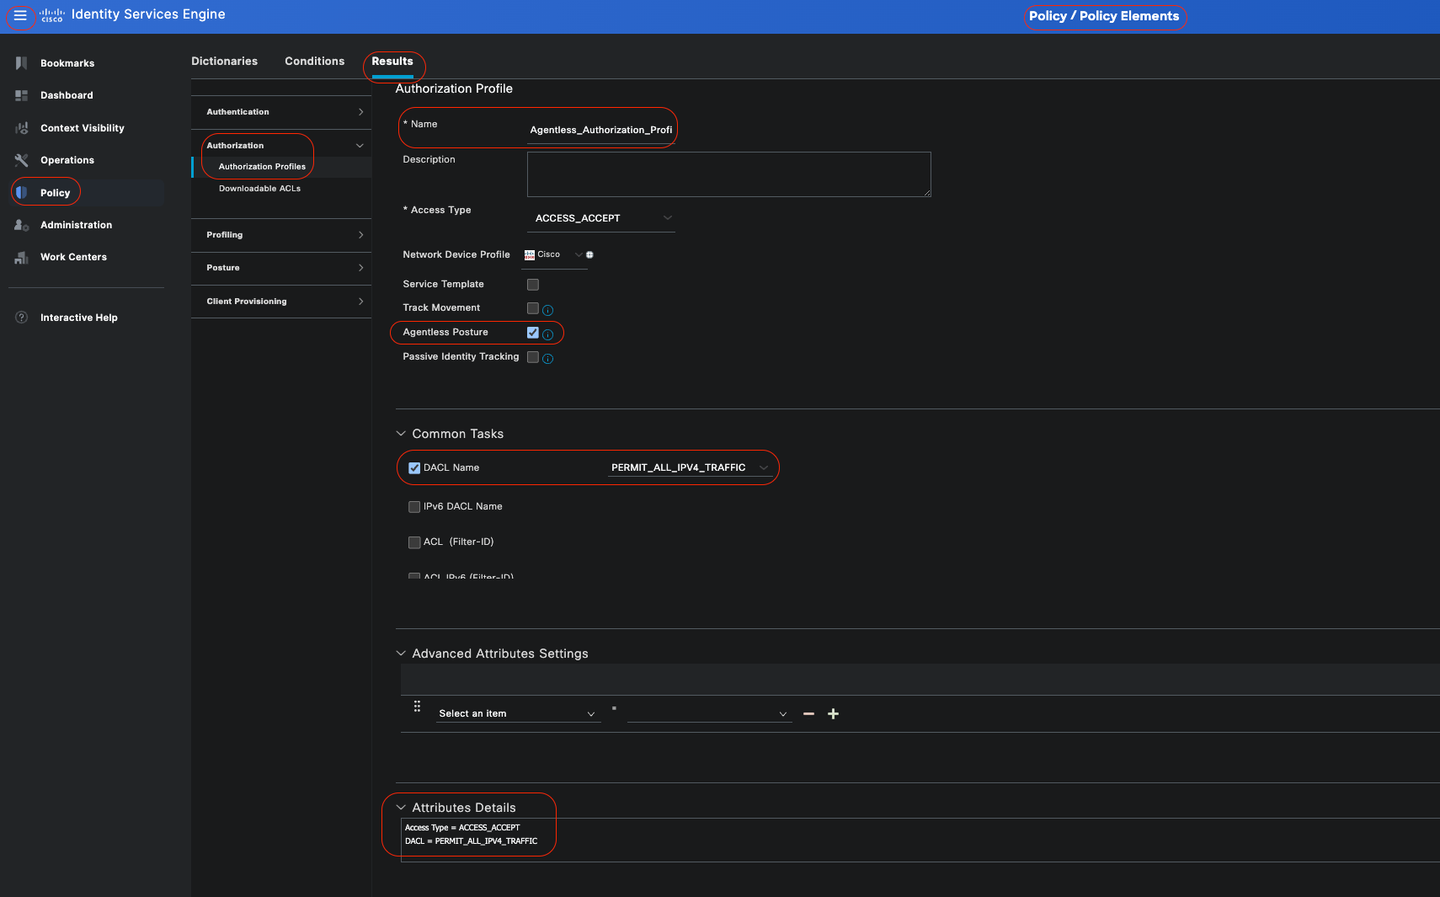 Agentless Authorization Profile
Alternative to use remediation (Optional)
Support for remediation in the agentless flow is not available. To address this, you can implement a customized hotspot portal to enhance user awareness regarding endpoint compliance. When an endpoint is identified as non-compliant, users can be redirected to this portal. This approach ensures that users are informed about the compliance status of their endpoints and can take appropriate actions to rectify any issues.
In the Cisco ISE GUI, click theMenuicon ( ) and choose Work Centers > Guest Access > Portals & Components >Guest Portals. Click Create > Select Hotspot Guest Portal > Continue: . In this configuration example, Hotspot Portal is named as Agentless_Warning.
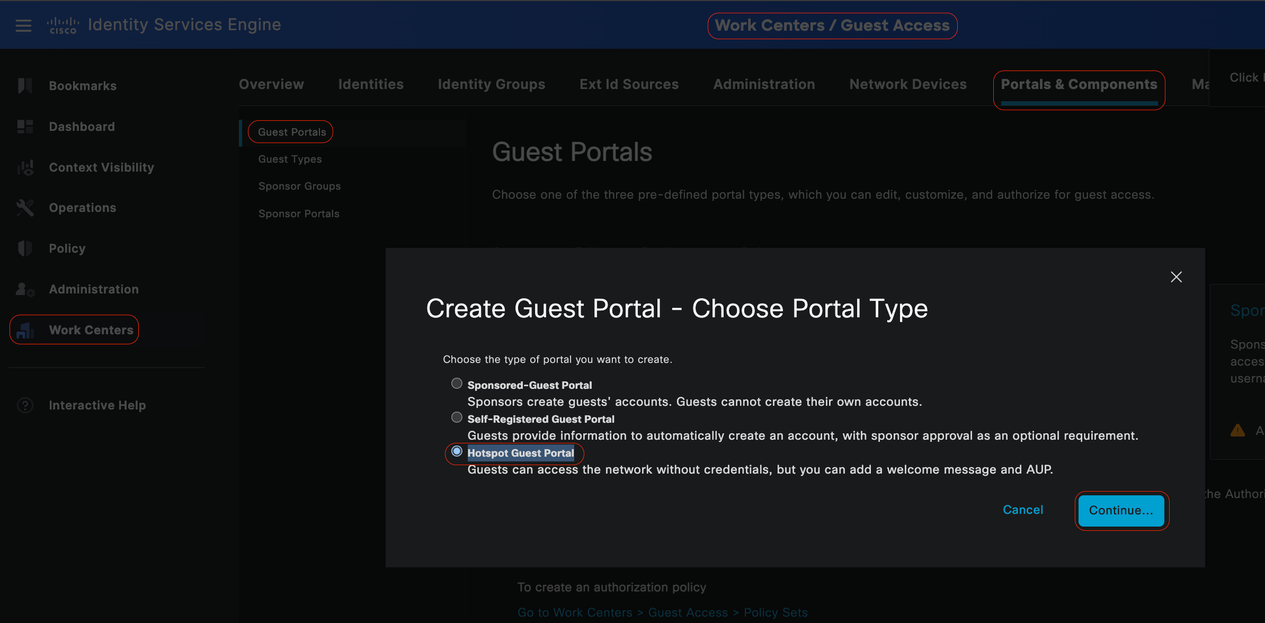 Hotspot Guest Portal
In the portal settings, you have the capability to customize the messages displayed to end-users to align with your specific requirements, this is just an example of customized portal view:
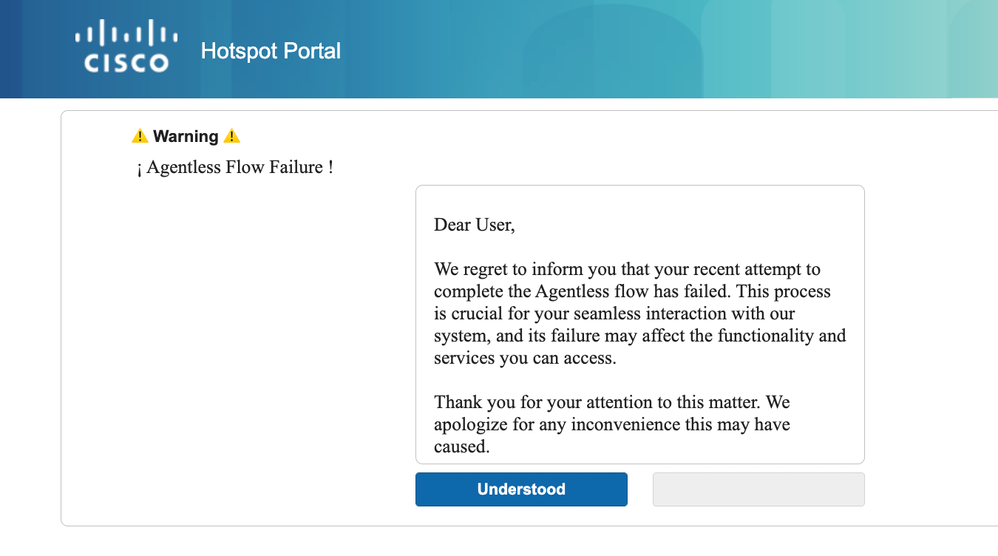 Failed Posture Agentless
Remediation Authorization Profile (Optional)
In the Cisco ISE GUI, click theMenuicon ( ) and choosePolicy > Policy Elements > Results > Authorization > Authorization Profilesand create an Authorization Profile for your remediation.
-
In this configuration example, named Authorization Profile as Remediation_Authorization_Profile.
-
For the sake of simplicity, this configuration example includes only a downloadable Access Control List (dACL) named Limited_Access that permits limited access, tailored to the specific needs of your organization.
-
The Web Redirection feature has been configured including an external group and the hotspot, enhancing user awareness regarding endpoint compliance.
-
Click Save.
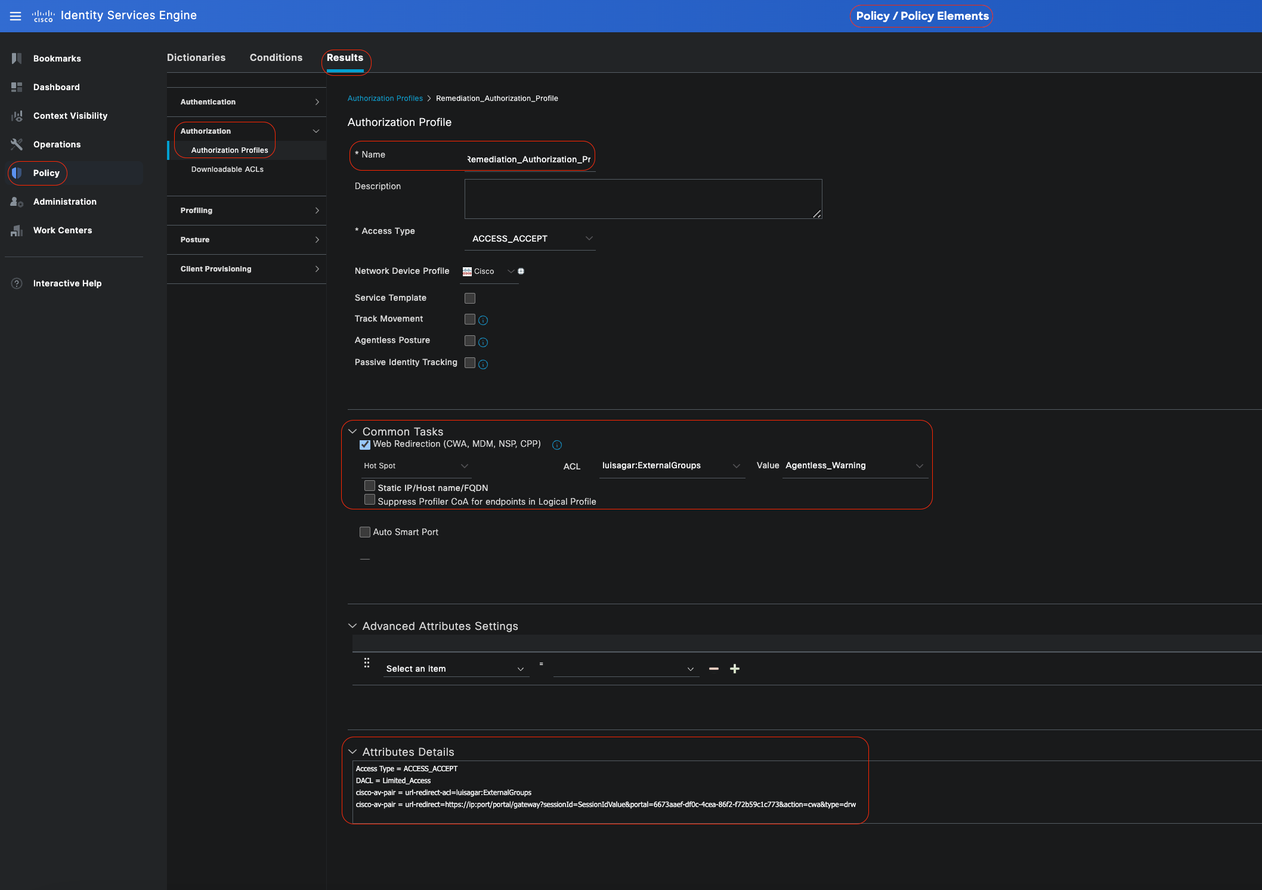 Remediation Authorization Rule
Agentless Authorization Rule
In the Cisco ISE GUI, click theMenuicon ( ) and choosePolicy > Policy Setsand expand Authorization Policy. Enable and configure these three Authorization policies:

Note: These Authorization Rules must be configured in the specified order to ensure the posture flow operates correctly.
Unknown_Compliance_Redirect:
• Conditions:
Configure Network_Access_Authentication_Passed AND Compliance_Unknown_Devices with the result set to Agentless Posture. This condition triggers the Agentless Flow.
• Example Conditions:
Configure an Active Directory (AD) Group condition to segment traffic.
The Compliance_Unknown_Devices condition must be configured as the initial posture state is unknown.
• Authorization Profile:
Assign Agentless_Authorization_Profile to this Authorization Rule to ensure devices go through the Agentless Posture flow. This condition contains Agentless Flow so devices hitting this profile can initiate Agentless flow.
 Unknown Authorization Rule
NonCompliant_Devices_Redirect:
• Conditions: Configure Network_Access_Authentication_Passed and Non_Compliant_Devices with the result set to DenyAccess. Alternatively, you can use the remediation option, as demonstrated in this example.
• Example Conditions:
Configure an AD Group condition to segment traffic.
The Compliance_Unknown_Devices condition must be configured to assign limited resources when the posture state is non-compliant.
• Authorization Profile:
Assign Remediation_Authorization_Profile to this Authorization Rule to notify non-compliant devices of their current status through Hotspot Portal or to Deny Access.
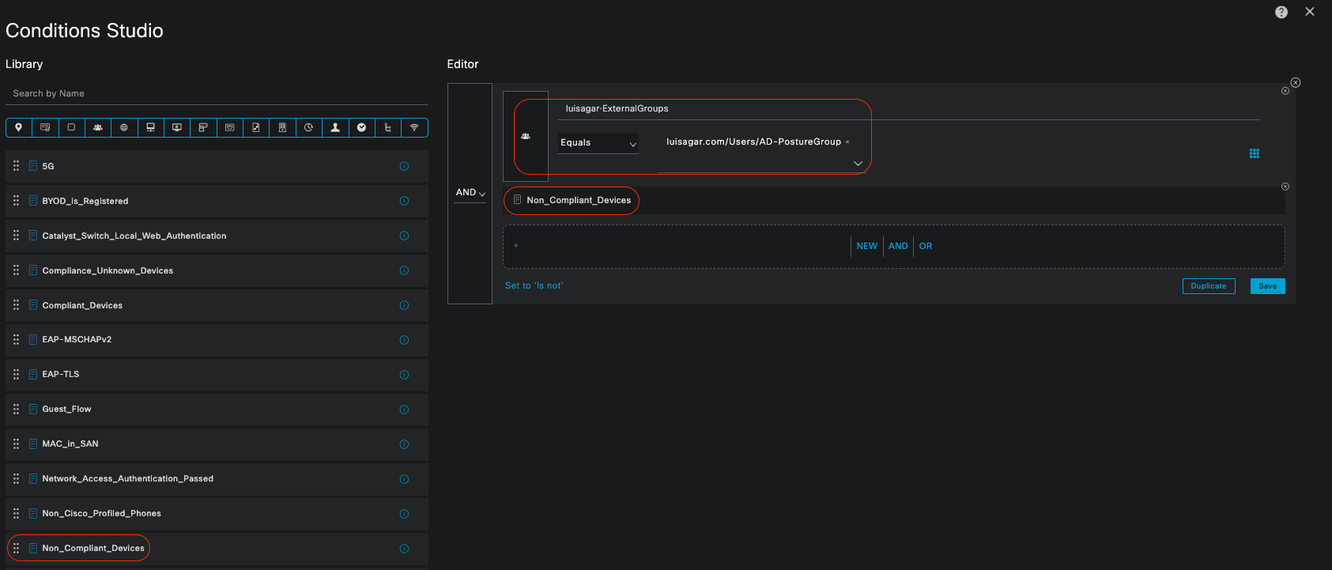 Non-Compliant Authorization Rule
Compliant_Devices_Access:
• Conditions:
Configure Network_Access_Authentication_Passed and Compliant_Devices with the result set to PermitAccess.
• Example Conditions:
Configure an AD Group condition to segment traffic.
The Compliance_Unknown_Devices condition must be configured so that compliant devices are granted proper access.
• Authorization Profile:
Assign PermitAccess to this Authorization Rule to ensure compliant devices have access. This profile can be customized to meet the needs of your organization.
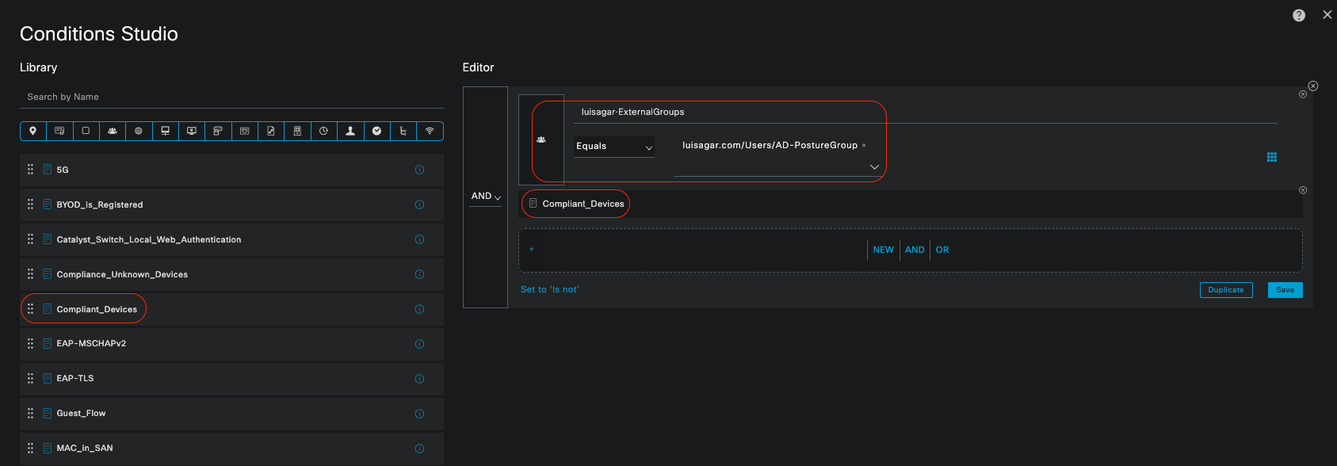 Compliant Authorization Rule
All Authorization rules
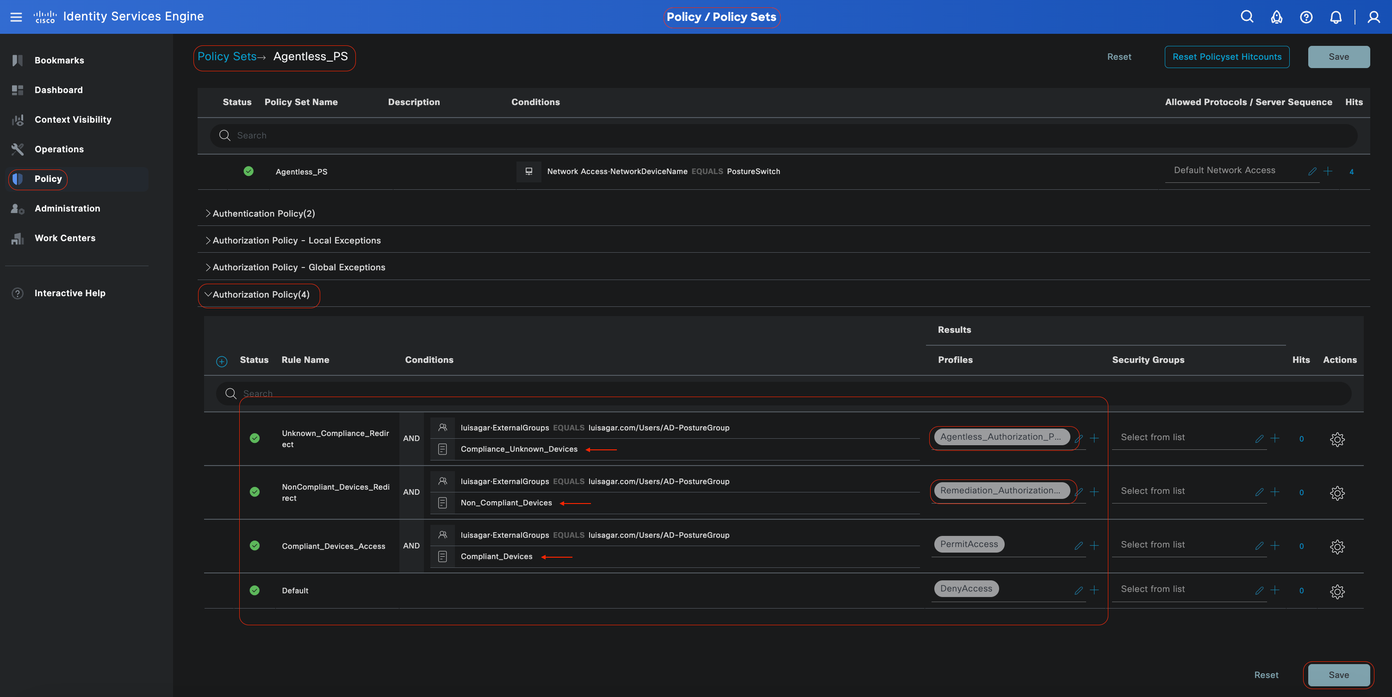 Authorization Rules
Configure Endpoint Login Credentials
In the Cisco ISE GUI, click theMenuicon ( ) and chooseAdministration > Settings > Endpoint Scripts > Login Configuration, and configure the client credentials to log onto clients.
These same credentials are used by the Endpoint Scripts so Cisco ISE can log in to clients.
For windows devices, you only configure the two first tabs (Windows Domain User and Windows Local User
-
Windows Domain User:
Configure the domain credentials that Cisco ISE must use to log in to a client via SSH. Click thePlusicon and enter as many Windows logins as you need. For each domain, enter the required values in theDomain,Username, andPasswordfields. If you configure domain credentials, the local user credentials that are configured in theWindows Local Usertab are ignored.
If you are administering Windows endpoints that utilize an Agentless posture assessment through an Active Directory domain, ensure to supply the domain name along with credentials possessing local administrative privileges.
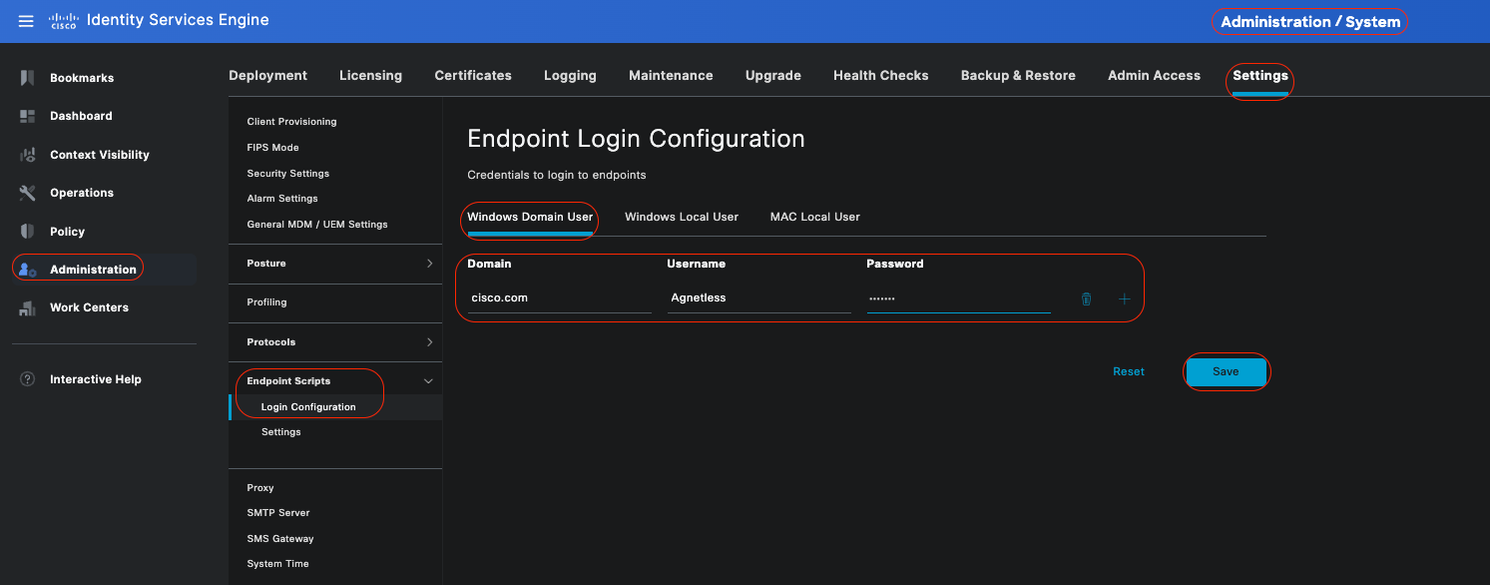 Windows Domain User
-
Windows Local User:
Configure the local account that Cisco ISE uses to access the client via SSH. The local account must be able to run Powershell and Powershell remote.
If you are not administering Windows endpoints that utilize an Agentless posture assessment through an Active Directory domain, ensure to provide credentials which has local administrative privileges.
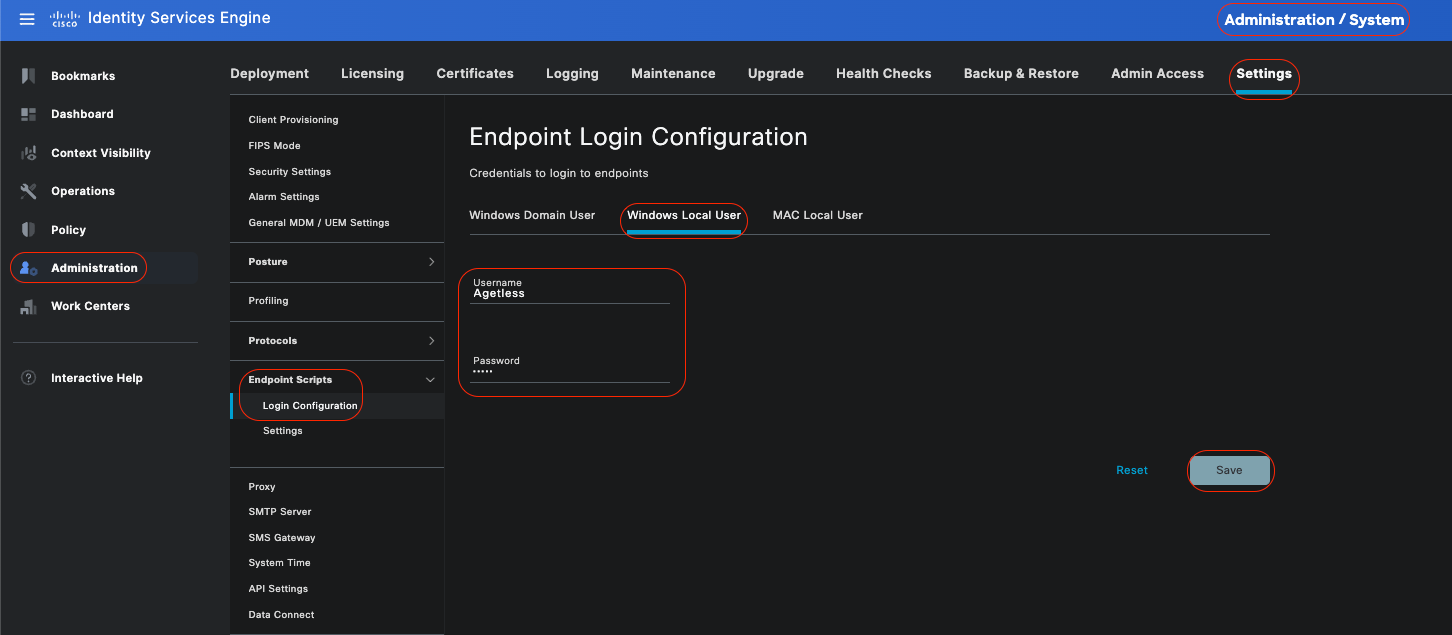 Windows Local User
Veify Accounts
To verify your Windows domain user and Windows local user accounts so you can accurately add the appropriate data under Endpoint Login Credentials, please use this procedure:
Windows local user: Using the GUI (Settings App) Click on the WindowsStart button, select Settings (the gear icon), Click on Accounts, and select Your info:
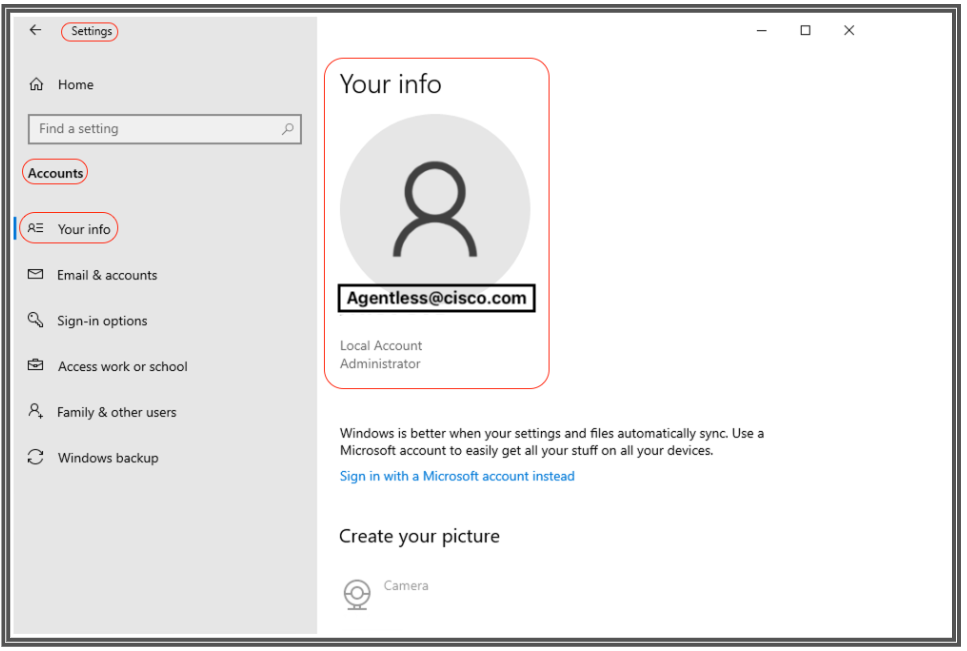 Verify Accounts

Note: For MacOS, you can refer to MAC Local User. Howerver in this configuration example, you are not going to see MacOS configuration.
-
MAC Local User: Configure the local account that Cisco ISE uses to access the client via SSH. The local account must be able to run Powershell and Powershell remote. In theUsernamefield, enter the Account Name of the local account.
To view a Mac OS Account Name, run this commandwhoami in the Terminal:
Settings
In the Cisco ISE GUI, click theMenuicon ( ) and chooseAdministration > Settings > Endpoint Scripts > Settings, and configureMax retry attempts for OS identification,Delay between retries for OS identification and so on. These settings determine how quickly connectivity issues can be confirmed. For example, an error that the PowerShell port is not open displays in logs only after all retries are not exhausted.
This screenshot shows default value settings:
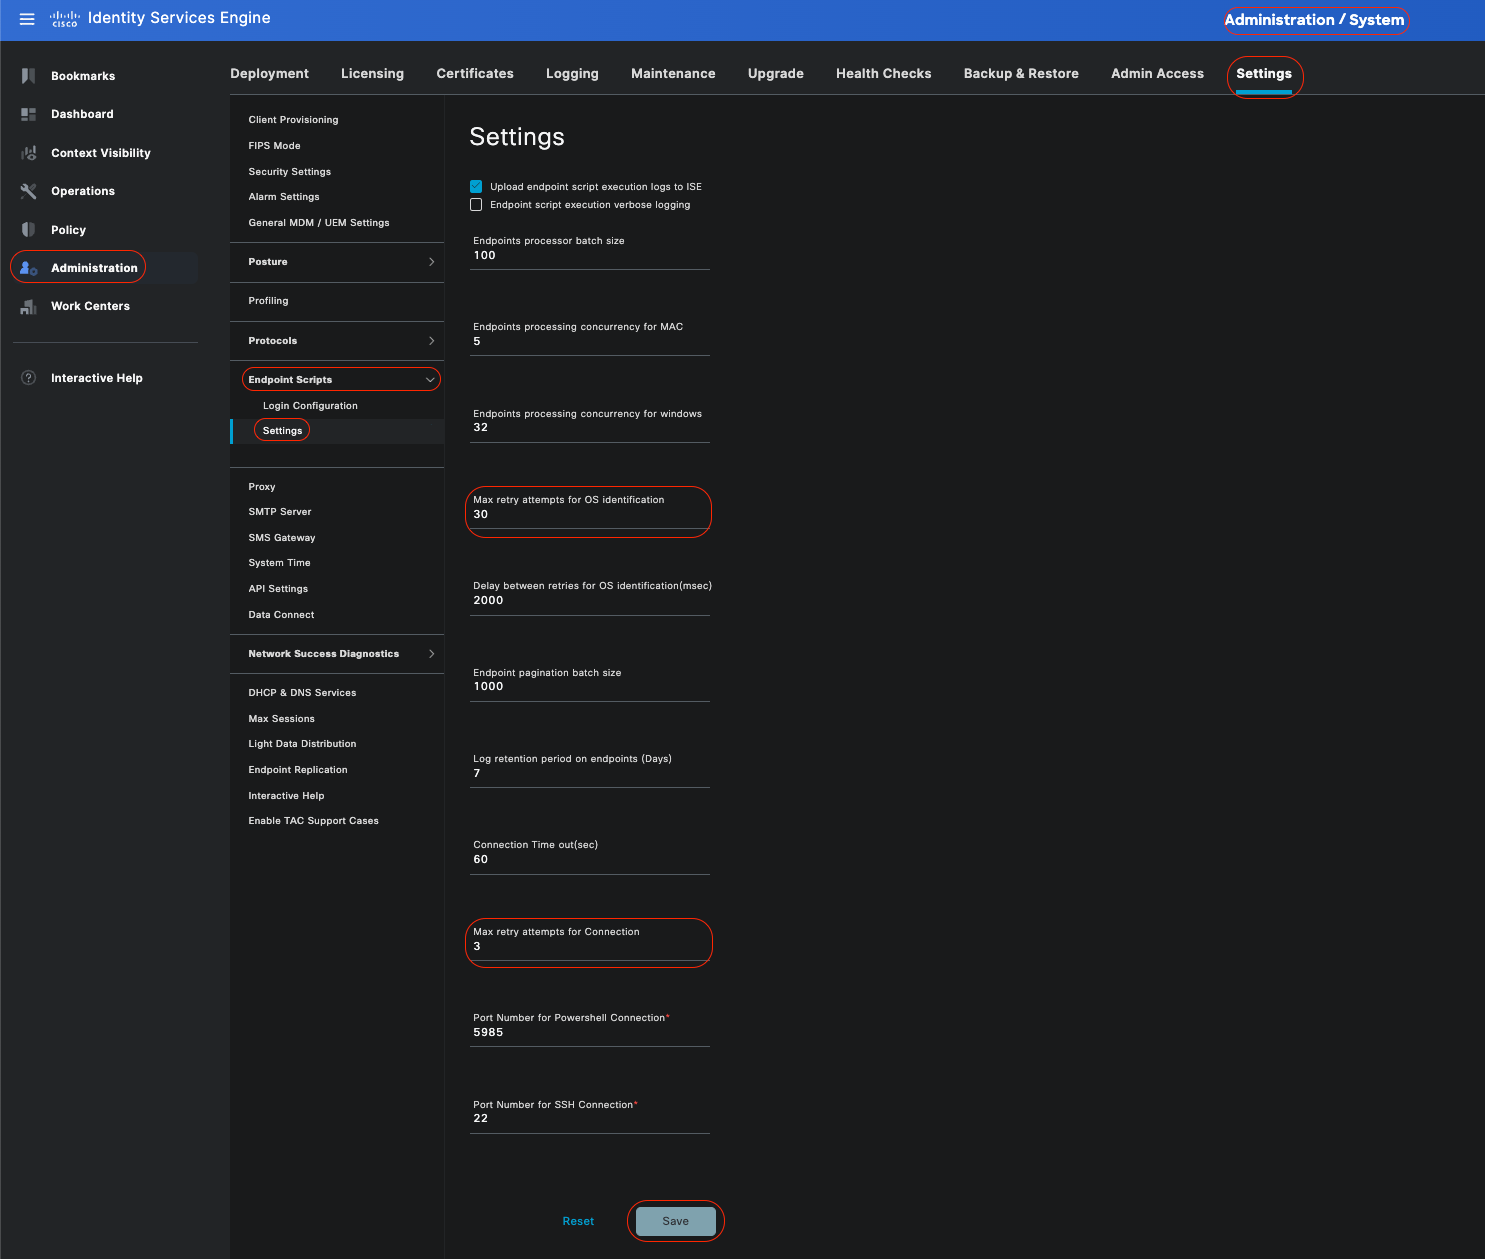 Endpoint Script Settings
As clients connect with Agentless posture, you can see them in the Live Logs.
Configurating and Troubleshooting Windows Endpoint

Note: These are some recommendations to check and apply on your windows device; however, you must refer to Microsoft documentation or contact Microsoft support if encountering issues such as user privileges, PowerShell access and so on…
Verifying and Troubleshooting prerequisites
Testing TCP connection to port 5985
For Windows clients, port 5985 to access powershell on the client must be opened. Run this command to confirm TCP connection to port 5985: Test-NetConnection -ComputerName localhost -Port 5985
The output shown in this screenshot indicates that the TCP connection to port 5985 on localhost failed. This means that the WinRM (Windows Remote Management) service, which uses port 5985, is not running or is not properly configured.
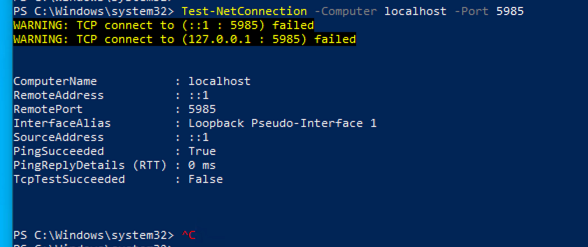 Connection failed to WinRM
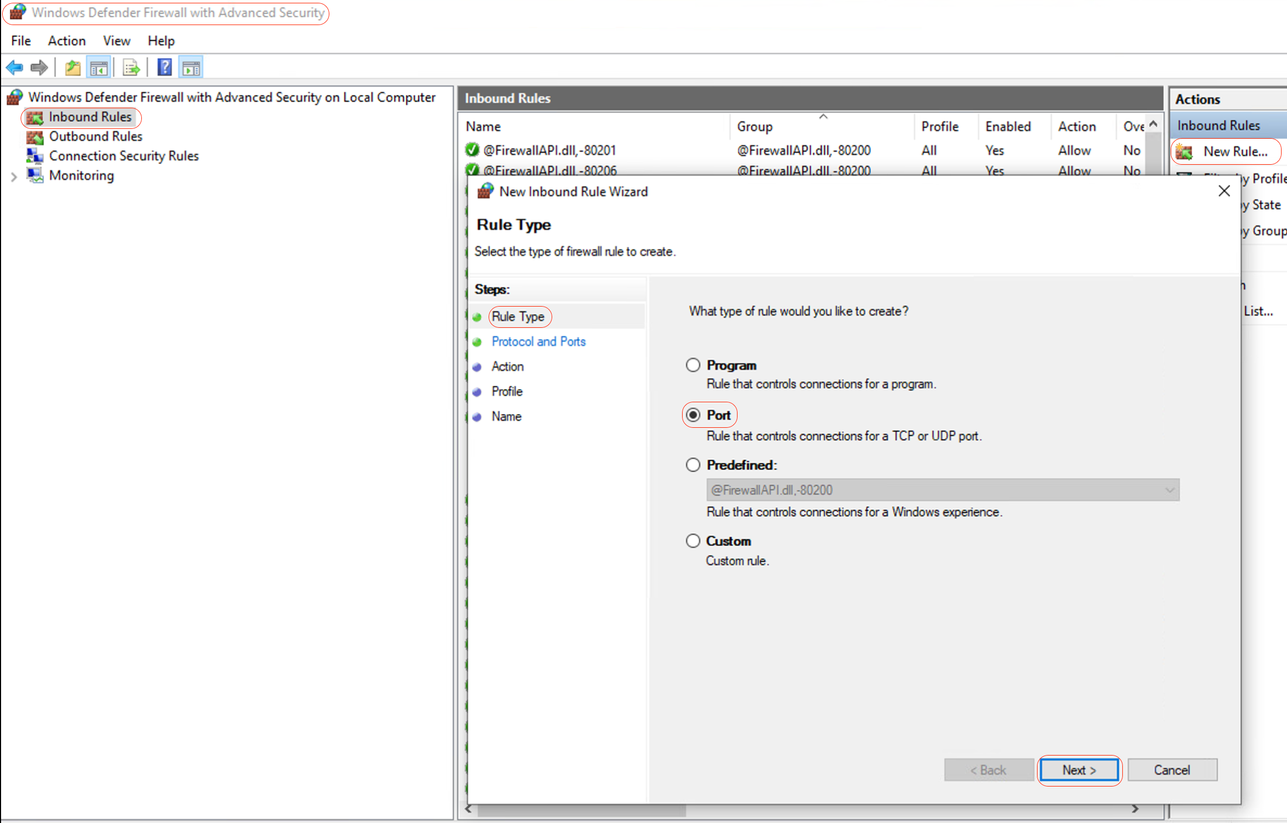
Creating Inbound Rule to allow PowerShell on port 5985
Step 1- In Windows GUI, go to Search Bar, type Windows Firewall with Advanced Security, click on it and select Run as administrator > Inbound Rules > New Rule > Rule Type > Port > Next:
 New Inbound Rule - Port
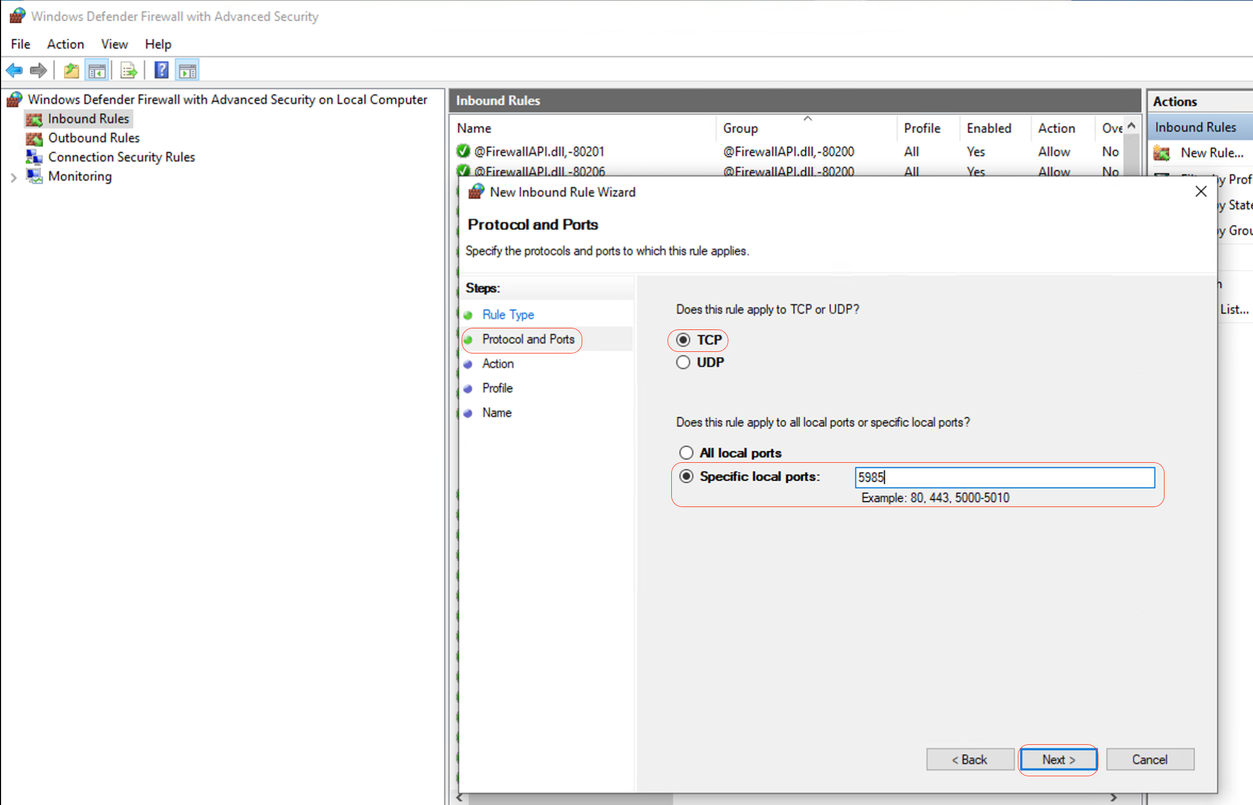
Step 2- Under Protocols and Ports, select TCP and Specify local ports, type port number 5985 (Default port for PowerShell remoting) and click Next:
 Protocols and Ports
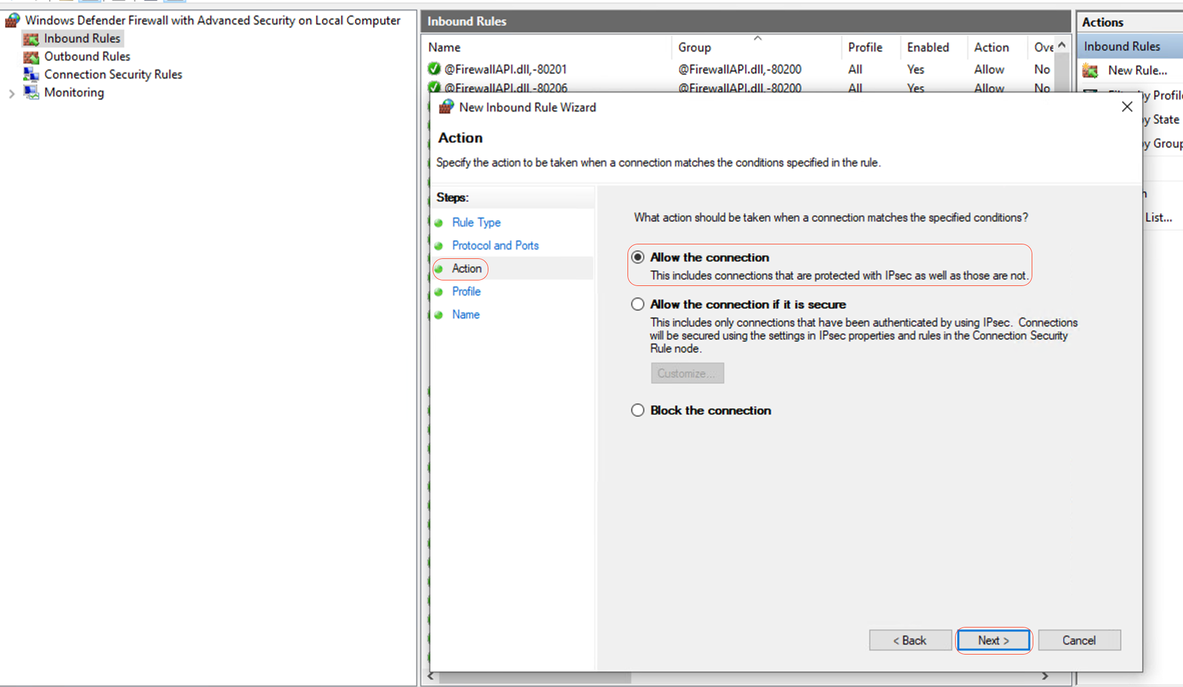
Step 3- Under Action > Select Allow the connection > Next:
 Action
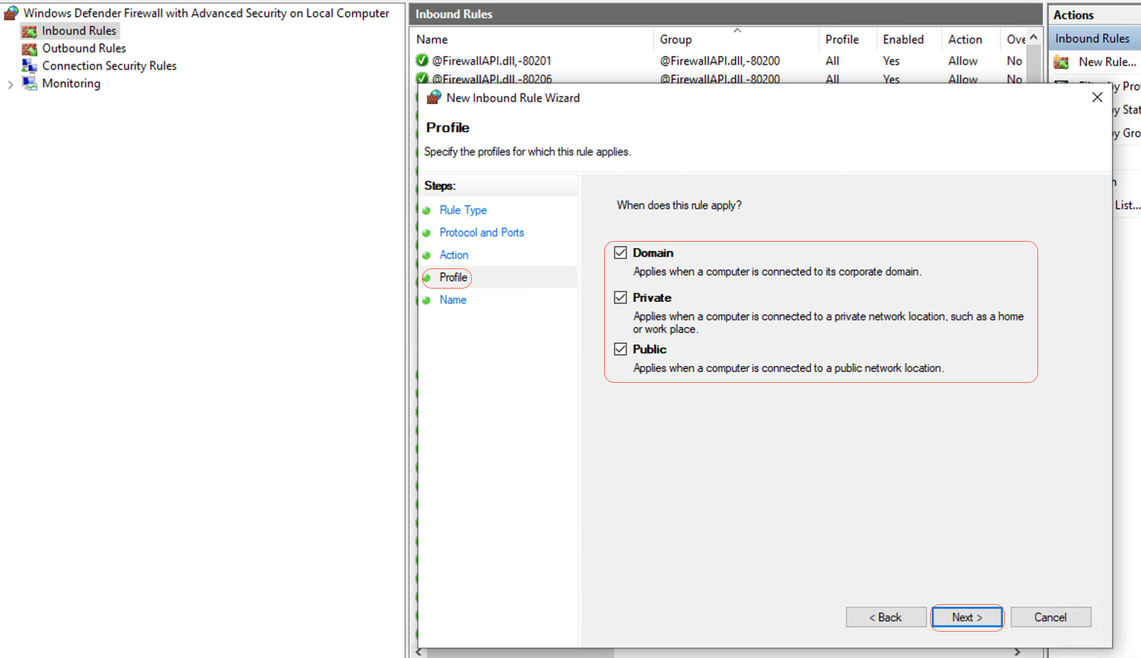
Step 4- Under Profile, check the Domain, Private, and Public checkboxes and click Next:
 Profile
Step 5- Under Name, Enter a name for the rule, such as Allow PowerShell on Port 5985 and click Finish:
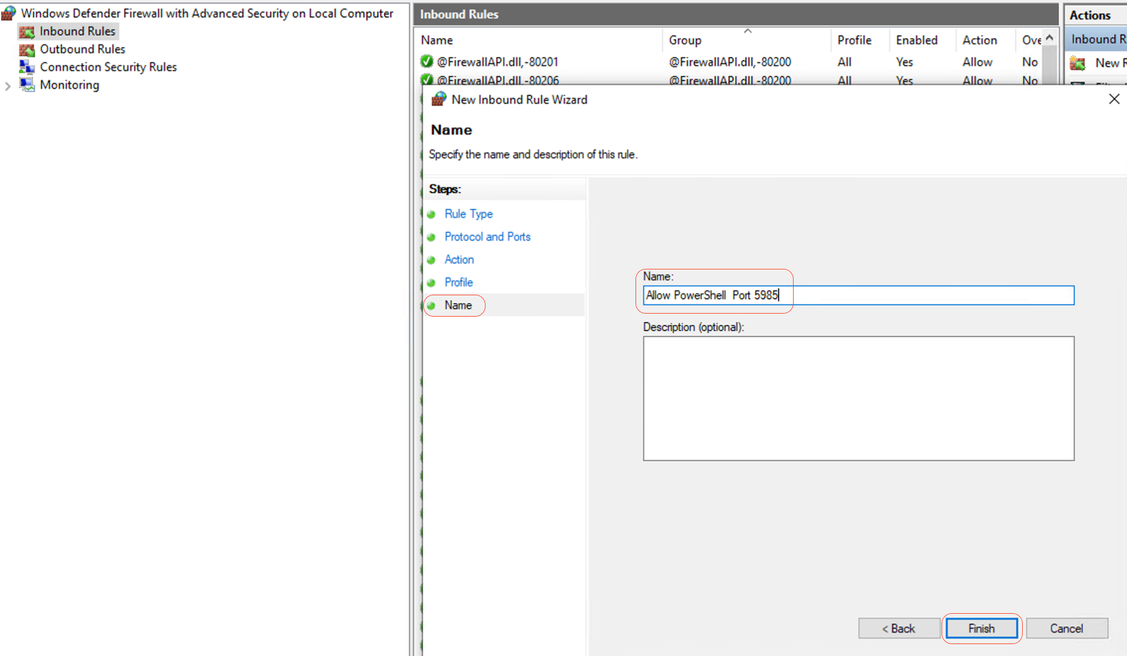 Name
Name
Client credentials for shell login must have local admin privileges
Client credentials for shell login must have local admin privileges. To confirm whether having Admin privileges, please check this steps:
In Windows GUI, go to Settings > Computer Management > Local Users and Groups > Users > Select the User Account (in this example, Agentless Account is selected) > Member of, account must have Administrators Group.
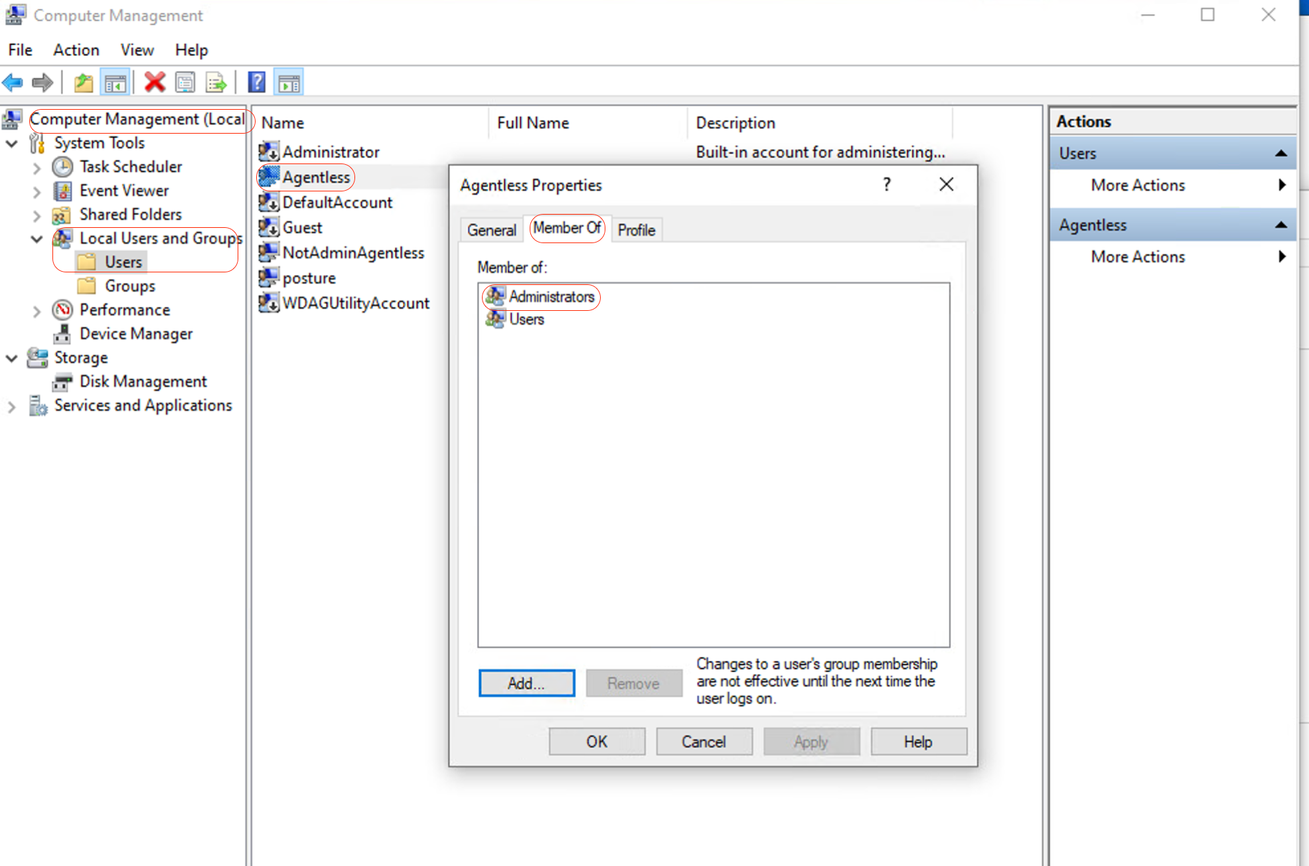 Local Admin Privileges
Validating WinRM listener
Ensure that the WinRM listener is configured for HTTP on port 5985:
C: \Windows\system32> winrm enumerate winrm/config/listener
Listener
Address = *
Transport = НТТР
Port = 5985
Hostname
Enabled = true
URLPrefix = wsman
CertificateThumbprint
C: \Windows\system32>
Enable PowerShell Remoting WinRM
Ensure service is running and configured to start automatically, go through these steps:
# Enable the WinRM service
Enable-PSRemoting -Force

# Start the WinRM service
Start-Service WinRM

# Set the WinRM service to start automatically
Set-Service -Name WinRM -StartupType Automatic
Expected output:
C: \Windows\system32> Enable-PSRemoting -Force
WinRM is already set up to receive requests on this computer.
WinRM has been updated for remote management.
WinRM firewall exception enabled.
-Configured LocalAccountTokenFilterPolicy to grant administrative rights remotely to local users.
C: \Windows\system32> Start-Service WinRM
C: \Windows\system32> Set-Service -Name WinRM -StartupType Automatic
Powershell must be v7.1 or later. The client must have cURL v7.34 or later:
How to Check PowerShell and cURL Versions on Windows
Ensuring that you are using the appropriate versions of PowerShell ; cURL is essential for Posture Agentless:
Checking PowerShell Version
On Windows:
1. Open PowerShell:
• Press Win + X and select Windows PowerShell or Windows PowerShell (Admin).
2.Execute the command:$PSVersionTable.PSVersion
• This command outputs the version details of PowerShell installed on your system.
Checking cURL Version
On Windows:
1. Open Command Prompt:
• Press Win + R, type cmd, and click Enter.
2. Execute the Command: curl --version
• This command displays the version of cURL installed on your system.
Output for checking the PowerShell and cURL versions on Windows devices
C: \Windows\system32> $PSVersionTable.PSVersion
 Major        Minor         Build           Revision
 -----       -----         -----           -----
   7              1              19041           4291
C: \Windows\system32>
C: \Windows\system32>
C: \Windows \system32>curl --version
curl 8.4.0 (Windows) libcurl/8.4.0 Schannel WinIDN
Release-Date: 2023-10-11
Protocols: dict file ftp ftps http https imap imaps pop3 pop3s smtp smtps telnet tftp
ftps http https
Features: AsynchNS HSTS HTTPS-proxy IDN IPv6 Kerberos Largefile NTLM SPNEGO SSL SSPI threadsafe Unicode UnixSockets
c: \Windows\system32>
Additional Configuration
This command configures your machine to trust specific remote hosts for WinRM connections: Set-Item WSMan:\localhost\Client\TrustedHosts -Value <Client-IP>
C: \Windows\system32> Set-Item WSMan:\localhost\Client\TrustedHosts -Value x.x.x.x
WinRM Security Configuration.
This command modifies the TrustedHosts list for the WinRM client. The computers in the TrustedHosts list cannot be authenticated. The client can send credential information to these computers. Are you sure that you want to modify this list?
[Y] Yes [N] No [S] Suspend [?] Help (default is "y"): Y
PS C: \Windows \system32> -
The test-wsman cmdlet with the -Authentication Negotiate and -Credential parameters is a powerful tool for verifying the availability and configuration of the WinRM service on a remote machine: test-wsman <Client-IP> -Authentication Negotiate -Credential <Accountname>
MacOS
Powershell must be v7.1 or later. The client must have cURL v7.34 or later:
On macOS:
1. Open Terminal:
• You can find Terminal in Applications > Utilities.
2. Execute the Command: pwsh -Command '$PSVersionTable.PSVersion'

Note: Note: • Ensure you have PowerShell Core (pwsh) installed. If not, you can install it via Homebrew (make sure you have Himebrew install): brew install --cask powershell
On macOS:
1. Open Terminal:
• You can find Terminal in Applications > Utilities.
2. Execute the Command: curl --version
• This command must display the version of cURL installed on your system.
For MacOS clients, port 22 to access SSH must be open to access the client
Step-by-Step Guide:
1. Open System Preferences:
• Navigate to System Preferences from the Apple menu.
2. Enable Remote Login:
• Go to Sharing.
• Check the box next to Remote Login.
• Ensure that the Allow access for option is set to the appropriate users or groups. Selecting All users allows any user with a valid account on the Mac to log in via SSH.
3. Verify Firewall Settings:
• If the firewall is enabled, you need to ensure that it allows SSH connections.
• Go to System Preferences > Security & Privacy > Firewall.
• Click on the Firewall Options button.
• Check that Remote Login or SSH is listed and allowed. If it is not listed, click the Add button (+) to add it.
4. Open Port 22 via Terminal (if necessary):
• Open the Terminal application from Applications > Utilities.
• Use the pfctl command to check the current firewall rules and ensure port 22 is open:sudo pfctl -sr | grep 22
• If port 22 is not open, you can manually add a rule to allow SSH:echo "pass in proto tcp from any to any port 22" | sudo pfctl -ef -
5. Test SSH Access:
• From another device, open a terminal or SSH client.
• Attempt to connect to the macOS client using its IP address:ssh username@<macOS-client-IP>
• Replace username with the appropriate user account and <macOS-client-IP> with the IP address of the macOS client.
For MacOS, ensure that this entry is updated in the sudoers file to avoid certificate installation failure on the endpoints:
When managing macOS endpoints, it is crucial to ensure that specific administrative commands can be executed without requiring a password prompt.
Prerequisites
• Administrator access on the macOS machine.
• Basic familiarity with Terminal commands.
Steps to Update the Sudoers File
1. Open Terminal:
• You can find Terminal in Applications > Utilities.
2. Edit the Sudoers File:
• Use the visudo command to safely edit the sudoers file. This ensures that any syntax errors are caught before saving the file.sudo visudo
• You are going to be prompted to enter your administrator password.
3. Find the Appropriate Section:
• In the visudo editor, navigate to the section where user-specific rules are defined. Typically, this is towards the bottom of the file.
4. Add the Required Entry:
• Add this line to grant the specified user permission to run the security and osascript commands without a password: <macadminusername> ALL = (ALL) NOPASSWD: /usr/bin/security, /usr/bin/osascript
• Replace <macadminusername> with the actual username of the macOS admin.
5. Save and Exit:
• If you are using the default editor (nano), press Ctrl + X to exit, then press Y to confirm the changes, and finally press Enter to save the file.
• If using vi or vim, press Esc, type :wq, and press Enter to save and exit.
6. Verify the Changes:
• To ensure that the changes have taken effect, you can run a command that requires the updated sudo permissions. For example:
sudo /usr/bin/security find-certificate -a
sudo /usr/bin/osascript -e 'tell application "Finder" to display dialog "Test"'
• These commands can be executed without prompting for a password.
Revision History
| Revision | Publish Date | Comments |
|---|---|---|
1.0 |
31-Jul-2024 |
Initial Release |
Contributed by Cisco Engineers
- Antonio Garcia ArayaTechnical Consulting Engineer
Contact Cisco
- Open a Support Case

- (Requires a Cisco Service Contract)
 Feedback