Introduction
This document describes the procedure to configure Cisco Identity Services Engine (ISE) with IPv6 for Admin Portal and CLI.
Prerequisites
Requirements
Cisco recommends that you have knowledge of these topics:
- Identity Services Engine (ISE)
- IPv6
Components Used
The information in this document is based on these software and hardware versions:
The information in this document was created from the devices in a specific lab environment. All of the devices used in this document started with a cleared (default) configuration. If your network is live, ensure that you understand the potential impact of any command.
Background Information
In most cases, Cisco Identity Services Engine can be configured with an Ipv4 address to manage ISE through User interface (GUI) and CLI log in into Admin Portal, however, from ISE version 2.6 and above Cisco ISE can be managed over an IPv6 address, and configure an IPv6 address to Eth0 (Interface) when setup wizard as well as through CLI. When configured IPv6 address, it is recommended to have an IPv4 address configured (in addition to IPv6 address) for the Cisco ISE node communication. Hence, dual stack (combination of both IPv4 and IPv6) is required.
It is possible to configure Secure Socket Shell (SSH) with IPv6 addresses. Cisco ISE supports multiple IPv6 addresses on any interface and these IPv6 addresses can be configured and managed using CLI.
Configure
Network Diagram
The image provides an example of a network diagram

ISE Configuration
Note: By default, ipv6 address option is enable in all ISE interfaces. It is a best practice to disable this option if it is not planned to be used issue the no ipv6 address autoconfig and/or no ipv6 enable where applicable. Use the show run command to validate which interfaces have ipv6 enabled.
Note: The configuration considers cisco ISE is already configured with IPv4 addressing.
ems-ise-mnt001/admin# Configure terminal
ems-ise-mnt001/admin(config)# int GigabitEthernet 0
ems-ise-mnt001/admin(config-GigabitEthernet)# ipv6 address 2001:420:404a:133::66
% Changing the IP address might cause ise services to restart
Continue with IP address change? Y/N [N]:Y
Note: Adding or changing IP addressing on an interface causes the services to restart
Step 2. Once services have been restarted issue the show application status ise command to validate the services are running:
ems-ise-mnt001/admin# show application status ise
ISE PROCESS NAME STATE PROCESS ID
--------------------------------------------------------------------
Database Listener running 1252
Database Server running 74 PROCESSES
Application Server running 11134
Profiler Database running 6897
ISE Indexing Engine running 14121
AD Connector running 17184
M&T Session Database running 6681
M&T Log Processor running 11337
Certificate Authority Service running 17044
EST Service running 10559
SXP Engine Service disabled
Docker Daemon running 3579
TC-NAC Service disabled
pxGrid Infrastructure Service running 9712
pxGrid Publisher Subscriber Service running 9791
pxGrid Connection Manager running 9761
pxGrid Controller running 9821
PassiveID WMI Service disabled
PassiveID Syslog Service disabled
PassiveID API Service disabled
PassiveID Agent Service disabled
PassiveID Endpoint Service disabled
PassiveID SPAN Service disabled
DHCP Server (dhcpd) disabled
DNS Server (named) disabled
ISE Messaging Service running 4260
ISE API Gateway Database Service running 5805
ISE API Gateway Service running 8973
Segmentation Policy Service disabled
REST Auth Service disabled
SSE Connector disabled
Step 3. Issue the show run command to validate IPv6 has been configured on Eth0 (Interface):
ems-ise-mnt001/admin# show run
Generating configuration...
!
hostname ems-ise-mnt001
!
ip domain-name ise.com
!
ipv6 enable
!
interface GigabitEthernet 0
ip address 10.52.13.175 255.255.255.0
ipv6 address 2001:420:404a:133::66/64
ipv6 address autoconfig
ipv6 enable
!
Verify
Cisco ISE UI
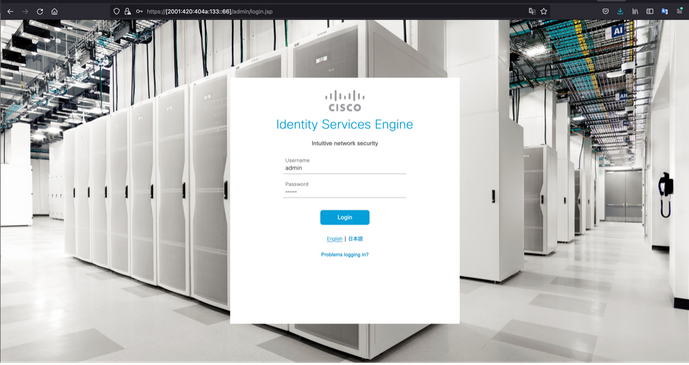
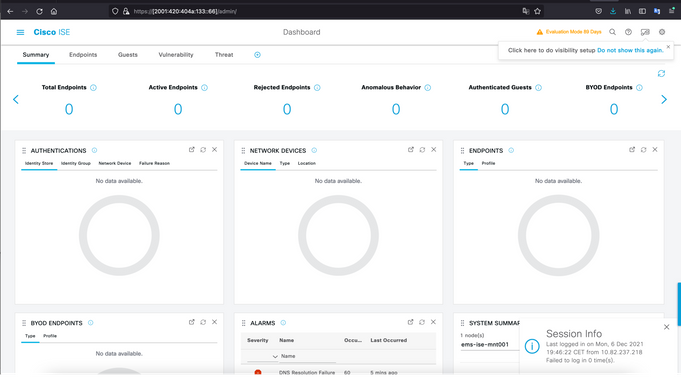
Step 1. Open a new window browser and type https://[2001:420:404a:133::66]. Please note the IPv6 address must be in brackets.
Cisco ISE SSH
Note: Secure CRT is used in this example.
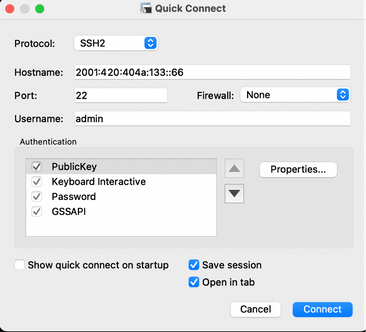
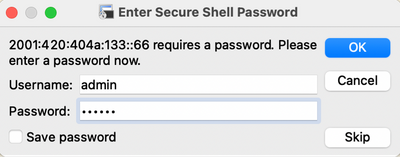
Step 1. Open a new SSH session and type the IPv6 Address followed by Admin username and password.
Step 2. Issue the show interface gigabitEthernet 0 command to validate IPv6 address configured on Eth0 (Interface):
ems-ise-mnt001/admin# show interface gigabitEthernet 0
GigabitEthernet 0
flags=4163<UP,BROADCAST,RUNNING,MULTICAST> mtu 1500
inet 10.52.13.175 netmask 255.255.255.0 broadcast 10.52.13.255
inet6 2001:420:404a:133:117:4cd6:4dfe:811 prefixlen 64 scopeid 0x0<global>
inet6 2001:420:404a:133::66 prefixlen 64 scopeid 0x0<global>
ether 00:50:56:89:74:4f txqueuelen 1000 (Ethernet)
RX packets 17683390 bytes 15013193200 (13.9 GiB)
RX errors 0 dropped 7611 overruns 0 frame 0
TX packets 16604234 bytes 2712406084 (2.5 GiB)
TX errors 0 dropped 0 overruns 0 carrier 0 collisions 0
Step 3. Issue the show users command to validate the source IPv6 address.
ems-ise-mnt001/admin# show users
USERNAME ROLE HOST TTY LOGIN DATETIME
admin Admin 10.82.237.218 pts/0 Mon Dec 6 19:47:38 2021
admin Admin 2001:420:c0c4:1005::589 pts/2 Mon Dec 6 20:09:04 20
Troubleshoot
This section provides information you can use to troubleshoot your configuration.
Communication validation with use of ping for IPv6 Address on MacOS
Step 1. Open a terminal and use the ping6 <IPv6 Address> command to validate the communication response from ISE
M-65PH:~ ecanogut$ ping6 2001:420:404a:133::66
PING6(56=40+8+8 bytes) 2001:420:c0c4:1005::589 --> 2001:420:404a:133::66
16 bytes from 2001:420:404a:133::66, icmp_seq=0 hlim=51 time=229.774 ms
16 bytes from 2001:420:404a:133::66, icmp_seq=1 hlim=51 time=231.262 ms
16 bytes from 2001:420:404a:133::66, icmp_seq=2 hlim=51 time=230.545 ms
16 bytes from 2001:420:404a:133::66, icmp_seq=3 hlim=51 time=320.207 ms
16 bytes from 2001:420:404a:133::66, icmp_seq=4 hlim=51 time=236.246
Communication validation with use of ping for IPv6 Address on Windows
In order for the IPv6 ping command to work, Ipv6 needs to be enabled on the network configuration.
Step 1. Select Start > Settings > Control Panel > Network and Internet > Network and Sharing Center > Change adapter settings.
Step 2. Validate Internet Protocol Version 6 (TCP/IPv6) is enabled, click on the checkbox in case this option is disable.
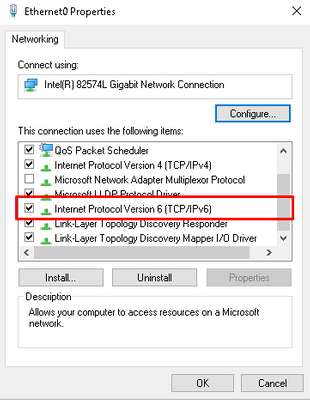
Step 3: Open a terminal and use ping <IPv6 Address> or ping -6 <ise_node_fqdn> command to validate the communication response from ISE
> ping 2001:420:404a:133::66
Communication validation with use of ping for IPv6 Address on Ping IPv6 In Linux (Ubuntu, Debian, Mint, CentOS, RHEL).
Step 1. Open a terminal and use ping <IPv6 Address> or ping -6 <ise_node_fqdn> command to validate the communication response from ISE
$ ping 2001:420:404a:133::66
Communication validation with use of ping for IPv6 Address on Ping IPv6 In Cisco (IOS)
Note: Cisco provides the ping command in exec mode in order to check connectivity to the IPv6 targets. The ping command requires ipv6 parameter and the IPv6 address of the target.
Step 1. Log in into cisco IOS device in exec mode and issue the ping Ipv6 <IPv6 Address> command to validate the communication response from ISE
# ping ipv6 2001:420:404a:133::66
Note: In addition, you can also take pcaps from ISE to validate the income IPv6 Traffic
Additional reference: https://community.cisco.com/t5/security-documents/cisco-ise-identity-services-engine-ipv6-support/ta-p/4480704#toc-hId-1800166300


 Feedback