Configure ISE Version 1.4 Email and SMS Notifications
Available Languages
Contents
Introduction
The document describes how to configure the Cisco Identity Services Engine (ISE) Version 1.4 in order to support email and Short Message Service (SMS) notifications for multiple services.
Prerequisites
Requirements
Cisco recommends that you have a basic knowledge of the Cisco ISE and guest services.
Components Used
The information in this document is based on these hardware and software versions:
- Microsoft Windows Version 7 with Cisco AnyConnect Secure Mobility Client, Version 3.1
- Cisco Catalyst 3750X Series switch that runs software Versions 15.0.2 and later
- Cisco ISE Versions 1.3 and later
The information in this document was created from the devices in a specific lab environment. All of the devices used in this document started with a cleared (default) configuration. If your network is live, make sure that you understand the potential impact of any command.
Configure
This section describes how to configure the ISE in order to support email and SMS notifications for various services.
SMTP Settings
Before it can use any email services, the ISE must have a Simple Message Transfer Protocol (SMTP) relay server configured. In order to configure the server, navigate to Administration > System > Settings > SMTP Server:
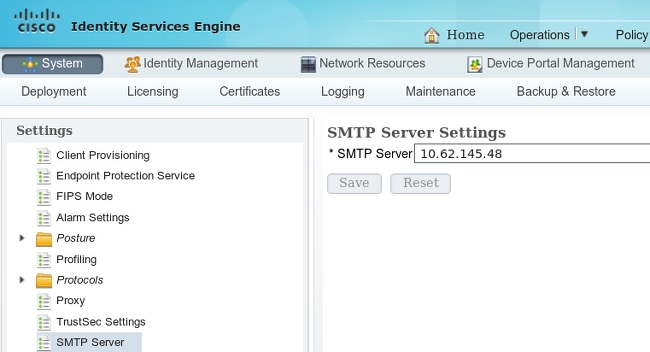
This server should have the ability to accept any emails from the ISE without authentication or encryption.
SMS Settings
In order for the SMS services to work with the ISE, you must configure a specific SMS gateway. The ISE supports Smtp2SMS and Http2SMS gateways. By default, there are nine gateways that are preconfigured for well known providers (you might might need to tune these). In order to configure these, navigate to Administration > System > Settings > SMS gateway:
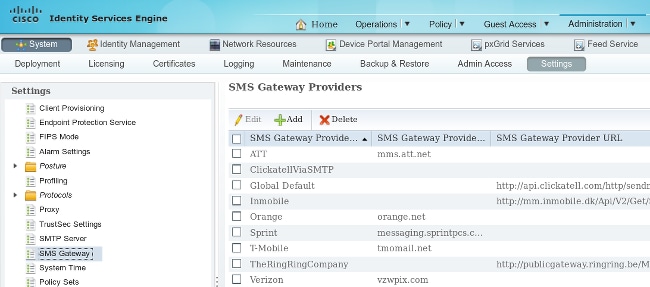
SMS Gateway Via SMTP
When you configure the SMTP SMS gateway, the only required field is the Provider Domain field, as per the SMS Gateway Settings for SMS Email Gateway section of the Cisco Identity Services Engine Administrator Guide, Release 1.4.
With the default settings (empty), the value of the SMTP API body template field is equal to the $message$ value.
The default message value depends on the service that is used. For notification services (when you create a guest account), it is configurable from the sponsor portal customization page (Notify Guest/SMS Notification). This is the default value:
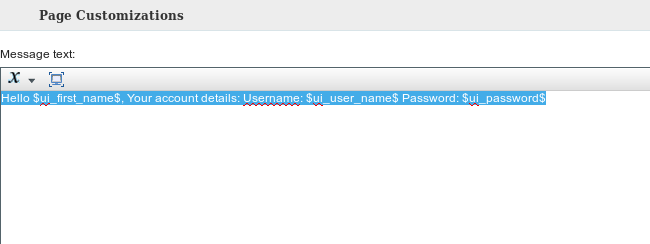
The SMTP API body template field value can also be customized. The supported dynamic substitutions for the default value are $mobilenumber$ and $message$. For example, when you configure the test template $message$ value, this data is sent in the SMTP payload:
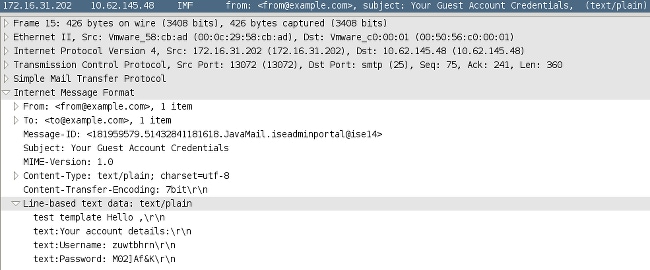
After the test template string, the value of the $message$ will be substituted (in this example, for SMS notification service).
Another example of the SMTP API body template field value is test template2 $mobilenumber$. This is the payload that is sent when this value is used:
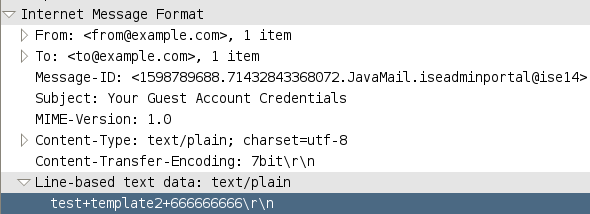
It is important to notice a slight difference between the $mobilenumber$ and $message$ variables. Normally, all of the whitespace characters (spaces) are escaped and replaced by the + character. When the $message$ variable is used, those whitespace characters are kept.
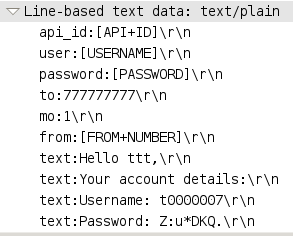
There is one example of an SMTP SMS gateway (ClickatellViaSMTP) that is configured with multiple values in the SMTP API body template field. All of these values are static (except the $message$ and $mobilenumber$ values). The values are provided in order to show that it is possible to adjust that payload and provide additional data, which might be required by the SMTP provider. The values that are displayed in capital letters should be replaced with the correct values, which are provided by the provider (and they will be the same for all of the emails that are sent via this provider).
Here is an example:
SMS Gateway Via HTTP
For the HTTP2SMS gateway, enter SMS HTTP API in order to use an HTTP Get request method:
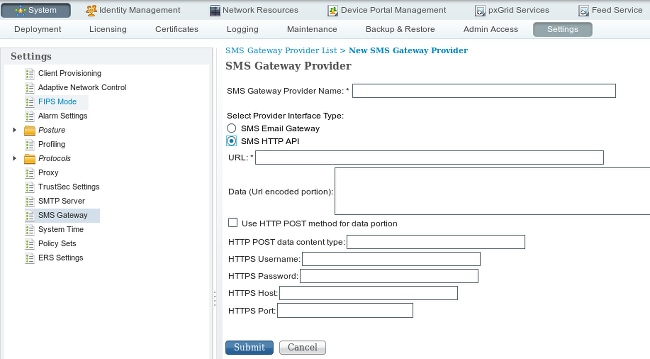
Usually, the SMS provider should indicate the attributes that are mandatory to send and those that are optional, as well as the kind of string that should be sent and the port number (if it is other than 80).
Here is an example that is based on the AwalJawaly SMS service provider, and this is the URL structure that is used: http://awaljawaly.awalservices.com.sa:8001/Send.aspx.
These are the mandatory parameters:
- Request type (SMSSubmitReq)
- Username
- Password
- Mobile number
- Message
These are the optional parameters:
- Origin address
- Type
- Delivery time
- Validity period
- Flashing
- Acknowledgement
- Maximum credits
- Client message ID
- User Data Header (UDH)
This is the URL that is used in this example:
http://awaljawaly.awalservices.com.sa:8001/Send.aspx?REQUESTTYPE=SMSSubmitReq&Username=&Test&&Password=123456&MOBILENO=$mobilenumber$&MESSAGE=$message$
Here are some notes about the optional fields:
- The username and password should be included in this link (unfortunately, clear text is used).
- The mobile number is taken automatically from the Phone number field during the guest creation exercise from the Sponsor portal.
- The message field is filled automatically from this location: Sponsor portal > Portal Page Customization > Notify Guests > SMS notification > Message text.
After you enable the Use HTTP POST method for data portion, the HTTP POST request is used:
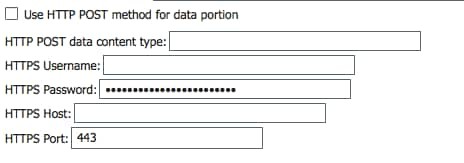
If you use the POST method, specify the content type, such as plain/text or application/xml. All other information should be shared by the SMS service provider.
The Data field is mostly used with the POST method. Any information that is used in the Data field for the GET method is added at the end of the Uniform Resource Identifier (URI) for the GET HTTP request.

Here is an example of the URI for the GET HTTP request:

When the $message$ variable is not used in the URL link, but information is input in the Data field, this information is visible near the start (message field) of the URI for the GET HTTP request:

Here is an example of the URI for the GET HTTP request:

Here are some notes about the encoding:
- URL field â This field is not URL-encoded. The guest account mobile number is substituted into the URL. The supported dynamic substitutions are $mobilenumber$ and $message$.
- Data field â This field is URL-encoded by the application/x-www-form-urlencoded system.
- Space â There are two types of URL encoding, which differ in the way that they treat spaces. The first (specified by RFC 1738) treats a space as just another illegal character in a URL and encodes it as %20. The second (when the application/x-www-form-urlencoded system is implemented) encodes a space as a + character and is used in order to build the query strings. The second option uses urlencode( ) and urldecode( ) functions that differ from their raw counterparts (RFC 1738) only in that they encode the spaces as plus signs (+) instead of as the sequence %20. Because the ISE uses the application/x-www-form-urlencoded system for the Data field encryption, a space is encrypted as a + character.
Here are two examples:


Here is an example of the URI for the GET HTTP request:

Guest Notification with Credentials Via Email
The user that creates guest accounts via the Sponsor portal has the option to send email notifications with credentials to that specific user:
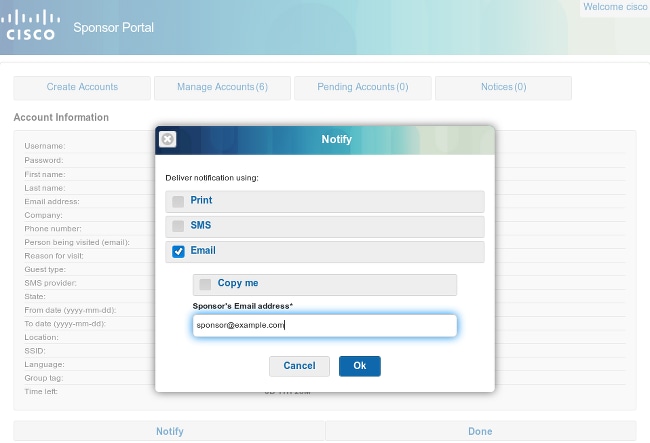
This email is sent to the guest email address through the previously configured SMTP relay. The sponsor can provide any email that is used as From. If the sponsor does not provide the guest email address during account creation, the ISE returns this Graphic User Interface (GUI) error:
Unable to send email.
The SMTP server policies decide whether to accept or drop such an email. For example, the server can be configured in order to accept emails only from the domain example.com.
Guest Notification with Credentials Via SMS
In order for this option to work, the sponsor must be in the sponsor group that has enabled the privilege:
Send SMS notifications with guests' credentials
The default sponsor group (ALL_ACCOUNTS) does have that privilege disabled. In order to change this, navigate to Guest Access > Configure > Sponsor Groups > ALL_ACCOUNTS:
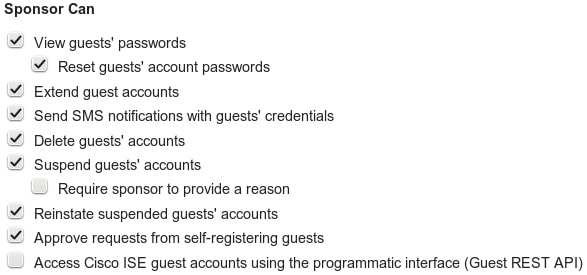
When you choose a notification via SMS, by default there is no option to choose a specific SMS provider, so a default one is used. In order to change this, you can customize the Sponsor portal.
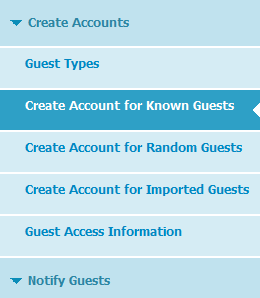
In order to customize the Sponsor portal, navigate to Guest Access > Configure > Sponsor Portals > Sponsor Portal. You can then choose the Portal Page Customization option and scroll down to Create Account for Known Guests:
Within the right pane, change the value from Previous to Settings and select the desired (multiple) SMS provider for that page:
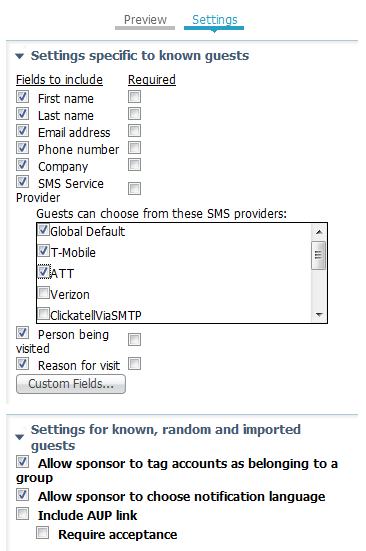
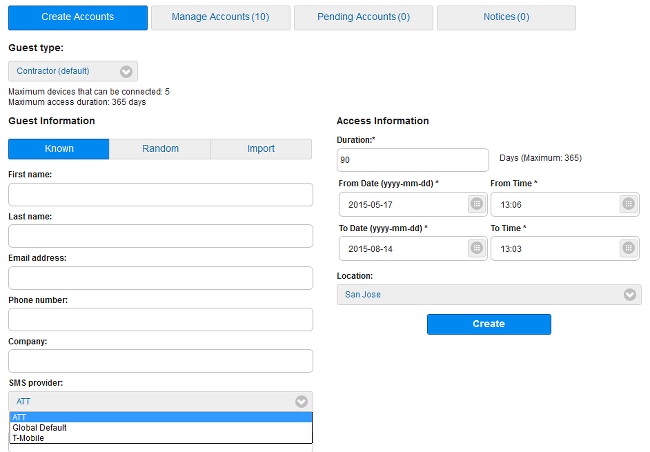
Once the Guest portal Create Account for Known Guest page is customized, the sponsor that uses the portal has the option to select an SMS provider during the creation of a guest account. This same provider is used for further SMS notifications:
When the SMS gateway is not reachable or returns an error, the ISE GUI sends a notification:
Unable to send SMS.
Guest Users (Self-Registered)
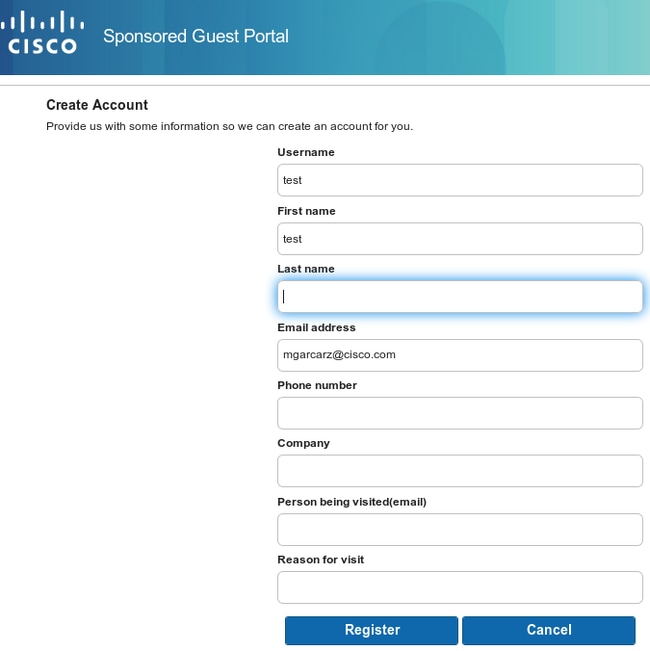
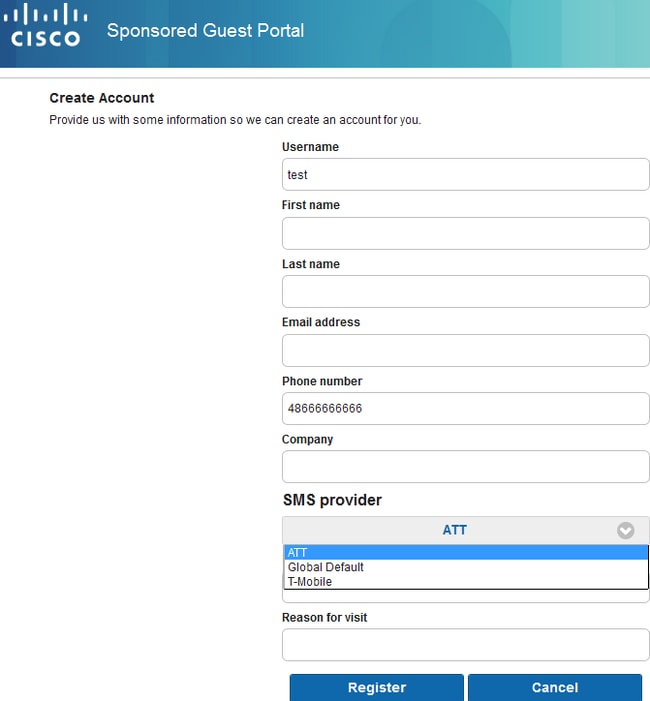
Guests accounts can be created automatically via the Self-Registered Guest portal. The guest users are able to create their own accounts:
They are provided (by default) with credentials on the same web page:
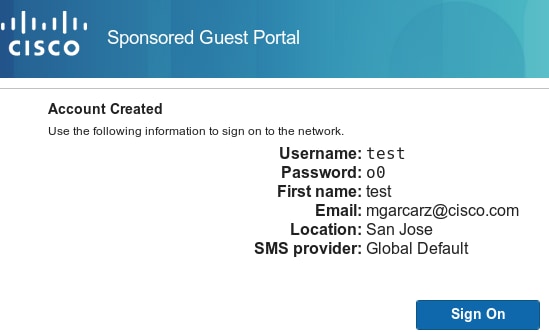
These credentials can also be delivered via email or SMS.
Navigate to Guest Access > Configure > Guest Portals > Self Registered Guest Portal > Self Registration Page Settings in order to allow multiple SMS gateways for specific self-registered guests:
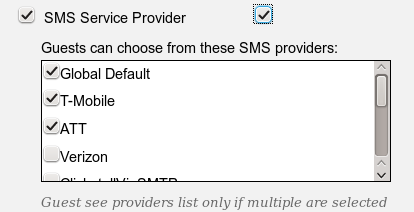
The guests are able to select an SMS provider during account creation. This is used in order to deliver credentials to their mobile phones:
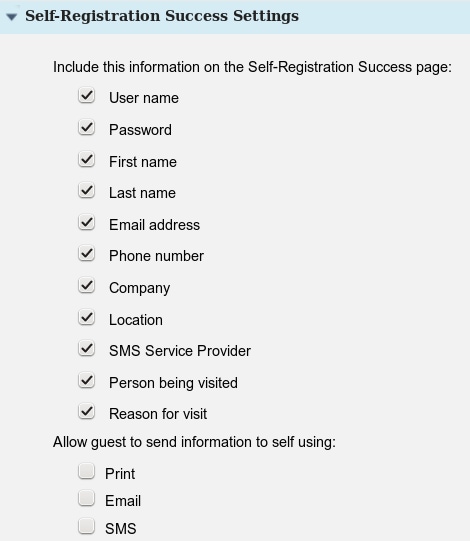
After registration is complete, a password is presented on the next page. If this is not desired, you can disable it from the Self Registration Success Page section of the portal. From the same page, you can also allow the guest to manually deliver the notification via email or SMS:
In order to automatically deliver the credentials via email or SMS (or both), customize the last section of the Self Registration Page Settings:

In this case, an email address and phone number must be input during guest account creation.
This is the only guest flow where notifications can be sent automatically (immediately after the user has registered). When the guest user account is created by a sponsor, this option is not available, and a notification is sent only after the sponsor manually clicks the Notification button.
Guest Approval Via Email
As described in the previous section, guests can register themselves and have an account automatically registered. However, it is also possible to enable sponsor approval for this process.
In this case, the sponsor receives an email that must be approved (a specific link in the email is clicked). Only then is the guest account activated. In order to configure this feature (by default it is disabled) navigate to Guest Access > Configure > Guest Portals > Self Registered Guest Portal > Self Registration Page Settings and enable the Require self-registered guests to be approved option:

You must also provide the email addresses of the sponsor(s) that are able to approve the guest account.
Here are some additional settings that can be configured from the Guest Email Settings page:
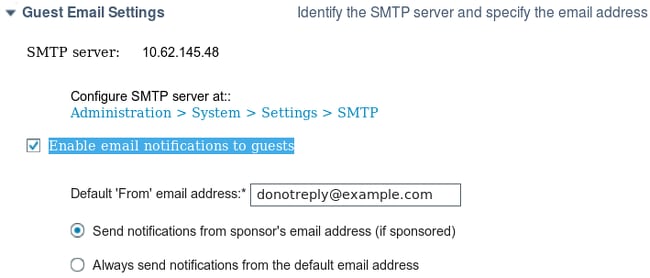
These settings apply to all types of guest notifications (not only sponsor-approved).
Guest Account Expiration Via Email/SMS
Guests users can be informed when the account is soon to expire. In order to configure this (per Guest Type), navigate to Guest Access > Guest Types > Contractor:
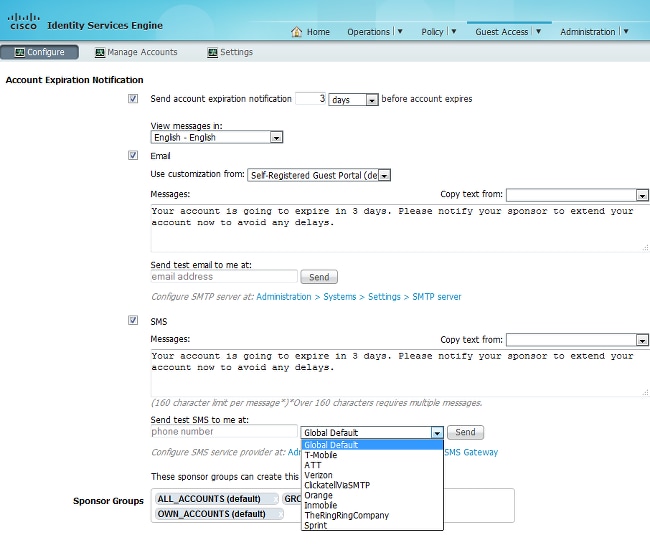
All of the guests that are contractors will receive a notification three days prior to the account expiration. This notification can be delivered via SMS and/or email. The SMS-specific provider can be selected and will be used for all of the guests (even if the specific guest is self-registered and is allowed to use a different SMS provider).
In the same section, there is a Send test email to me at option. This makes it possible to test the SMTP server availability and configuration. After you provide an email address, this email message is then delivered:

Alarms Delivered Via Email
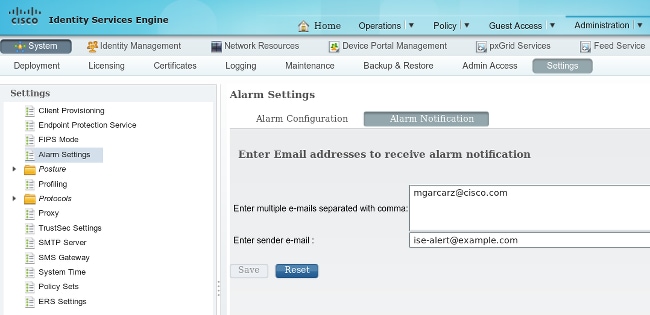
The ISE is able to send emails for detected system alerts. In order to enable this capability, navigate to Administration > System > Alarm Settings > Alarm Notification and provide the From and To email addresses:
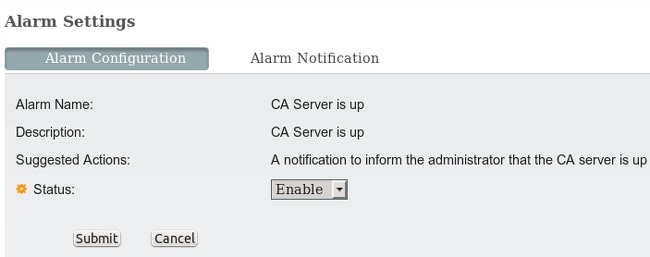
Ensure that a specific alarm is enabled from the Alarm Configuration section:
Once enabled and triggered, an email will be sent when the alarm is triggered. Here is an example of the typical alert that is sent:
ISE Alarm : Warning : No Accounting messages in the last 15 mins

No Accounting Start

Details :
No Accounting messages in the last 15 mins

Description :
No Accounting messages have been received from Network Device(s) in the past 15 minutes
 for any of the session(s) authorized by ISE Policy Service Nodes

Suggested Actions :
Ensure RADIUS accounting is configured on the Network Device(s), Check Network Device(s)
 configuration for local Authorization

*** This message is generated by Cisco Identity Services Engine (ISE) ***

Sent By Host : ise13
Send SMS Via REST API
The ISE allows the use of a guest REST API in order to create guest users. Once a guest user is created with the correct SMS provider, it is possible to send an SMS with the guest REST API. Here is an example:
PUT https://<ISE-ADMIN-NODE>:9060/ers/config/guestuser/sms/444/portalId/
 ff2d99e0-2101-11e4-b5cf-005056bf2f0a
Authorization: Basic xxxxxxxxxxxxxxxxxxx
Accept:a pplication/vnd.com.cisco.ise.identity.guestuser.2.0+xml
In this example, 444 is the guest user ID and the long string (ff2d99e0-2101-11e4-b5cf-005056bf2f0a) is the portal ID (sponsor portal).
Verify
There is currently no verification procedure available for this configuration.
Troubleshoot
There is currently no specific troubleshooting information available for this configuration.
Related Information
- Cisco Identity Services Engine Administrator Guide, Release 1.3
- Cisco Identity Services Engine Administrator Guide, Release 1.4 â Configure Guest Access
- Cisco Identity Services Engine API Reference Guide, Release 1.4 â Send an SMS Text to a Guest User
- Cisco Identity Services Engine Administrator Guide, Release 1.3 â SMS Gateway Settings
- Administer Cisco ISE
- Technical Support & Documentation - Cisco Systems
Revision History
| Revision | Publish Date | Comments |
|---|---|---|
1.0 |
03-Aug-2015 |
Initial Release |
Contact Cisco
- Open a Support Case

- (Requires a Cisco Service Contract)
 Feedback