Introduction
This document describes how to configure authorization policies in Cisco ISE to distinguish between different service set identifiers (SSIDs).
Requirements
This guide assumes that:
1) The Wireless LAN Controller (WLC) is set up and works for all SSIDs involved.
2) Authentication works on all SSIDs involved against ISE.
Wireless LAN Controller Release 7.3.101.0
Identify Services Engine Release 1.1.2.145
Earlier versions also have both of these features.
Only one configuration method is used at a time. If both configurations are implemented simultaneously, the amount processed by ISE increases and affects rule readability. This document reviews the advantages and disadvantages of each configuration method.
Background Information
It is very common for an organization to have multiple SSIDs in their wireless network for various purposes. One of the most common purposes is to have a corporate SSID for employees and a guest SSID for visitors to the organization.
Method 1: Airespace-Wlan-Id
Every Wireless Local Area Network (WLAN) created on the WLC has a WLAN ID. The WLAN ID is displayed on the WLAN summary page.

When a client connects to the SSID, the RADIUS request to ISE contains the Airespace-WLAN-ID attribute. This simple attribute is used to make policy decisions in ISE. One disadvantage to this attribute is if the WLAN ID does not match on a SSID spread across multiple controllers. If this describes your deployment, continue to Method 2.
In this case, Airespace-Wlan-Id is used as a condition. It can be used as a simple condition (by itself) or in a compound condition (in conjunction with another attribute) to achieve the desired result. This document covers both use cases. With the two SSIDs above, these two rules can be created.
A) Guest users must log in to the Guest SSID.
B) Corporate users must be in the Active Directory (AD) group "Domain Users" and must log in to the Corporate SSID.
Rule A
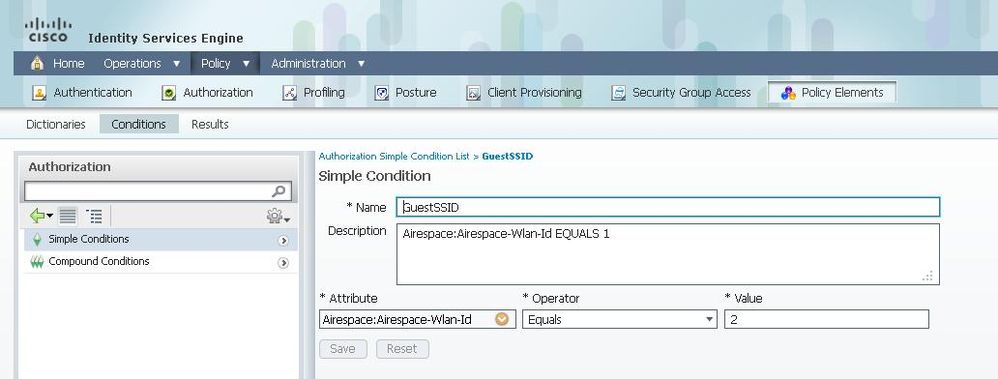
Rule A has just one requirement, so you can build a simple condition (based on the values above):
1) In ISE, go to Policy > Policy Elements > Conditions > Authorization > Simple Conditions and create a new condition.
2) In the Name field, enter a condition name.
3) In the Description field, enter a description (optional).
4) From the Attribute drop-down list, choose Airespace > Airespace-Wlan-Id--[1].
5) From the Operator drop-down list, choose Equals.
6) From the Value drop-down list, choose 2.
7) Click Save.
Rule B
Rule B has two requirements, so you can build a compound condition (based on the values above):
1) In ISE, go to Policy > Policy Elements > Conditions > Authorization > Compound Conditions and create a new condition.
2) In the Name field, enter a condition name.
3) In the Description field, enter a description (optional).
4) Choose Create New Condition (Advance Option).
5) From the Attribute drop-down list, choose Airespace > Airespace-Wlan-Id--[1].
6) From the Operator drop-down list, choose Equals.
7) From the Value drop-down list, choose 1.
Click the gear to the right and choose Add Attribute/Value.
9) From the Attribute drop-down list, choose AD1 > External Groups.
10) From the Operator drop-down list, choose Equals.
11) From the Value drop-down list, select the required group. In this example, it is set to Domain Users.
12) Click Save.


Note: Throughout this document we use simple Authorization Profiles configured under Policy > Policy Elements > Results > Authorization > Authorization Profiles. They are set to Permit Access, but can be adapted to fit your deployment's needs.
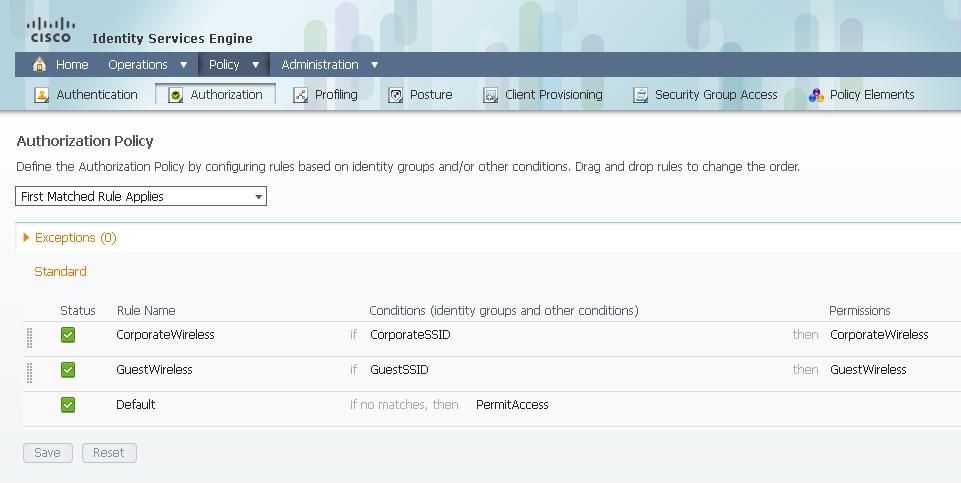
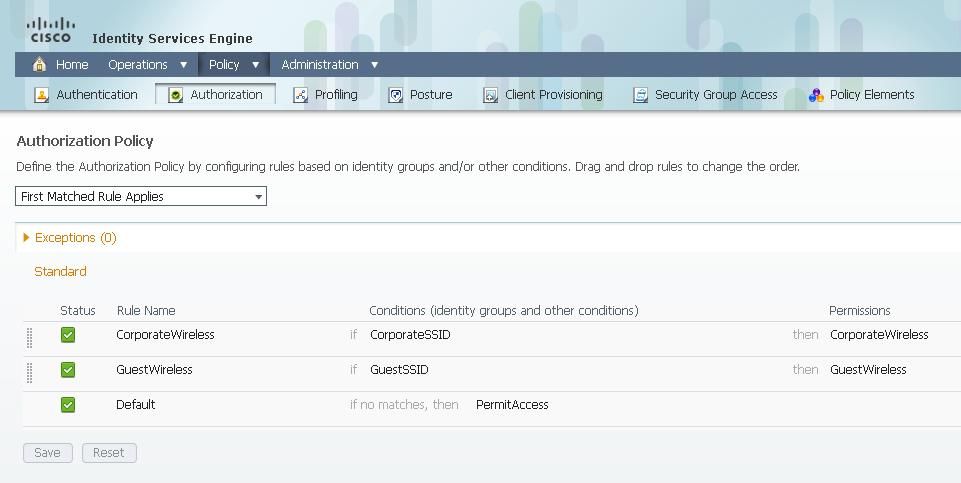
Now that we have the conditions, we can apply them to an Authorization Policy. Go to Policy > Authorization. Determine where to insert the rule in the list or edit your existing rule.
Guest Rule
1) Click the down arrow to the right of an existing rule and choose Insert a new rule.
2) Enter a name for your guest rule and leave the identity groups field set to Any.
3) Under Conditions, click the plus and click Select Existing Condition from Library.
4) Under Condition Name, choose Simple Condition > GuestSSID.
5) Under Permissions, choose the appropriate Authorization Profile for your Guest users.
6) Click Done.
Corporate Rule
1) Click the down arrow to the right of an existing rule and choose Insert a new rule.
2) Enter a name for your corporate rule and leave the identity groups field set to Any.
3) Under Conditions, click the plus and click Select Existing Condition from Library.
4) Under Condition Name, choose Compound Condition > CorporateSSID.
5) Under Permissions, choose the appropriate Authorization Profile for your Corporate users.
6) Click Done.

Note: Until you click Save at the bottom of the Policy List, no changes made on this screen is applied to your deployment.
Method 2: Called-Station-ID
The WLC can be configured to send the SSID name in the RADIUS Called-Station-ID attribute, which in turn can be used as a condition on ISE. The advantage of this attribute is that it can be used regardless of what the WLAN ID is set to on the WLC. By default, the WLC does not send the SSID in the Called-Station-ID attribute. To enable this feature on the WLC, go to Security > AAA > RADIUS > Authentication and set the Call Station ID Type to AP MAC Address:SSID. This sets the format of the Called-Station-ID to <MAC of the AP the user is connecting to>:<SSID Name>.

You can see what SSID Name is going to be sent from the WLAN summary page.

Since the Called-Station-Id attribute also contains the MAC address of the AP, a Regular Expression (REGEX) is used to match the SSID name in the ISE policy. The operator 'Matches' in the condition configuration can read a REGEX from the Value field.
REGEX Examples
`Starts with'—for example, use the REGEX value of ^(Acme).*—this condition is configured as CERTIFICATE:Organization MATCHES `Acme' (any match with a condition that starts with "Acme").
`Ends with'—for example, use the REGEX value of .*(mktg)$—this condition is configured as CERTIFICATE:Organization MATCHES `mktg' (any match with a condition that ends with "mktg").
`Contains'—for example, use the REGEX value of .*(1234).*—this condition is configured as CERTIFICATE:Organization MATCHES `1234' (any match with a condition that contains "1234", such as Eng1234, 1234Dev, and Corp1234Mktg).
`Does not start with'—for example, use the REGEX value of ^(?!LDAP).*—this condition is configured as CERTIFICATE:Organization MATCHES `LDAP' (any match with a condition that does not start with "LDAP", such as usLDAP or CorpLDAPmktg).
Called-Station-ID ends with the SSID name, so the REGEX to use in this example is .*(:<SSID NAME>)$. Keep this in mind as you go through the configuration.
With the two SSIDs above, you can create two rules with these requirements:
A) Guest users must log in to the Guest SSID.
B) Corporate users must be in the AD group "Domain Users" and must log in to the Corporate SSID.
Rule A
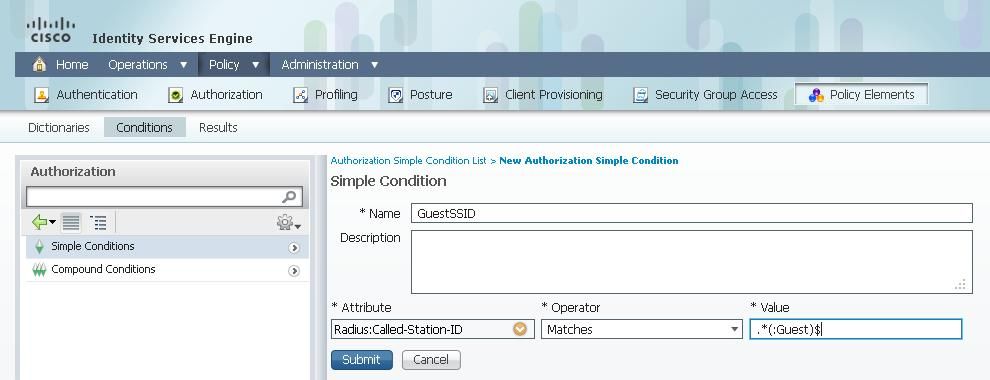
Rule A has just one requirement, so you can build a simple condition (based on the values above):
1) In ISE, go to Policy > Policy Elements > Conditions > Authorization > Simple Conditions and create a new condition.
2) In the Name field, enter a condition name.
3) In the Description field, enter a description (optional).
4) From the Attribute drop-down list, choose Radius > Called-Station-ID--[30].
5) From the Operator drop-down list, choose Matches.
6) From the Value drop-down list, choose .*(:Guest)$. This is case-sensitive.
7) Click Save.
Rule B
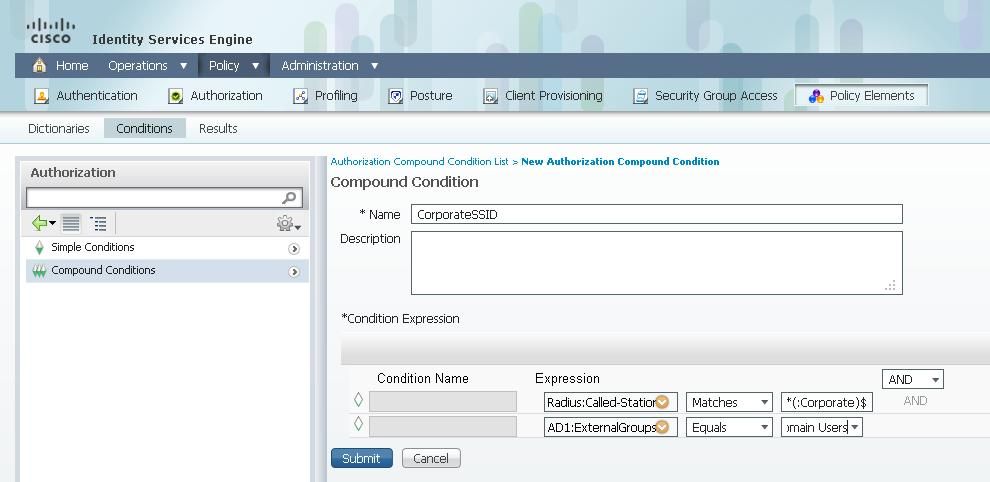
Rule B has two requirements, so you can build a compound condition (based on the values above):
1) In ISE, go to Policy > Policy Elements > Conditions > Authorization > Compound Conditions and create a new condition.
2) In the Name field, enter a condition name.
3) In the Description field, enter a description (optional).
4) Choose Create New Condition (Advance Option).
5) From the Attribute drop-down list, choose Radius > Called-Station-Id--[30].
6) From the Operator drop-down list, choose Matches.
7) From the Value drop-down list, choose .*(:Corporate)$. This is case-sensitive.
Click the gear to the right and choose Add Attribute/Value.
9) From the Attribute drop-down list, choose AD1 > External Groups.
10) From the Operator drop-down list, choose Equals.
11) From the Value drop-down list, select the required group. In this example, it is set to Domain Users.
12) Click Save.

Note: Throughout this document, we use simple Authorization Profiles configured under Policy > Policy Elements > Results > Authorization > Authorization Profiles. They are set to Permit Access, but can be adapted to fit your deployment's needs.
Now that the conditions are configured, apply them to an Authorization Policy. Go to Policy > Authorization. Insert the rule in the list in the appropriate location or edit an existing rule.
Guest Rule
1) Click the down arrow to the right of an existing rule and choose Insert a new rule.
2) Enter a name for your guest rule and leave the identity groups field set to Any.
3) Under Conditions, click the plus and click Select Existing Condition from Library.
4) Under Condition Name, choose Simple Condition > GuestSSID.
5) Under Permissions, choose the appropriate Authorization Profile for your Guest users.
6) Click Done.
Corporate Rule
1) Click the down arrow to the right of an existing rule and choose Insert a new rule.
2) Enter a name for your corporate rule and leave the identity groups field set to Any.
3) Under Conditions, click the plus and click Select Existing Condition from Library.
4) Under Condition Name, choose Compound Condition > CorporateSSID.
5) Under Permissions, choose the appropriate Authorization Profile for your Corporate users.
6) Click Done.
7) Click Save at the bottom of the Policy list.

Note: Until you click Save at the bottom of the Policy List, no changes made on this screen is applied to your deployment.
Troubleshoot
To find out if the policy was created properly and to make sure ISE is receiving the proper attributes, review the detailed authentication report for either a passed or failed authentication for the user. Choose Operations > Authentications and then click the Details icon for an authentication.

First, check the Authentication Summary. This shows the basics of the authentication which include what Authorization Profile was provided to the user.

If the policy is incorrect, the Authentication Details shows what Airespace-Wlan-Id and what Called-Station-Id was sent from the WLC. Adjust your rules accordingly. The Authorization Policy Matched Rule confirms whether or not the authentication is matching your intended rule.

These rules are commonly misconfigured. To reveal the configuration issue, match the rule against what is seen in the authentication details. If you do not see the attributes in the Other Attributes field, make sure the WLC is properly configured.


 Feedback