Cisco IOS/CCP - Configure DMVPN with Cisco CP
Available Languages
Contents
Introduction
This document provides a sample configuration for Dynamic Multipoint VPN (DMVPN) tunnel between hub and spoke routers using Cisco Configuration Professional (Cisco CP). Dynamic Multipoint VPN is a technology that integrates different concepts such as GRE, IPSec encryption, NHRP and Routing to provide a sophisticated solution that allows the end users to communicate effectively through the dynamically created spoke-to-spoke IPSec tunnels.
Prerequisites
Requirements
For best DMVPN functionality, it is recommended that you run Cisco IOS® Software Release 12.4 mainline,12.4T and later.
Components Used
The information in this document is based on these software and hardware versions:
-
Cisco IOS Router 3800 series with Software release 12.4 (22)
-
Cisco IOS Router 1800 series with Software release 12.3 (8)
-
Cisco Configuration Professional version 2.5
The information in this document was created from the devices in a specific lab environment. All of the devices used in this document started with a cleared (default) configuration. If your network is live, make sure that you understand the potential impact of any command.
Conventions
Refer to the Cisco Technical Tips Conventions for more information on document conventions.
Background Information
This document provides information how to configure a router as a spoke and another router as a hub using Cisco CP. Initially spoke configuration is shown, but later in the document, hub related configuration is also shown in detail to provide a better understanding. Other spokes can also be configured using the similar approach to connect to hub. Present scenario uses these parameters:
-
Hub Router Public Network - 209.165.201.0
-
Tunnel Network - 192.168.10.0
-
Routing Protocol Used - OSPF
Configure
In this section, you are presented with the information to configure the features described in this document.
Note: Use the Command Lookup Tool (registered customers only) to obtain more information on the commands used in this section.
Network Diagram
This document uses this network setup:
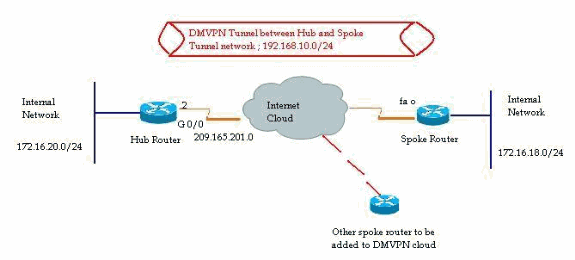
Spoke Configuration using Cisco CP
This section shows how to configure a router as a spoke using the step-by-step DMVPN wizard in the Cisco Configuration Professional.
-
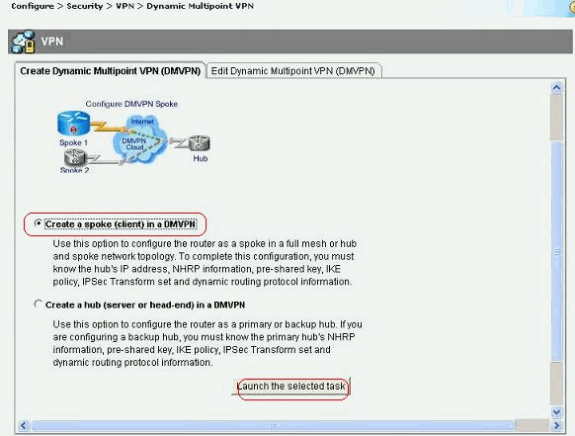
In order to start the Cisco CP application and launch the DMVPN wizard, go to Configure > Security > VPN > Dynamic Multipoint VPN. Then, select the Create a spoke in a DMVPN option and click Launch the selected task.
-
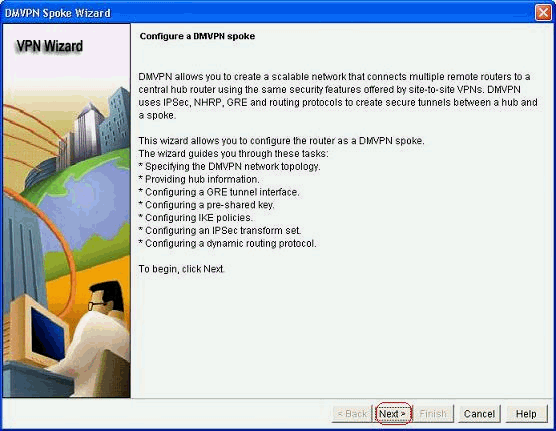
Click Next to begin.
-
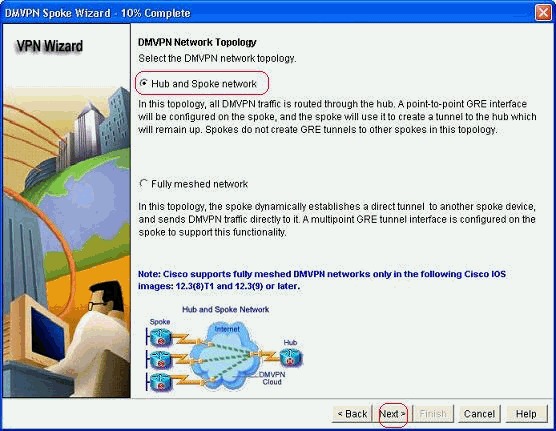
Select the Hub and Spoke network option and click Next.
-
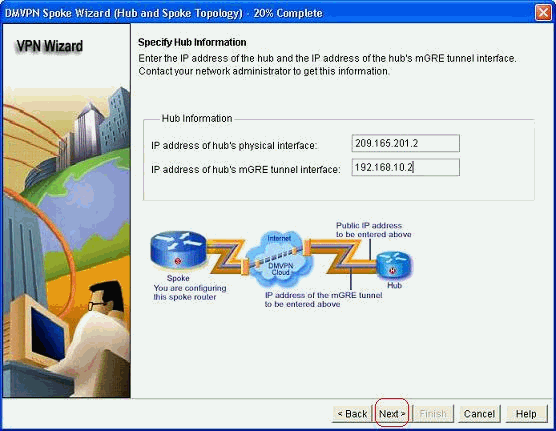
Specify the Hub related information, such as Hub router's public interface and Hub router's tunnel interface.
-
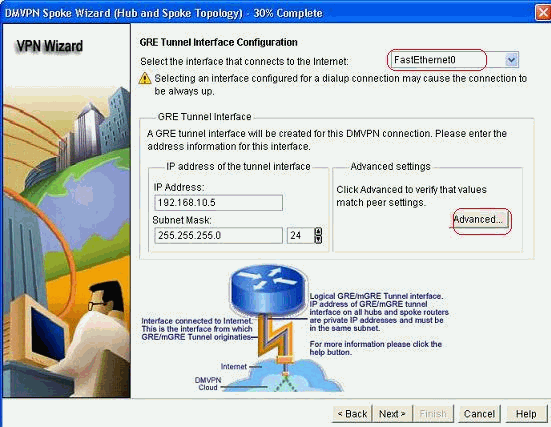
Specify the tunnel interface details of the spoke and the public interface of the spoke. Then, click Advanced.
-
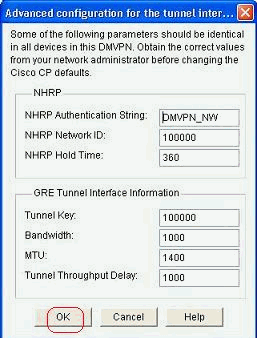
Verify the tunnel parameters and NHRP parameters, and make sure they match perfectly to the Hub parameters.
-
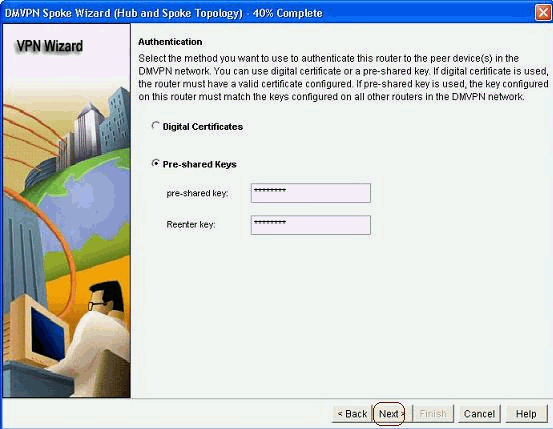
Specify the pre-shared key and click Next.
-
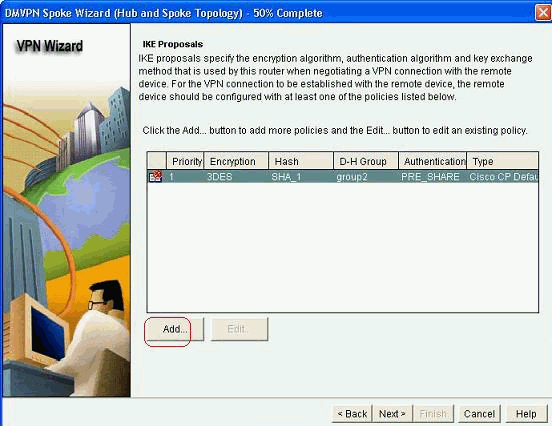
Click Add in order to add a separate IKE proposal.
-
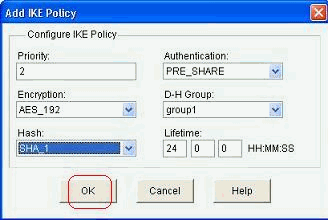
Specify the encryption, authentication and hash parameters. Then, click OK.
-
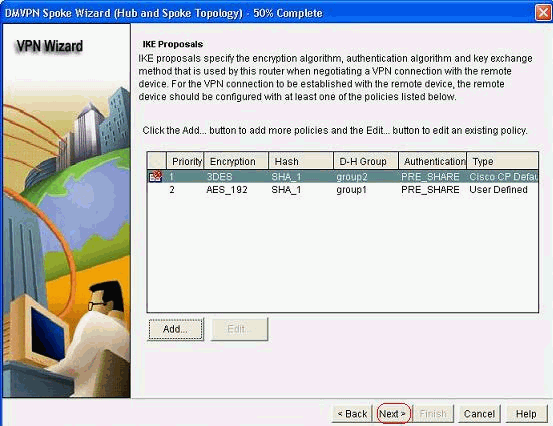
The newly created IKE policy can be seen here. Click Next.
-
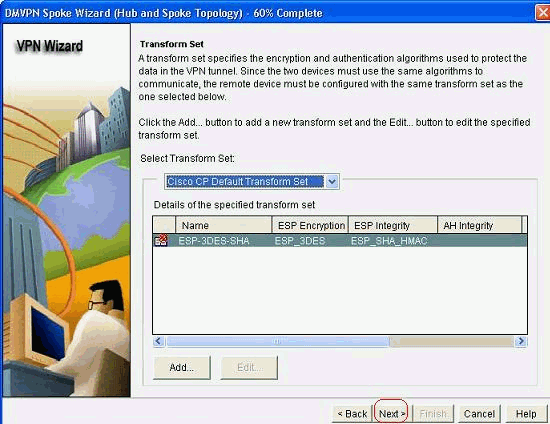
Click Next to continue with the Default Transform Set.
-
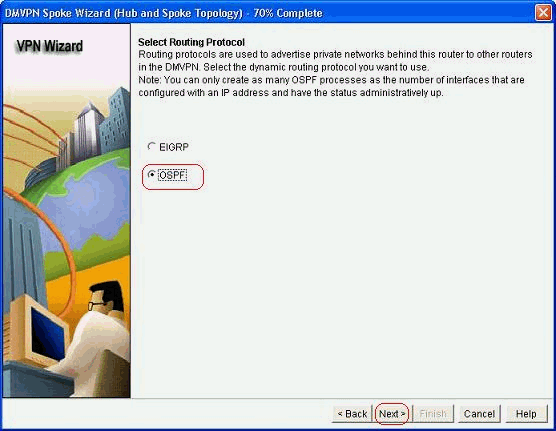
Select the required routing protocol. Here, OSPF is selected.
-
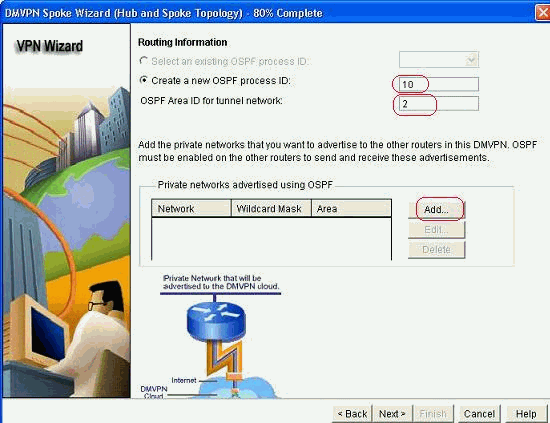
Specify the OSPF process ID and Area ID. Click Add in order to add the networks to be advertised by OSPF.
-
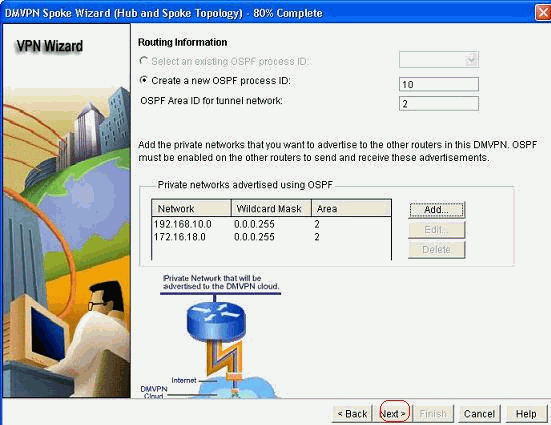
Add the tunnel network and click OK.

-
Add the private network behind the spoke router. Then, click Next.
-
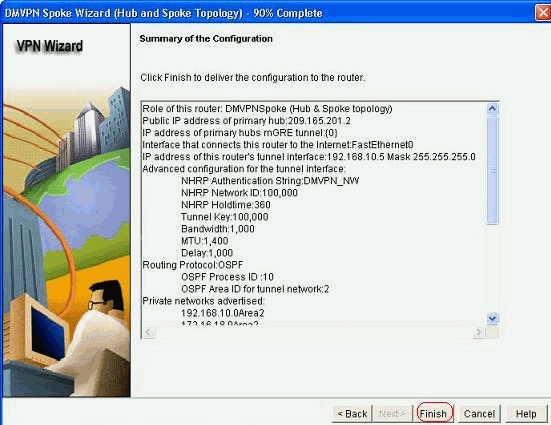
Click Finish to complete the wizard configuration.
-
Click Deliver to execute the commands. Check the Save running config to device's startup config check box if you want to save the configuration.
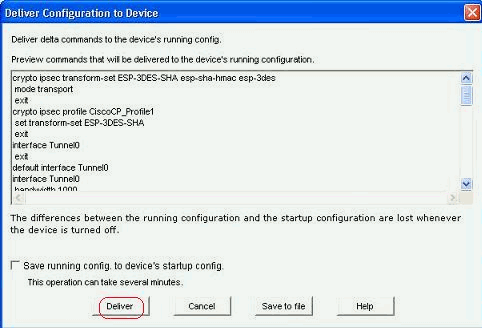
CLI Configuration for Spoke
The related CLI configuration is shown here:
| Spoke Router |
|---|
crypto ipsec transform-set ESP-3DES-SHA esp-sha-hmac esp-3des mode transport exit crypto ipsec profile CiscoCP_Profile1 set transform-set ESP-3DES-SHA exit interface Tunnel0 exit default interface Tunnel0 interface Tunnel0 bandwidth 1000 delay 1000 ip nhrp holdtime 360 ip nhrp network-id 100000 ip nhrp authentication DMVPN_NW ip ospf network point-to-multipoint ip mtu 1400 no shutdown ip address 192.168.10.5 255.255.255.0 ip tcp adjust-mss 1360 ip nhrp nhs 192.168.10.2 ip nhrp map 192.168.10.2 209.165.201.2 tunnel source FastEthernet0 tunnel destination 209.165.201.2 tunnel protection ipsec profile CiscoCP_Profile1 tunnel key 100000 exit router ospf 10 network 192.168.10.0 0.0.0.255 area 2 network 172.16.18.0 0.0.0.255 area 2 exit crypto isakmp key ******** address 209.165.201.2 crypto isakmp policy 2 authentication pre-share encr aes 192 hash sha group 1 lifetime 86400 exit crypto isakmp policy 1 authentication pre-share encr 3des hash sha group 2 lifetime 86400 exit |
Hub Configuration using Cisco CP
A step-by-step approach on how to configure the hub router for the DMVPN is shown in this section.
-
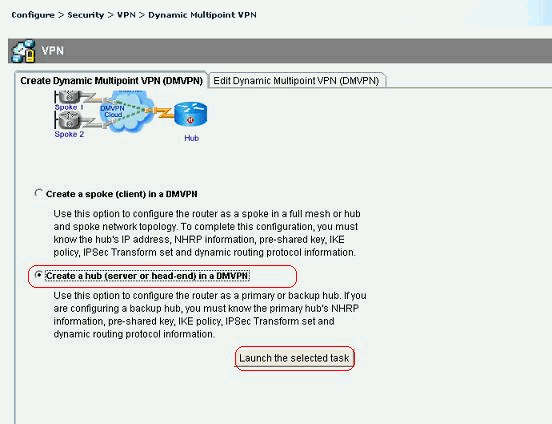
Go to Configure > Security > VPN > Dynamic Multipoint VPN and select the Create a hub in a DMVPN option. The, click Launch the selected task.
-
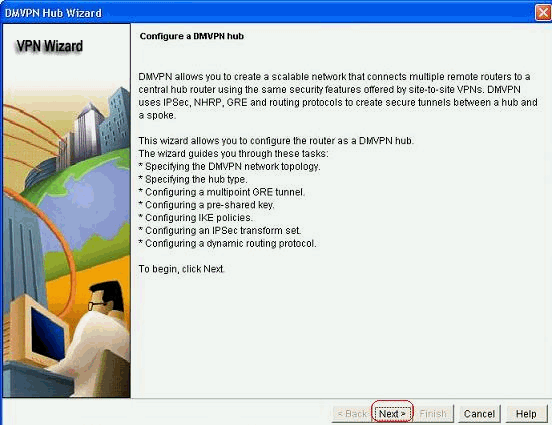
Click Next.
-
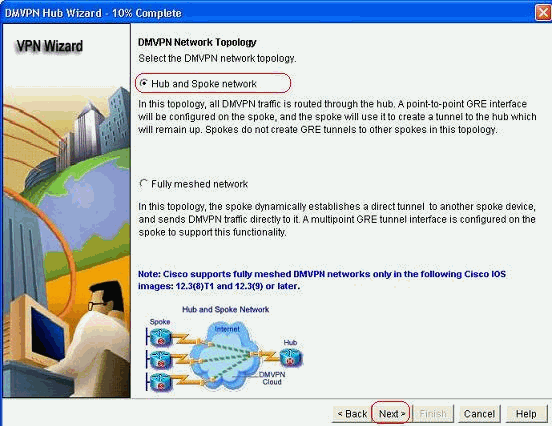
Select the Hub and Spoke network option and click Next.
-
Select Primary Hub. Then, click Next.

-
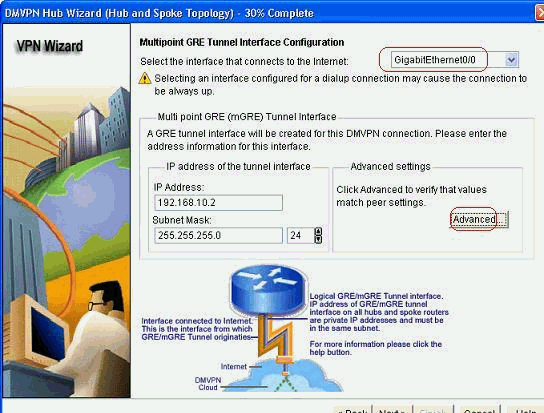
Specify the Tunnel interface parameters and click Advanced.
-
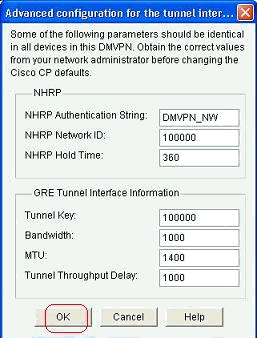
Specify the Tunnel parameters and NHRP parameters. Then, click OK.
-
Specify the option based on your network setup.

-
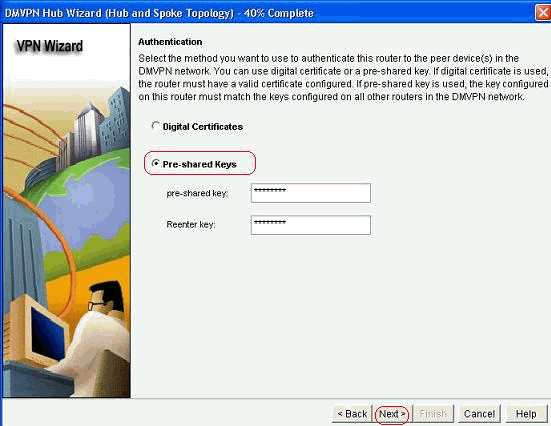
Select Pre-shared Keys and specify the pre-shared keys. Then, click Next.
-
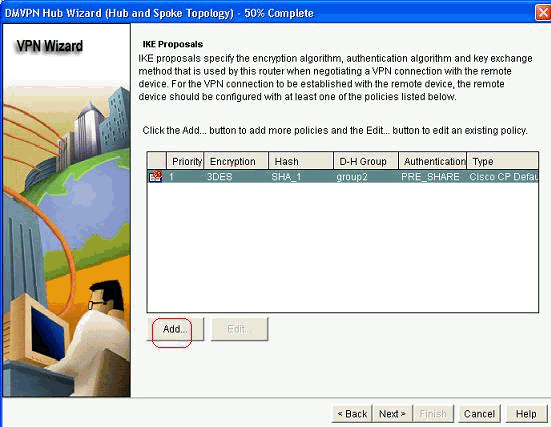
Click Add in order to add a separate IKE proposal.
-
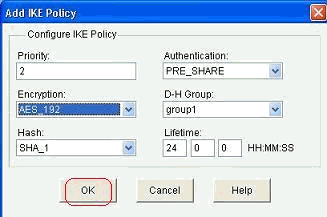
Specify the encryption, authentication and hash parameters. Then, click OK.
-
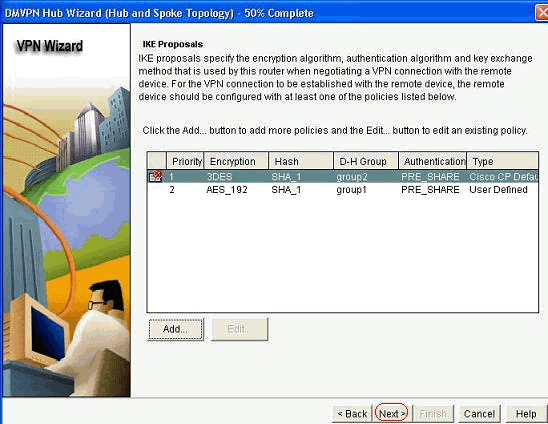
The newly created IKE policy can be seen here. Click Next.
-
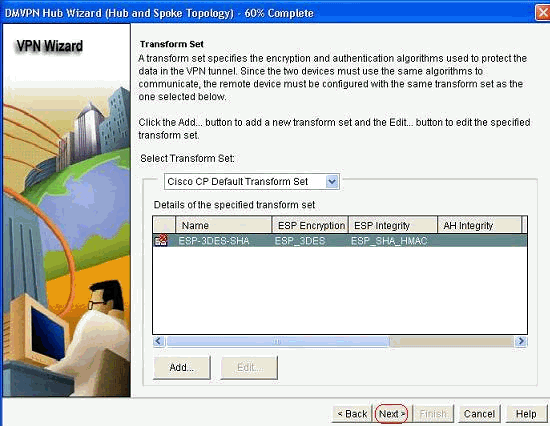
Click Next to continue with the Default Transform Set.
-
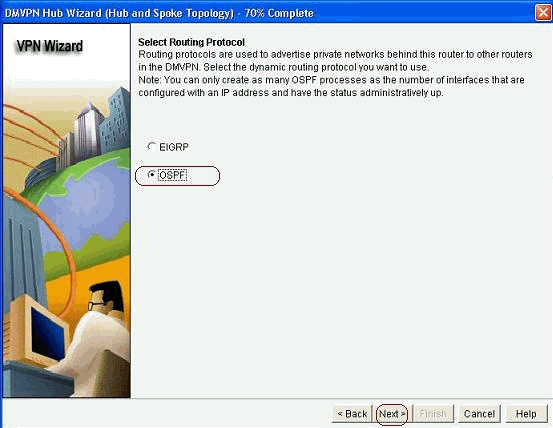
Select the required routing protocol. Here, OSPF is selected.
-
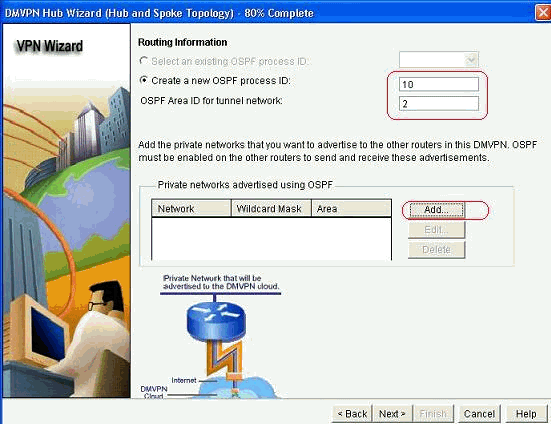
Specify the OSPF process ID and Area ID. Click Add in order to add the networks to be advertised by OSPF.
-
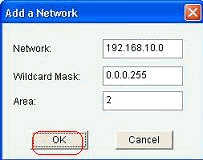
Add the tunnel network and click OK.
-
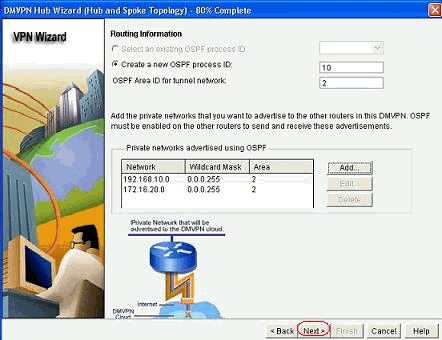
Add the private network behind the Hub router and click Next.
-
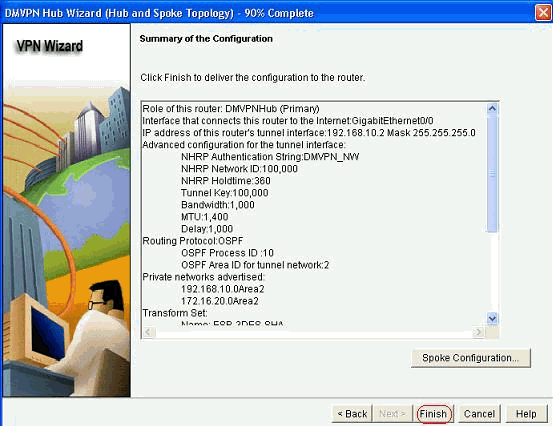
Click Finish to complete the wizard configuration.
-
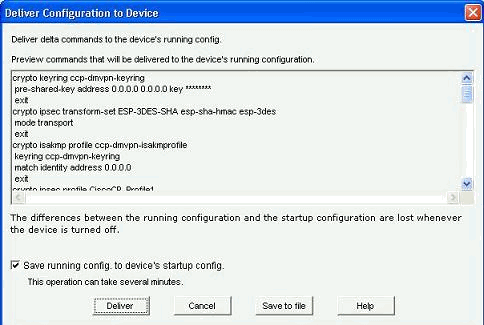
Click Deliver to execute the commands.
CLI Configuration for Hub
Related CLI configuration is shown here:
| Hub Router |
|---|
! crypto isakmp policy 1 encr 3des authentication pre-share group 2 ! crypto isakmp policy 2 encr aes 192 authentication pre-share crypto isakmp key abcd123 address 0.0.0.0 0.0.0.0 ! crypto ipsec transform-set ESP-3DES-SHA esp-3des esp-sha-hmac mode transport ! crypto ipsec profile CiscoCP_Profile1 set transform-set ESP-3DES-SHA ! interface Tunnel0 bandwidth 1000 ip address 192.168.10.2 255.255.255.0 no ip redirects ip mtu 1400 ip nhrp authentication DMVPN_NW ip nhrp map multicast dynamic ip nhrp network-id 100000 ip nhrp holdtime 360 ip tcp adjust-mss 1360 ip ospf network point-to-multipoint delay 1000 tunnel source GigabitEthernet0/0 tunnel mode gre multipoint tunnel key 100000 tunnel protection ipsec profile CiscoCP_Profile1 ! router ospf 10 log-adjacency-changes network 172.16.20.0 0.0.0.255 area 2 network 192.168.10.0 0.0.0.255 area 2 ! |
Edit the DMVPN Configuration using CCP
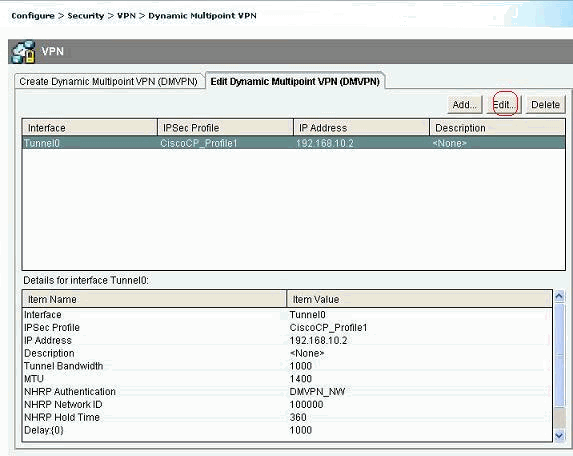
You can edit the existing DMVPN tunnel parameters manually when you select the tunnel interface and click Edit.
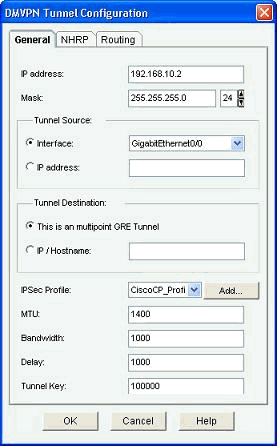
Tunnel interface parameters such as MTU and Tunnel key, are modified under the General tab.
-
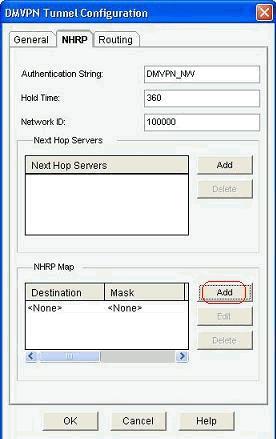
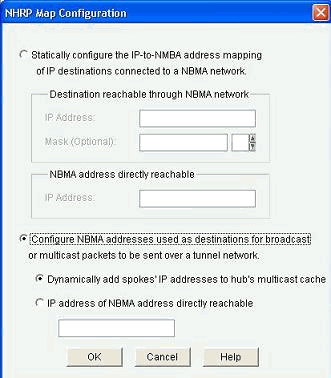
NHRP related parameters are found and modified as per the requirement under the NHRP tab. For a spoke router, you should be able to view the NHS as the Hub router's IP address. Click Add in the NHRP Map section in order to add the NHRP mapping.
-
Depending on the network setup, NHRP mapping parameters can be configured as shown here:
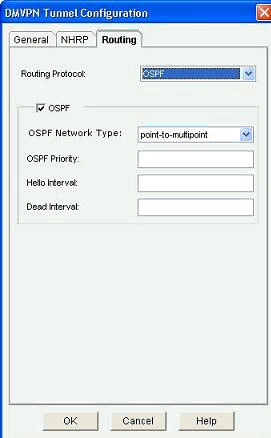
The routing related parameters are viewed and modified under the Routing tab.
More Information
The DMVPN tunnels are configured in these two ways:
-
Spoke-to-Spoke Communication through the Hub
-
Spoke-to-Spoke Communication without the Hub
In this document, only the first method is discussed. In order to allow the establishment of spoke-to-spoke dynamic IPSec tunnels, this approach is used to add the spoke to the DMVPN cloud:
-
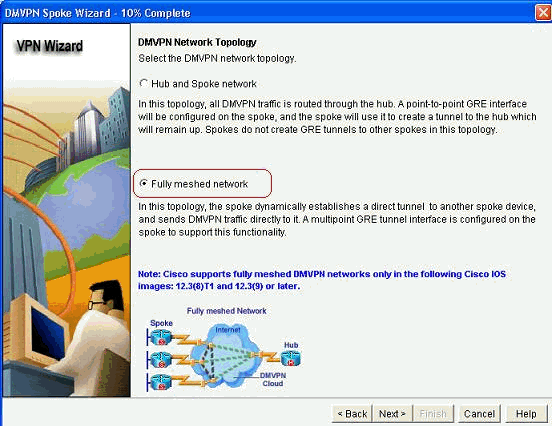
Launch the DMVPN wizard and select the Spoke configuration option.
-
From the DMVPN Network Topology window, select the Full meshed network option instead of the Hub and Spoke network option.
-
Complete the rest of the configuration using the same steps as the other configurations in this document.
Verify
There is currently no verification procedure available for this configuration.
Related Information
Revision History
| Revision | Publish Date | Comments |
|---|---|---|
1.0 |
27-Sep-2011 |
Initial Release |
Contact Cisco
- Open a Support Case

- (Requires a Cisco Service Contract)


 Feedback