NGFW Services Module TLS Abort Errors Due to Handshake Failure or Certificate Validation Error
Available Languages
Download Options
Bias-Free Language
The documentation set for this product strives to use bias-free language. For the purposes of this documentation set, bias-free is defined as language that does not imply discrimination based on age, disability, gender, racial identity, ethnic identity, sexual orientation, socioeconomic status, and intersectionality. Exceptions may be present in the documentation due to language that is hardcoded in the user interfaces of the product software, language used based on RFP documentation, or language that is used by a referenced third-party product. Learn more about how Cisco is using Inclusive Language.
Contents
Introduction
This document describes how to troubleshoot a particular problem with access to HTTPS-based websites through the Cisco Next-Generation Firewall (NGFW) services module with decryption enabled.
Prerequisites
Requirements
Cisco recommends that you have knowledge of these topics:
- Secure Sockets Layer (SSL) handshake procedures
- SSL certificates
Components Used
The information in this document is based on the Cisco NGFW services module with Cisco Prime Security Manager (PRSM) Version 9.2.1.2(52).
The information in this document was created from the devices in a specific lab environment. All of the devices used in this document started with a cleared (default) configuration. If your network is live, make sure that you understand the potential impact of any command.
Background Information
Decryption is a feature that enables the NGFW services module to decrypt SSL-encrypted flows (and inspect the conversation that is otherwise encrypted) and enforce policies on the traffic. In order to configure this feature, administrators must configure a decryption certificate on the NGFW module, which is presented to the client access HTTPS-based websites in place of the original server certificate.
In order for decryption to work, the NGFW module must trust the server-presented certificate. This document explains the scenarios when the SSL handshake fails between the NGFW services module and the server, which causes certain HTTPS-based websites to fail when you attempt to reach them.
For the purpose of this document, these policies are defined on the NGFW services module with PRSM:
- Identity policies: There are no defined identity policies.
- Decryption policies: The Decrypt-All policy uses this configuration:

- Access policies: There are no defined access policies.
- Decryption settings: This document assumes that a Decryption certificate is configured on the NGFW services module and that the clients trust it.
When a decryption policy is defined on the NGFW services module and is configured as previously described, the NGFW services module tries to intercept all of the SSL-encrypted traffic through the module and decrypt.
Note: A step-by-step explanation of this process is available in the Decrypted Traffic Flow section of the User Guide for ASA CX and Cisco Prime Security Manager 9.2.
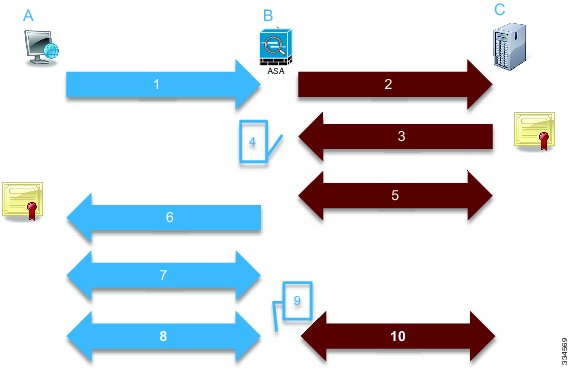
This image depicts the sequence of events:

In this image, A is the client, B is the NGFW services module, and C is the HTTPS server. For the examples provided in this document, the HTTPS-based server is a Cisco Adaptive Security Device Manager (ASDM) on a Cisco Adaptive Security Appliance (ASA).
There are two important factors about this process that you should consider:
- In the second step of the process, the server must accept one of the SSL cipher suites that are presented by the NGFW services module.
- In the fourth step of the process, the NGFW services module must trust the certificate that is presented by the server.
Problem
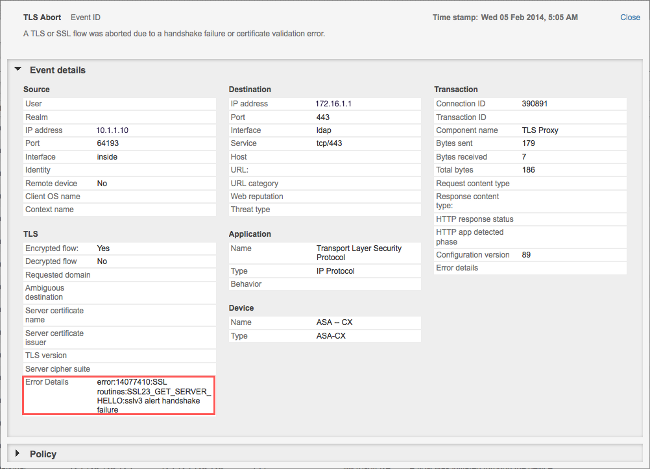
If the server cannot accept any of the SSL ciphers that are presented by the NFGW services module, you receive an error message similar to this:

It is important to take note of the Error Details information (highlighted), which shows:
error:14077410:SSL routines:SSL23_GET_SERVER_HELLO:sslv3 alert handshake failure
When you view the /var/log/cisco/tls_proxy.log file in the module diagnostics archive, these error messages appear:
2014-02-05 05:21:42,189 INFO  TLS_Proxy   - SSL alert message received from
 server (0x228 = "fatal : handshake failure") in Session: x2fd1f6

2014-02-05 05:21:42,189 ERROR TLS_Proxy   - TLS problem (error:14077410:
 SSL routines:SSL23_GET_SERVER_HELLO:sslv3 alert handshake failure) while
 connecting to server for Session: x2fd1f6
Solution
One possible cause for this problem is that a Triple Data Encryption Standard/Advanced Encryption Standard (3DES/AES) license (often referred to as K9) is not installed on the module. You can download the K9 license for the module without charge and upload it via PRSM.
If the problem persists after you install the 3DES/AES license, then obtain packet captures for the SSL handshake between the NGFW services module and the server, and contact the server administrator in order to enable the appropriate SSL cipher(s) on the server.
Problem
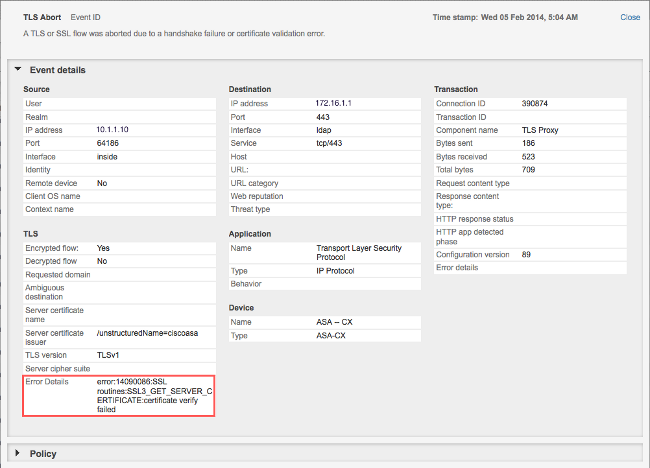
If the NGFW services module does not trust the certificate that is presented by the server, then you receive an error message similar to this:

It is important to take note of the Error Details information (highlighted), which shows:
error:14090086:SSL routines:SSL3_GET_SERVER_CERTIFICATE:certificate verify failed
When you view the /var/log/cisco/tls_proxy.log file in the module diagnostics archive, these error messages appear:
2014-02-05 05:22:11,505 INFO  TLS_Proxy - Certificate verification failure:
 self signed certificate (code 18, depth 0)

2014-02-05 05:22:11,505 INFO  TLS_Proxy - Subject: /unstructuredName=ciscoasa

2014-02-05 05:22:11,505 INFO  TLS_Proxy - Issuer: /unstructuredName=ciscoasa

2014-02-05 05:22:11,505 INFO  TLS_Proxy - SSL alert message received from
 server (0x230 = "fatal : unknown CA") in Session: x148a696e

2014-02-05 05:22:11,505 ERROR TLS_Proxy - TLS problem (error:14090086:
 SSL routines:SSL3_GET_SERVER_CERTIFICATE:certificate verify failed) while
 connecting to server for Session: x148a696e
Solution
If the module is unable to trust the server SSL certificate, you must import the server certificate into the module with PRSM in order to ensure that the SSL handshake process is successful.
Complete these steps in order to import the server certificate:
- Bypass the NGFW services module when you access the server in order to download the certificate via a browser. One way to bypass the module is to create a decryption policy that does not decrypt traffic to that particular server. This video shows you how to create the policy:
These are the steps that are shown in the video:
- In order to access the PRSM on the CX, navigate to https://<IP_ADDRESS_OF_PRSM>. This example uses https://10.106.44.101.
- Navigate to Configurations > Policies/Settings > Decryption policies in the PRSM.
- Click the icon that is located near the top-left corner of the screen and choose the Add above policy option in order to add a policy to the top of the list.
- Name the policy, leave the Source as Any, and create a CX Network group object.
Note: Remember to include the IP address of the HTTPS-based server. In this example, an IP address of 172.16.1.1 is used.
- Choose Do not decrypt for the Action.
- Save the policy and commit the changes.
- In order to access the PRSM on the CX, navigate to https://<IP_ADDRESS_OF_PRSM>. This example uses https://10.106.44.101.
- Download the server certificate through a browser and upload it to the NGFW services module via PRSM, as shown in this video:
These are the steps that are shown in the video:- Once the previously-mentioned policy is defined, use a browser in order to navigate to the HTTPS-based server that opens through the NGFW services module.
Note: In this example, Mozilla Firefox Version 26.0 is used in order to navigate to the server (an ASDM on an ASA) with the URL https://172.16.1.1.
- Accept the security warning if one pops up and add a Security exception.
- Click the small lock-shaped icon located to the left of the address bar. The location of this icon varies based on the browser that is used and the version.
- Click the View Certificate button and then the Export button under the Details tab after you select the server certificate.
- Save the certificate on your personal machine at a location of your choice.
- Log into the PRSM and browse to Configurations > Certificates.
- Click I want to... > Import certificate and chose the previously-downloaded server certificate (from Step 4).
- Save and commit the changes. Once complete, the NGFW services module should trust the certificate that is presented by the server.
- Once the previously-mentioned policy is defined, use a browser in order to navigate to the HTTPS-based server that opens through the NGFW services module.
- Remove the policy that was added in Step 1. The NGFW services module is now able to complete the handshake successfully with the server.
Related Information
Contributed by Cisco Engineers
- Prapanch RamamoorthyCisco TAC Engineer
Contact Cisco
- Open a Support Case

- (Requires a Cisco Service Contract)
 Feedback