Quick start Guide - Catalyst SD-WAN Simplified Configuration and Policies
Available Languages
Download Options
Bias-Free Language
The documentation set for this product strives to use bias-free language. For the purposes of this documentation set, bias-free is defined as language that does not imply discrimination based on age, disability, gender, racial identity, ethnic identity, sexual orientation, socioeconomic status, and intersectionality. Exceptions may be present in the documentation due to language that is hardcoded in the user interfaces of the product software, language used based on RFP documentation, or language that is used by a referenced third-party product. Learn more about how Cisco is using Inclusive Language.
Contents
Introduction
This document is a Quick start guide for Simplified configuration and policies in Catalyst SD-WAN.
Summary
With Cisco Catalyst SD-WAN Software Release 20.12/17.12, it is recommended that users start migration from traditional configuration based on device and feature templates, to the new configuration approach based on Configuration Groups and Policy Groups. In this document, important details for the new configuration approach are described.
The main goal of this document is to serve as a guide for starting with using new constructs for Configuration, Policies and Onboarding, with the 20.12 golden release. The document does not cover explanations of individual features.
New Deployments
To successfully utilize the new configuration approach, you need to execute these steps:
- Network: Define the Network Hierarchy and System Constructs
- Configuration: Create Configuration with Configuration Groups using Workflow
- Applications: Define Custom Applications, if required, using the Application Catalog
- Policies: Create Policies using Policy Groups
- Topology: Define Topology
- Onboard: Onboard and Tag devices
- Deploy: Associate and Deploy Configuration Groups and Policy Groups. Activate Topology.
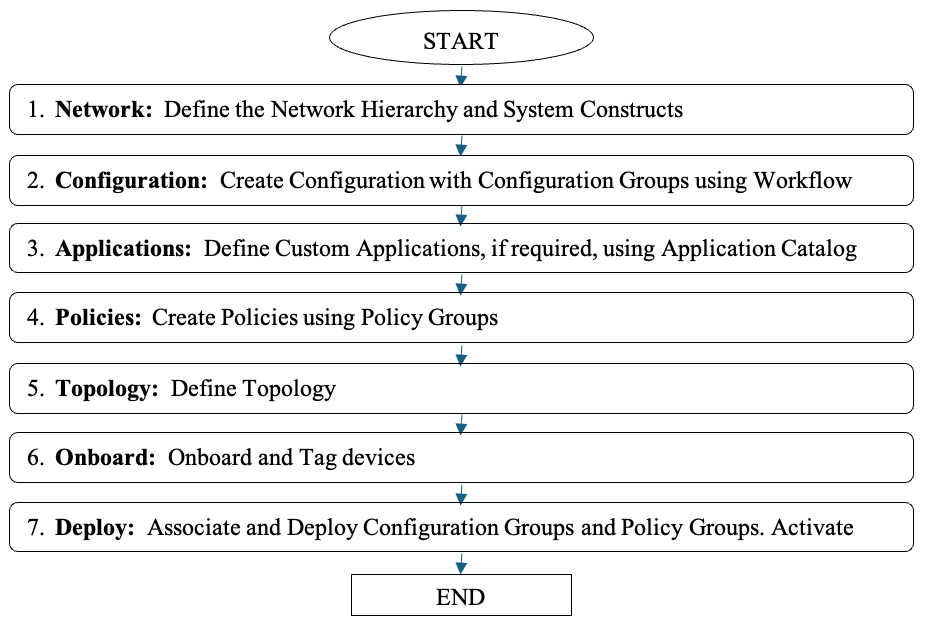 Flowchart for New Deployments
Existing Deployments
- Execute the steps mentioned in the Existing Deployments section
- Use the Conversion tool to convert existing configuration/policies to new Configuration/Policies
Enhancements to User Experience and Operational Simplification
Cisco Catalyst SD-WAN offers an enhanced User Experience and simplifies Operations.
- Common UI: A new UX framework has been introduced in Catalyst SD-WAN Manager and other Cisco products, to be about consistency in the User eXperience and providing a common look and feel across products.
- Configuration: Simplified configuration and policy creation & deployment with intuitive intent-based workflows and the use of Cisco-recommended smart defaults.
- Monitoring: Rich insights into network and application performance & health with new widgets and customizable & enhanced dashboards.
- Troubleshooting: Dynamic site & network topology views, context-based troubleshooting tools access, Reports on network & application performance on a scheduled basis.
Benefits
|
Ease of use |
Intuitive and Guided workflows |
|
Configuration sprawl |
Reduced sprawl (model agnostic, re-use, structure) |
|
Configuration creation |
Quicker and easier with smart defaults |
|
Configuration modification |
Modify now, deploy selectively later |
|
Visibility |
New dashboards, Apps/Sites performance monitoring |
|
Troubleshooting guidance |
Site Topology, Troubleshooting tools guidance |
Define your Network Hierarchy and System Constructs
Network Hierarchy
Provides a notion of ‘hierarchy’, that is, Sites, Regions and Areas, for the network. You can create this based on your network.
Example:
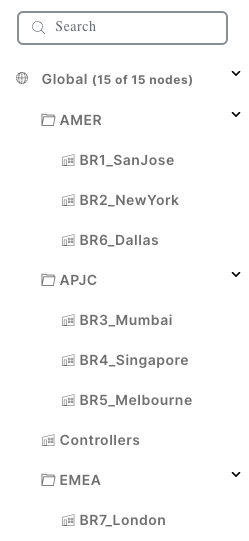 Network Hierarchy Manager (NHM)
This helps to define user-friendly site names which helps to achieve operational simplification.
System Constructs
These pools automate System-IP and Site-ID assignments during device configuration deployment.
You can define the IP pool for System-IP auto assignments. Site ID is assigned from the Global_Site pool.
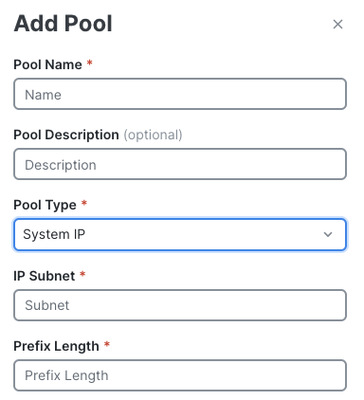 Add Pool Parameters
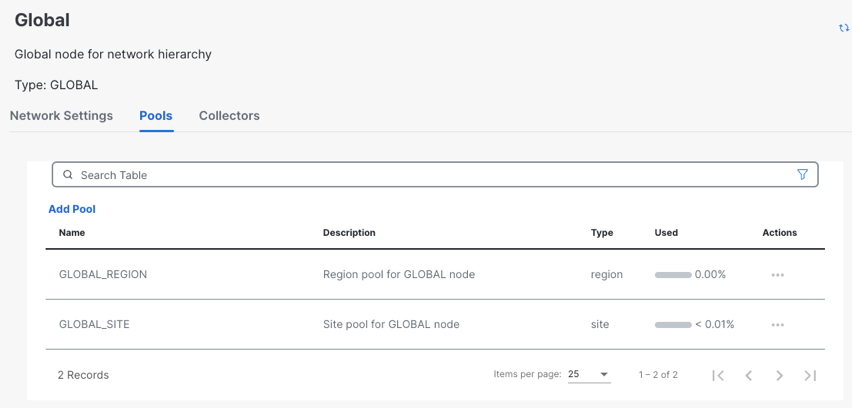 View and Manage Pools
Workflows
A workflow is a collection of guided steps to help you perform a certain task easily.
- The goal of a workflow is to help Novice users easily create configurations and deploy them to the device.
- Most of the configuration knobs/settings are set to Cisco-recommended smart defaults.
- Users need to specify a few configurations only.
- Advanced configuration knobs are available outside of the workflow, where the configuration group can be manually edited.
A Workflow Library lists all the available workflows.
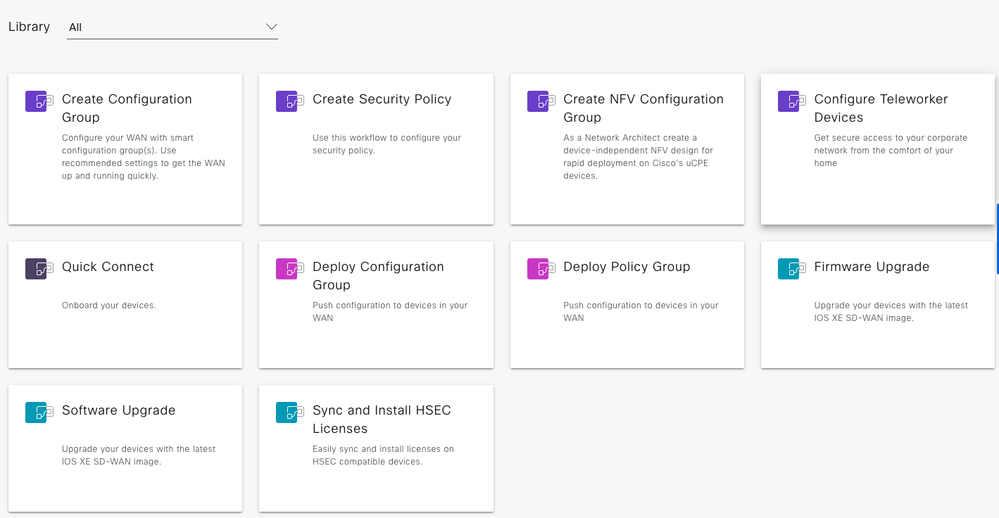 Workflow Library
Configuration Groups
Configuration Groups is a fresh approach to fabric configuration that is based on principles of simplicity, re-usability and structure.
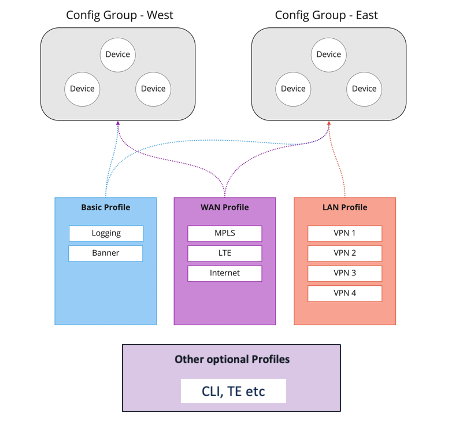 Configuration Groups Structure
Configuration Groups
- Logical grouping of devices that share a common purpose within the WAN.
- The user defines and can customize this grouping based on their business needs.
For example; East/West, Americas/APJC/EMEAR, Retail Store/Distribution Centre
Feature Profiles
- Flexible “buckets” of configuration that can be shared across Configuration Groups.
- Create Feature Profiles based on features that are required
- Put profiles together to complete device configuration, like building blocks
- Build, save, and reuse
For example; Basic Profile, WAN Profile, LAN Profile
Configuration Group Deployment Examples
Note:
- Configuration Groups are Device Model Agnostic
- Feature Profiles can be shared across Configuration Groups
Use-case 1: Government Customer
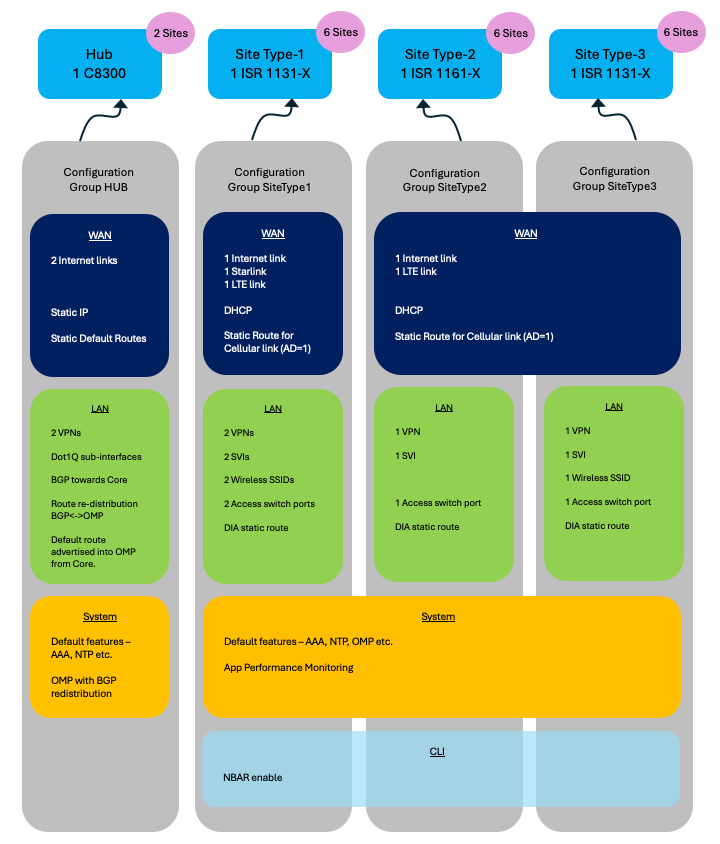 Example Usecase 1 - Configuration Groups
Configuration Group HUB
Execute the Create Configuration Group Workflow.
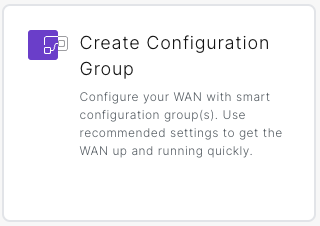 Create Configuration Group Workflow Option
WAN profile
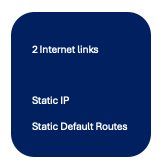 Example Usecase 1 - WAN Profile 1
Using the workflow, the complete WAN profile configuration for this use case, can be generated.
Entities like actual Static IP, Static Default route IP/subnet/Next-Hop and so on, can be specified as Global or Device-specific.
The device-specific option can be specified with actual values during deployment of the Configuration-group to the devices.
LAN profile
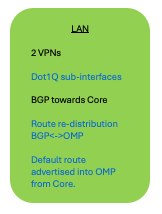 Example Usecase 1 - LAN Profile 1
Using the workflow, most of the LAN profile configuration for this use-case, can be generated.
- 2 VPNs
- BGP routing in each of the VPNs (AS number, network prefixes, neighbors)
Entities like actual Dot1Q sub-interfaces and any other entity marked as Device-specific, can be specified with actual values during deployment of the Configuration-group to the devices.
|
NOTE: Advanced configuration like Route re-distribution and Default route advertisement must be configured post the workflow, by manually editing the Configuration group, as also the Sub-interfaces if these are going to be used during deploy. |
System Profile
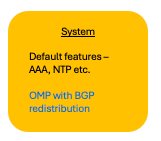 Example Usecase 1 - System Profile 1
Using the workflow, most of the System profile configuration for this use-case, can be generated – OMP, AAA, NTP, Logging and so on.
|
NOTE: Advanced configuration like OMP-BGP redistribution and any other changes to the System features like OMP, AAA, NTP and so on, must be configured post the workflow, by manually editing the Configuration group. |
Configuration Group SiteType1
Execute the Create Configuration Group Workflow.
WAN profile
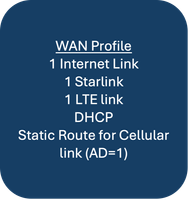 Example Usecase 1 - WAN Profile 2
Using the workflow, most of the WAN profile configuration for this use-case, can be generated. Ethernet interfaces for Internet and Starlink. DHCP.
|
NOTE: Cellular Interface for LTE link, including the Static route, must be configured post the workflow, by manually editing the Configuration group. |
LAN profile
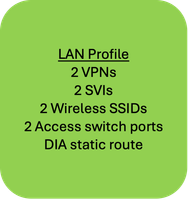 Example Usecase 1 - LAN Profile 2
Using the workflow, some of the LAN profile configuration for this use-case, can be generated. 2 VPNs, DIA static route.
Entities like actual Dot1Q sub-interfaces and any other entity marked as Device-specific, can be specified with actual values during deployment of the Configuration-group to the devices.
|
NOTE: SVIs, Wireless SSIDs, Access switch ports and so on, must be configured post the workflow, by manually editing the Configuration group. |
System Profile
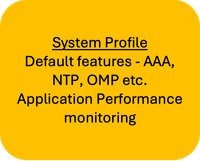 Example Usecase 1 - System Profile 2
Using the workflow, most of the System profile configuration for this use-case, can be generated – OMP, AAA, NTP, Logging and so on.
|
NOTE: Advanced configuration like Application Performance Monitoring, must be configured post the workflow, by manually editing the Configuration group. |
CLI Profile
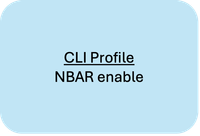 Example Usecase 1 - CLI Profile 2
Features not supported via GUI, like App/Flow Visibility (NBAR) enabling, can be configured using a CLI profile.
App/Flow visibility
To enable app-visibility and flow-visibility, use CLI profile/parcel.
(In 20.13 and later, it is available under Advanced Settings in Policy Group)
However, in 20.12, if a AAR policy is configured then, App/Flow Visibility is enabled. And configuring this using CLI profile/parcel, is not required.
Configuration Group SiteType2
Execute the Create Configuration Group Workflow.
WAN profile
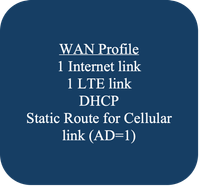 Example Usecase 1 - WAN Profile 3
Using the workflow, most of the WAN profile configuration for this use-case, can be generated. Ethernet interface for Internet. DHCP.
|
NOTE: Cellular Interface for LTE link, including the Static route, must be configured post the workflow, by manually editing the Configuration group. |
LAN profile
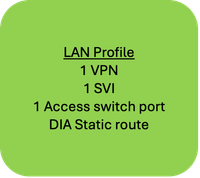 Example Usecase 1 - LAN Profile 3
Using the workflow, some of the LAN profile configuration for this use-case, can be generated. 1 VPN, DIA static route.
Entities like actual Dot1Q sub-interfaces and any other entity marked as Device-specific, can be specified with actual values during deployment of the Configuration-group to the devices.
|
NOTE: SVI, Access switch port and so on, must be configured post the workflow, by manually editing the Configuration group. |
System Profile
Same as Configuration Group SiteType1
CLI Profile
Same as Configuration Group SiteType1
Configuration Group SiteType3
Execute the Create Configuration Group Workflow.
WAN Profile
Same as Configuration Group SiteType2
LAN Profile
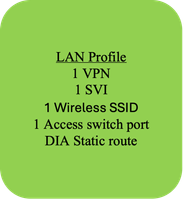 Example Usecase 1 - LAN Profile 4
Using the workflow, some of the LAN profile configuration for this use-case, can be generated. 1 VPN, DIA static route.
Entities like actual Dot1Q sub-interfaces and any other entity marked as Device-specific, can be specified with actual values during deployment of the Configuration-group to the devices.
|
NOTE: SVI, Wireless SSID, Access switch port and so on, must be configured post the workflow, by manually editing the Configuration group. |
System Profile
Same as Configuration Group SiteType1
CLI Profile
Same as Configuration Group SiteType1
Use-case 2: Retail Customer
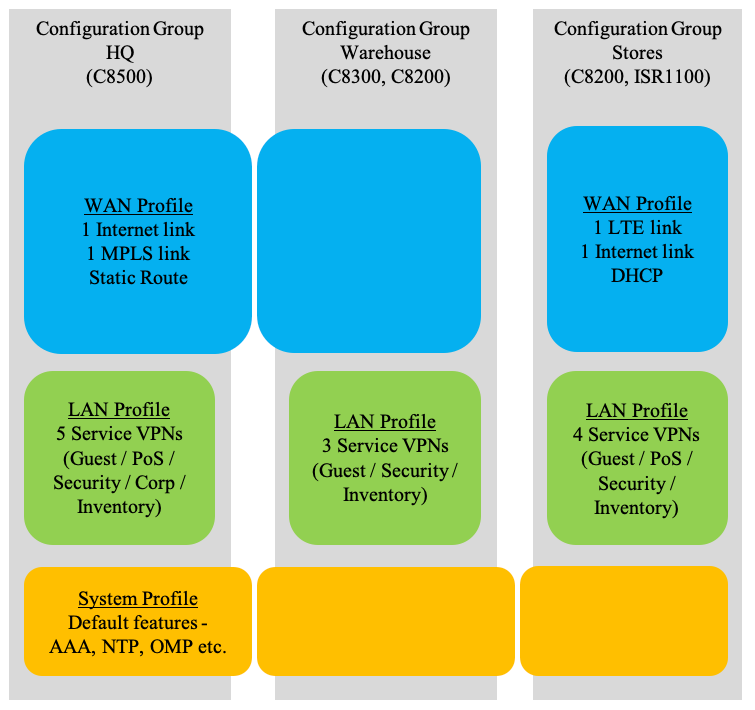 Example Usecase 2 - Configuration Groups
Configuration Group HQ and Warehouse
Execute the Create Configuration Group Workflow.
WAN profile
Using the workflow, all of the WAN profile configuration for this use-case, can be generated.
LAN Profile
Using the workflow, all of the LAN profile configuration for this use-case, can be generated.
Entities like actual Dot1Q sub-interfaces and any other entity marked as Device-specific, can be specified with actual values during deployment of the Configuration-group to the devices.
System Profile
Using the workflow, all of the System profile configuration for this use-case, can be generated.
|
NOTE: If any changes are required or if Advanced configuration like Application Performance Monitoring is required then, they must be configured post the workflow, by manually editing the Configuration group. |
Configuration Group Stores
Execute the Create Configuration Group Workflow.
WAN profile
Using the workflow, most of the WAN profile configuration for this use-case, can be generated.
|
NOTE: Cellular Interface for LTE link, including routing, must be configured post the workflow, by manually editing the Configuration group. |
LAN Profile
Using the workflow, all of the LAN profile configuration for this use-case, can be generated.
Entities like actual Dot1Q sub-interfaces and any other entity marked as Device-specific, can be specified with actual values during deployment of the Configuration-group to the devices.
System Profile
Same as Configuration Group HQ and Warehouse.
Associate
In the Configuration Group edit page (Configuration -> Configuration Groups), you can Associate devices with the Configuration Group.
Click on Associate Devices and go through the steps in the workflow.
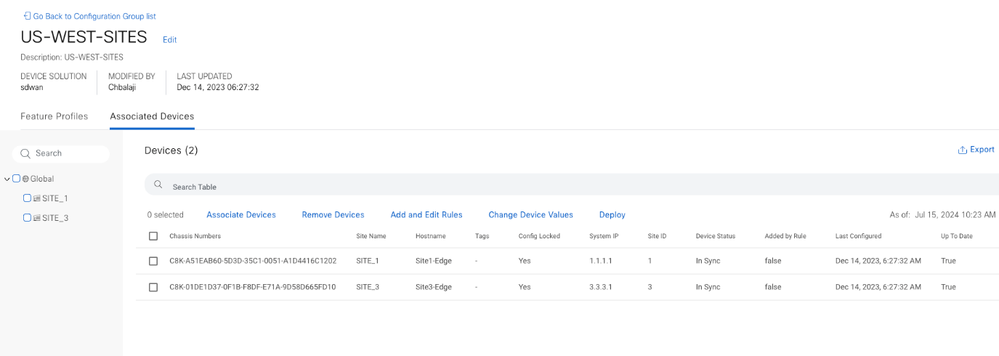 Associate Device - Configuration Groups
Deploy
Execute the Deploy Configuration Group Workflow.
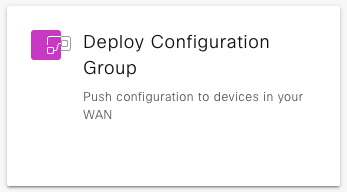 Deploy Configuration Group Workflow
|
NOTE:
|
Re-usability
- Configuration Groups are device model agnostic.
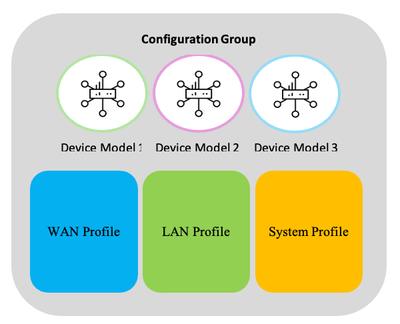 Configuration Group - Device Model Agnostic
|
NOTE: If a particular configuration is not supported on a device model then, the corresponding feature parcel push does not occur and an appropriate message is displayed as part of the deploy task. Example: A device does not support Wi-Fi, but the Configuration Group contains a Wi-Fi parcel. At deploy time, the Wi-Fi parcel configuration is skipped and the deploy task message informs that the Wi-Fi configuration push was skipped. |
- Use Configuration variables – device-specific values
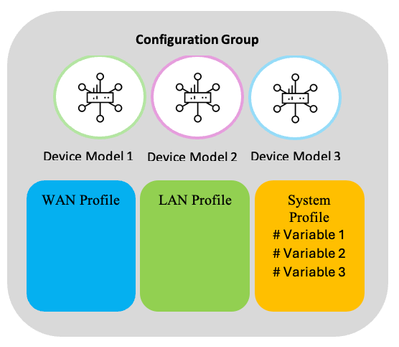 Configuration Group - Device Specific Variables
A Feature profile can have some configuration defined as device-specific, similar to template variables.
Example: Interface IP Address, port numbers, Interface name and so on.
These device-specific values can be supplied at deploy time. And it can be different for different devices.
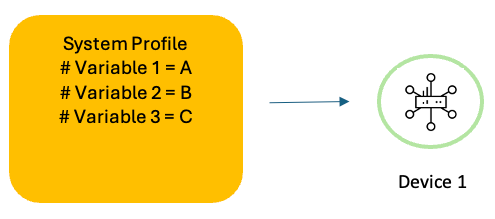 Configuration Group - Device Specific Variables Example 1
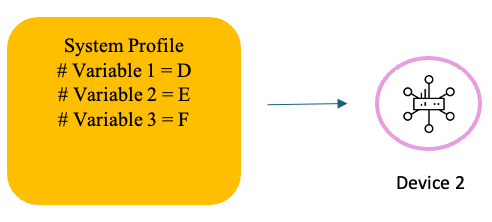 Configuration Group - Device Specific Variables Example 2
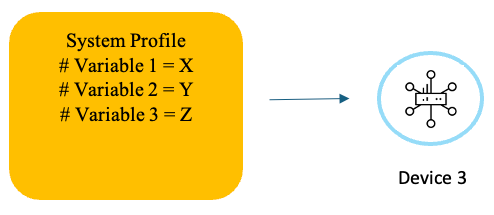 Configuration Group - Device Specific Variables Example 3
- Re-use Feature Profiles
Feature profiles can be re-used across configuration groups.
Illustration:
For several devices, if the WAN and System configurations are the same and they differ only in the LAN configuration, for example, then, the WAN and system profiles can be re-used across their Configuration groups while having a different LAN profile in each.
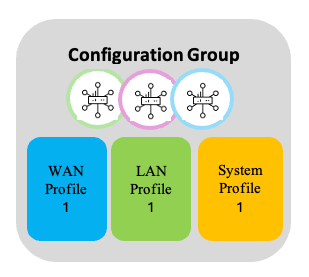 Re-use Feature Profiles - 1
LAN profile 1
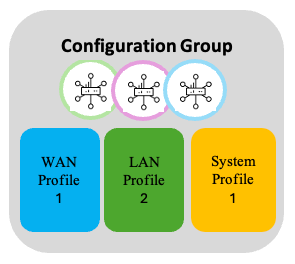 Re-use Feature Profiles - 2
LAN profile 2
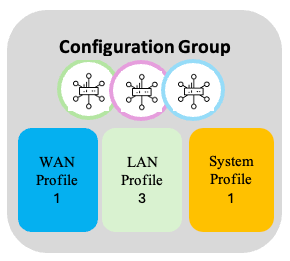 Re-use Feature Profiles - 3
LAN profile 3
Application Catalog
Traditional devices were able to manipulate traffic flows by conditional matching of source and/or destination IP addresses, source/destination ports, and protocols. As more and more applications are dependent upon DNS or embedded in HTTP it is harder to accurately identify network traffic at the application level.
Cisco’s Network Based Application Recognition (NBAR) engine has the ability to classify over 1500 applications providing network engineers the ability to classify and manipulate traffic flows with more granularity. Cisco’s Catalyst SD-WAN Manager contains the ability to connect to a Cisco application repository where signatures for applications can be updated quickly; which has significance for when cloud providers change hosting locations or traffic patterns.
The Application catalog provides the ability to create custom applications based upon the matching of server name, ip address, ports, or protocol. The application is then defined to a specific Application Family, Application Group, Traffic Class, and Business Relevance.
 Application Catalog
Applications can be dragged and dropped to the appropriate business relevance and/or traffic classification. Upon saving the changes, the definitions are updated in the database.
|
NOTE: Application classifications are global, and a change in the Application Catalog impacts all device classifications. |
Policy Groups
Similar to the Configuration Groups, a Policy Group is a grouping of policies that are deployed to devices associated with the Policy Group.
Policy Group approaches policy creation and deployment based on intent. A simplified UI and workflow makes the creation of a policy, grouping policies and deploying to devices, an easy task.
|
Pre-requisite: Configuration Group association and deployment to a device is a pre-requisite for Policy Group deployment to that device. |
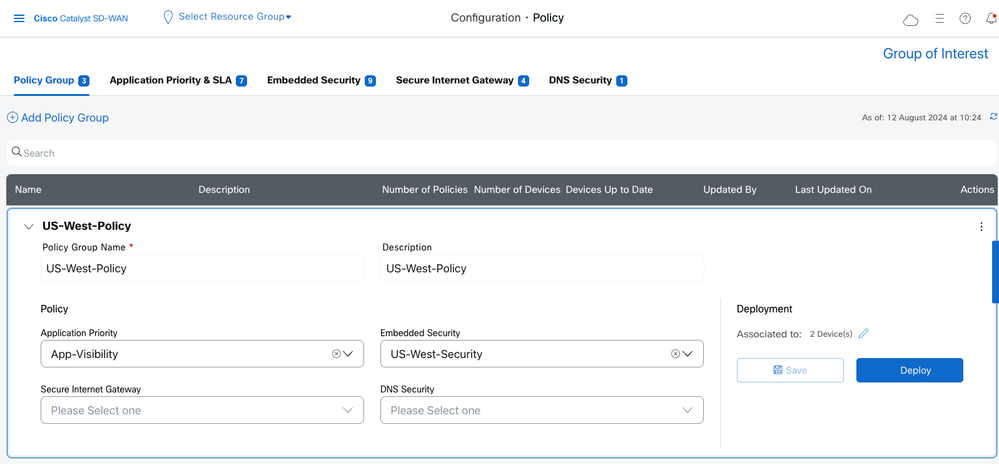 Policy Groups
Application Priority & SLA
With this policy intent, you can specify:
- Application Aware Routing and SLA policy
- QoS policy
- Traffic Data policy
- DIA policy
- SIG policy
Two modes are provided.
Simple mode
This is the Default mode.
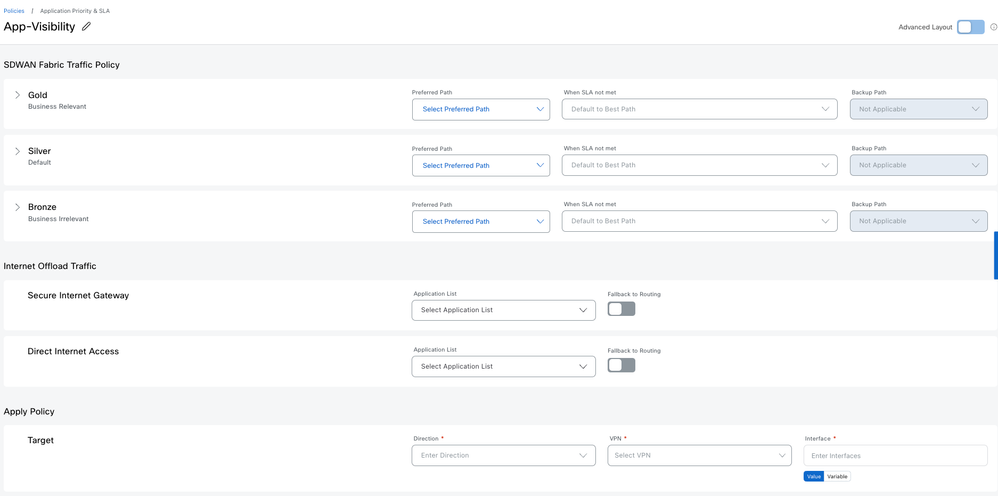 Simple Mode
This provides a quick and easy way to define the Application priority and SLA for your network.
|
NOTE: 1. Default policy action is DROP 2. Match criteria can be Applications only. If you need Prefixes then, use Advanced mode |
Advanced mode
This is a full and flexible mode.
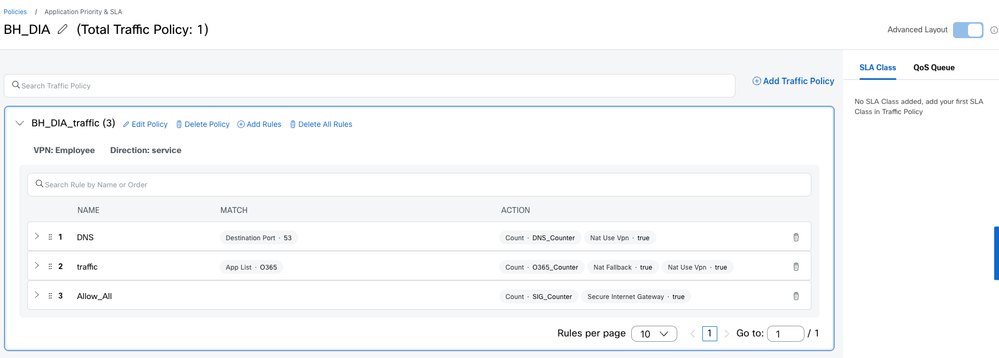 Advanced Mode
|
NOTE: 1. Default policy action is DROP 2. Application List and Traffic Class are essentially a list of Applications. Either one of them can be used for matching a list of Applicaitons. Mapping of Applications to Traffic Class can be done in Application Catalog. Simple mode generates rules using any or both of these whereas, Advanced mode provides Application List only. |
Quality of Service
In the QoS Queue option, you can add a QoS policy:
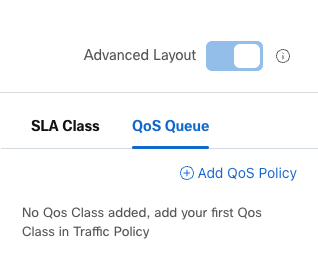 Add QoS Policy
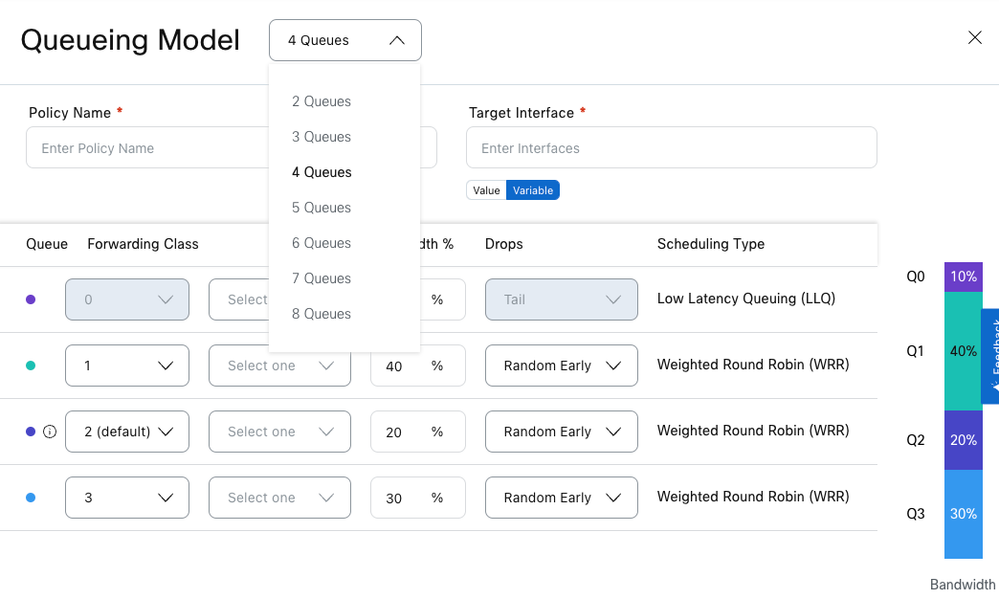 Queuing Models
Next you can define the Traffic data policy (Add Traffic policy).
Add rules to match desired traffic and redirect to appropriate Forwarding classes.
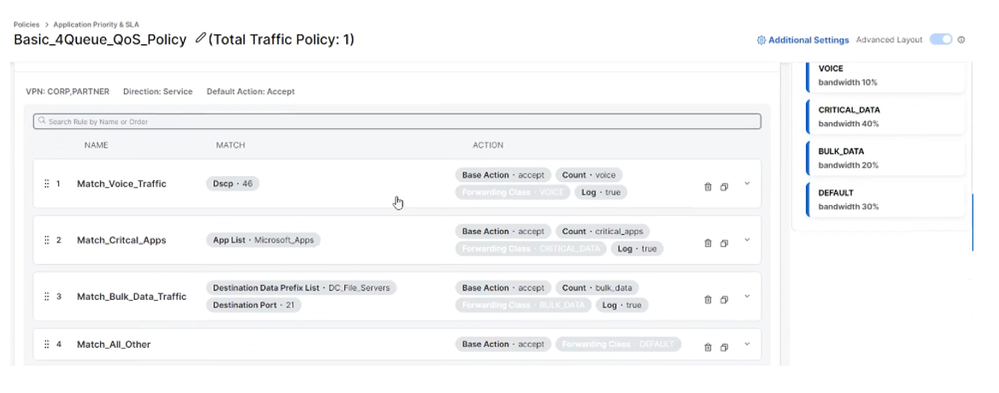 QoS Policy 2
Application Aware Routing
You can define SLA classes and use them in a Traffic policy to realize the intent of an AAR policy.
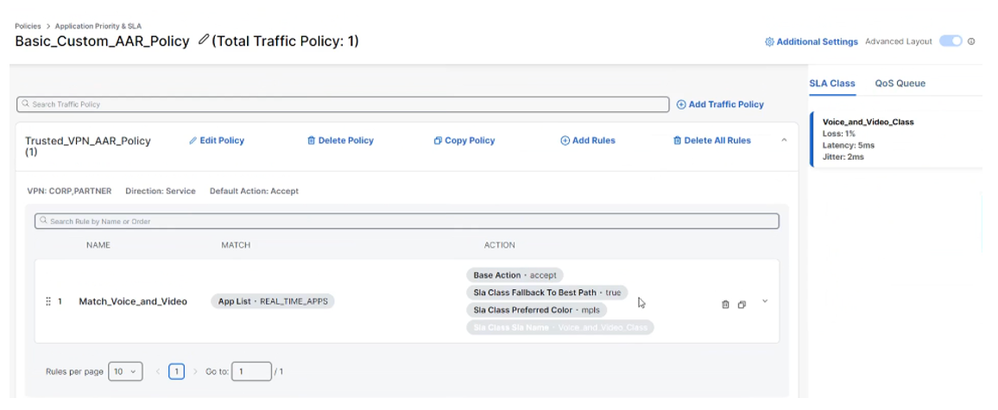 AAR Policy
App/Flow visibility
To enable app-visibility and flow-visibility, use CLI profile/parcel in Configuration Group.
(In 20.13 and later, it is available under Advanced Settings in Policy Group)
However, in 20.12, if a AAR policy is configured then, App/Flow Visibility is enabled. And configuring this using CLI profile/parcel, is not required.
Traffic policy
Traffic policy can also be used to create a DIA policy, SIG redirection and so on. Add Rules as required.
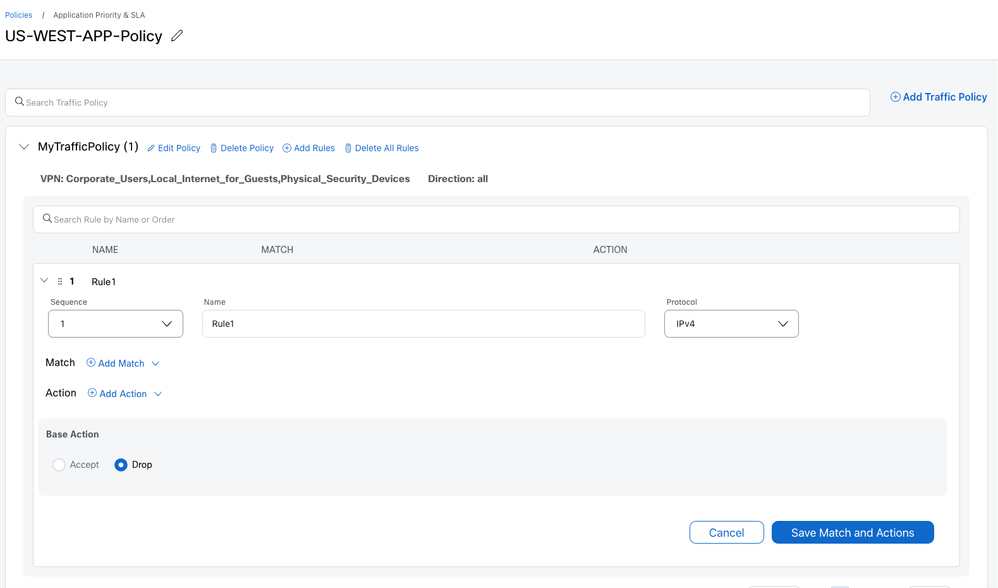 Traffic Policy
|
NOTE: If an Application Priority & SLA policy is created in simple mode, and then switched over to Advanced mode, some Match options are not available for selection. Example: Destination Data Prefix is greyed out. |
Embedded Security
Defines the security policy for on-box NGFW, IPS, Malware, and content filtering
Secure Internet Gateway/Secure Service Edge
Defines settings required to establish tunnels to cloud based content and security entities, like Cisco Secure Access.
|
NOTE: With the legacy configuration approach, this was available as a Feature Template. |
DNS Security
Define settings to allow the usage of cloud-based DNS security services for content filtering.
Groups of Interest
Define the object lists to use in your policies. Example: Application lists, VPN lists, Site lists, Prefixes list and so on.
Additionally, for Security policies, define your profiles like Advanced inspection profiles, SSL decryption policy and so on.
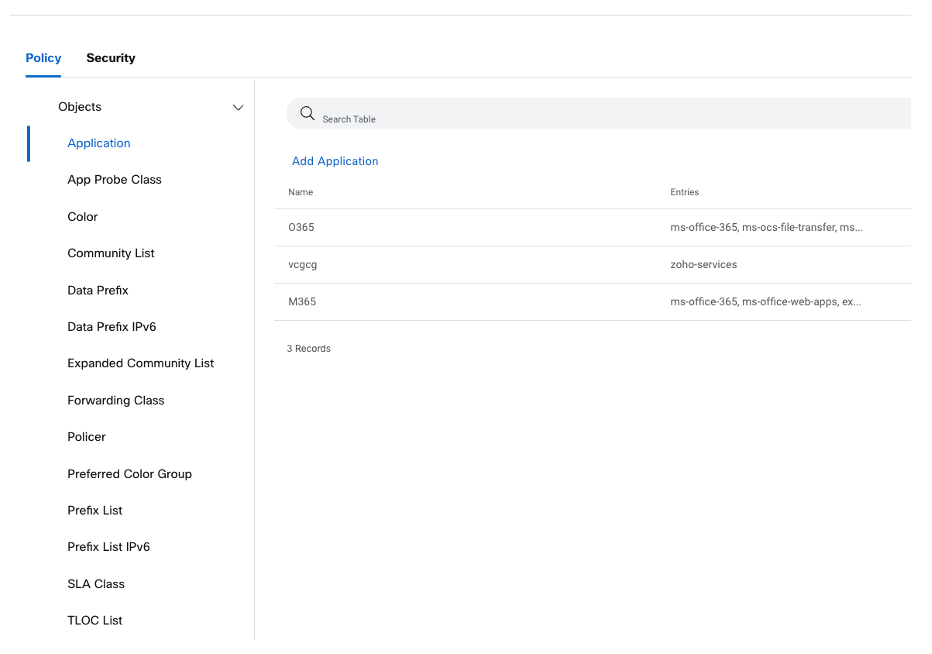 Policy Groups - Groups of Interest
Associate and Deploy
Similar to Configuration Groups, associate devices to Policy Group and deploy.
Localized policies
Localized policies like ACL, Route policy, Device access policy and so on, are defined in Configuration groups.
Topology
Define your Network Topology.
Start with a Full mesh or Hub-n-Spoke and customize it if required.
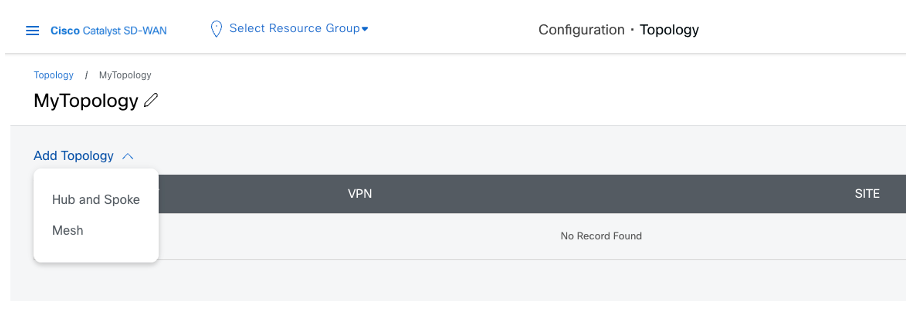 Topology menu
Topology and VPN
Keep in mind these design changes while creating Topology and specifying VPNs.
The new design allows dynamic mapping of VPN name to VPN ID, instead of 1:1 mapping.
A VPN name mapping to multiple VPN IDs
Illustration:
Say there is a VPN with the name Corporate in two different Configuration Groups.
One has VPN ID 10 and the other has VPN ID 20.
The Topology workflow VPN list shows one instance of Corporate VPN only.
Once you select Corporate VPN, the SD-WAN Manager determines the VPN IDs based on the Topology.
Say there are 2 devices in 2 sites:
1. Device1 in site 100 with Corporate as VPN 10
2. Device2 in site 200 with Corporate as VPN 20
If both site 100 and site 200 are part of the Topology then, SD-WAN Manager creates a VPN list that will have both VPN IDs (10 and 20).
If only site 100 is part of the Topology then, SD-WAN Manager creates a VPN list that will have VPN ID 10 only.
If only site 200 is part of the Topology then, SD-WAN Manager creates a VPN list that will have VPN ID 20 only.
Muliple VPN names mapping to the same VPN ID
You can configure multiple Topology policies with same VPN name that are mapped to different VPN IDs in different sites.
SD-WAN Manager determines the actual mapping based on which Topology is associated to which sites.
Illustration:
Two users can create two different Configuration Groups.
One specifies VPN ID 100 as Finance VPN and the other specifies it as Engineering VPN.
Then they can create Topology using their respective VPN names.
Onboarding
For onboarding your physical routers, use the Quick Connect Workflow.
Using this workflow, pre-define the Hostname, System-IP, and Site-name/ID for the devices to be onboarded. Manager auto-generates these but you can modify them if you wish to do so. You can also tag the devices which can then be used to auto-associate the devices to Configuration Groups.
During the PnP ZTP onboarding process, the devices establish the control plane tunnel connections to the SD-WAN Manager. SD-WAN Manager now pushes the pre-defined fabric configuration to the devices and the devices join the SD-WAN fabric.
 Quick Connect Workflow
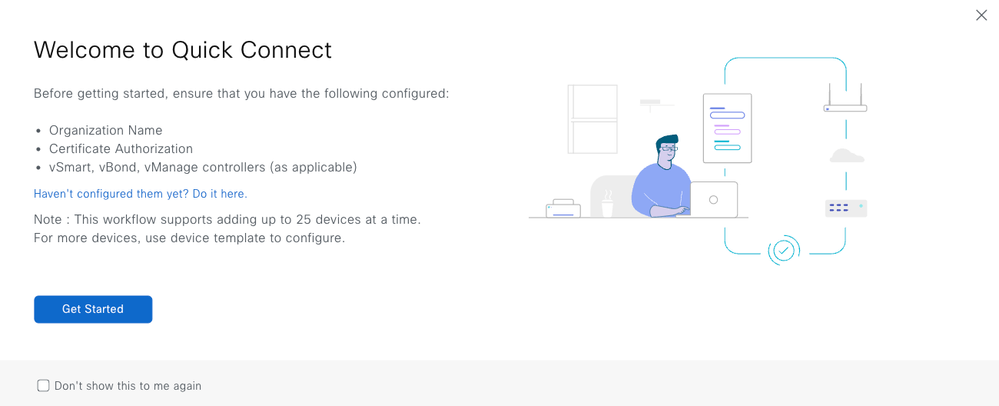 Quick Connect Workflow Description
Tagging
Devices can be associated with user-defined Tags.
Tags can be used for grouping, describing, finding, or managing devices.
Tags enables grouping of devices which can then be used in other features.
 Tagging Examples
Example: Association of Configuration Groups to devices.
Configuration Group rules can be set to enable devices with specific Tags to be automatically associated with that Configuration Group.
Add Tag
In Configuration->Devices, Tags can be created / added to / removed from the devices.
Tag Rules in Configuration Group
In the Configuration Group -> Associated Devices page, Tag rules can be added/edited.
Illustration
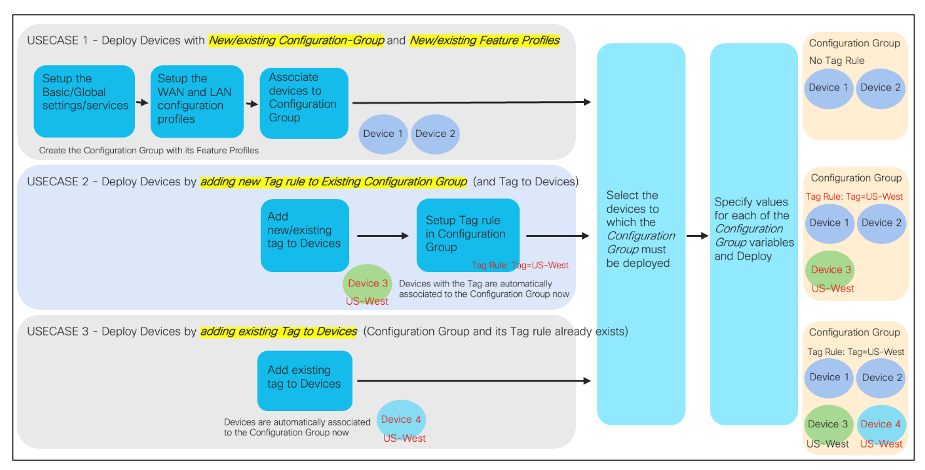 Tagging Illustration
Existing Deployments
In the SD-WAN network, devices which use the Legacy Configuration and Policies can co-exist with devices using the Simplified Configuration and Policies.
This section offers some recommendations for customers who want to take advantage of the Simplified Configuration and Policies, this section offers some recommendations.
The first step is that devices need to be migrated from Device Templates to Configuration Groups. Once that is done, policy groups and/or topology can be deployed.
Configuration Groups
Device templates and configuration groups provide the edge device configuration. So it is easy for co-existence to occur. The steps for migrating from a device template to a configuration group are:
|
Step 1 |
Extract a copy of the device values from the device templates. This is accomplished from the Configuration à Templates, click on the Ellipses (…) to the right of the device group and select ‘Export CSV”. |
|
Step 2 |
Create a Configuration Group (manually or with the conversion tool). |
|
Step 3 |
Detach the device template from the device. At this time, the device maintains the configuration at the point of attachment; but does not receive any future changes made to the device template (or any component feature templates). |
|
Step 4 |
Associate the device(s) to the new configuration group. |
|
Step 5 |
Deploy the devices associated to the configuration group. To make this process easier, open the Exported CSV file, and change the CSV column headers to match the new variables from the configuration group. |
|
Step 6 |
After the device variable input screen, you can preview the device configuration. This gives you a preview on what portions of the configuration group do not match to the previous instance; or what variables have changed from the Device Template. |
Maintaining a consistent naming scheme for variables simplifies device-specific settings. If all the device values are in a single CSV then you only have to rename the column headers once..
|
NOTE: A python script exists that works with CSV files for Device Templates or Configuration Groups to consolidate and alphabetize the column headers. The script is available here: |
Policy Groups
Devices that are configured via configuration groups can use a Centralized Policy, or migrate towards a Policy Group; but not both at the same time for the same application. In essence, the goal is to keep the same underlying policy for the edge devices. Policy Groups combine the original AAR and Data policies into a single Application Priority & SLA PG component. In essence, we are just changing how the configuration for policies is built (but not sent to the SD-WAN Manager).
It’s important to note that you cannot have a Data Policy or AAR policy reference a site list with a site that has the Application Priority & SLA component as they both configure the same setting.
It is possible to have Centralized Policy with only a Control Policy reference a site that uses a Policy Group with Application Priority & SLA) as they configure different components of a centralized policy.
The steps to migrate a device from a Centralized Policy to a Policy Group involves these steps:
|
Step 1 |
Create the necessary policy group components (Application Priority & SLA, Embedded Security, Secure Internet gateway/Secure Service Edge, DNS Security. |
|
Step 2 |
Create the policy group and associate necessary components. |
|
Step 3 |
Disassociate the site id from any SiteLists that are references in AAR or Data Policies. |
|
Step 4 |
Associate the device(s) to the policy group and save the policy group. |
|
Step 5 |
Deploy the policy group to the selected devices. At this time, the SD-WAN Manager sends updated configurations to the Edge devices (for QoS/SIG) and the controllers; so that the controllers can send updated data policies to the edge devices. |
|
Note: While Policy Groups can co-exist with a Centralized Policy, it is recommended to stay with a Centralized Policy (for AAR and Data Policies) while converting edge devices to Configuration Groups. Then at that point, start the migration from Centralized Policy to Policy Groups for functionality within the Application Priority & SLA component. This is done for pure simplicity and to reduce confusion amongst operational staff. |
|
NOTE: |
Topology
Devices that are configured via configuration groups can use a Centralized Policy, or migrate towards a Topology. In essence, the goal is to keep the same underlying control policy for the SD-WAN controllers. Topology is the latest iteration of Control Policies.
It’s important to note that you cannot have a Control Policy policy reference a site list with a site that has a Topology associated with it, as they both configure the same setting.
It is possible to have a Centralized Policy with only a Data Policy and/or AAR policy, and a topology policy as they configure different components.
Steps to migrate a device from a Centralized Policy to a Policy Group:
|
Step 1 |
Create the necessary Topology components |
|
Step 2 |
Disassociate sides from the older Topology List in the Centralized Policy. |
|
Step 3 |
Disassociate the site ID from any Site Lists that are referenced in AAR or Data Policies. |
|
Step 4 |
Activate the Topology. At this time, the SD-WAN Manager sends updated configurations to the Controllers and modifies any routes being transmitted to edge devices. |
|
Note: While Topology can co-exist with a Centralized Policy, it is recommended to stay with a Centralized Policy (for Topology and Route Manipulation) while converting edge devices to Configuration Groups. Then at that point, start the migration from Centralized Policy to Topology for functionality of modifying topologies and routing manipulation. This is done for pure simplicity and to reduce confusion amongst operational staff. |
Conversion Tool
Scope
The Conversion Tool does a 1-to-1 conversion of templates to configuration groups. The tool collects the templates from an SD-WAN Manager instance, converts them to configuration groups (including feature profiles and feature parcels), and uploads the newly converted constructs to the SD-WAN Manager.
* Conversion of policies to policy groups is tentatively expected to be available in the Conversion Tool in October 2024.
Access Details
A beta version of the tool is available. Please reach out to sdwan-ux-conversion-tool@cisco.com for more information.
How to Use
Prerequisite
Before using the tool, ensure that your SD-WAN Manager is running 20.12.x. If not, upgrade to 20.12 before proceeding.
Conversion Tool Workflow
|
Step 1 |
Sign in to the tool using credentials provided by Cisco. (Note: These are not CCO credentials. Reach out to sdwan-ux-conversion-tool@cisco.com for more details). |
|
Step 2 |
Select the ‘Conversion Tool’ workflow from the homepage. · If you have previously performed this workflow and have the JSON file with the converted configurations, you must select the ‘Upload from a file’ workflow. |
|
Step 3
|
Login: Provide your SD-WAN Manager IP or URL along with user credentials. · User must have read/write access. · Port and subdomain fields are optional. |
|
Step 4. |
Import: Click the ‘Collect’ button to retrieve all legacy constructs (device templates, feature templates, policies, and their associated constructs) from SD-WAN Manager. · Once collected, you must download the JSON file containing all of the configurations. This file must be used during this step at a later time instead of collecting from the SD-WAN Manager again. |
|
Step 5. |
Select: Select the templates and policies that you like to convert to their new equivalents. Click ‘Migrate’ to convert the selected constructs. |
|
Step 6. |
Transform: This page shows all of the newly converted constructs. Once ready, click ‘Upload’ to push these configurations to the SD-WAN Manager. · In the case that you’re not ready to push to SD-WAN Manager yet, you can download these converted configurations as a JSON file and use the ‘Upload from a file’ workflow at a later time. |
|
Step 7. |
Summary: At this time the configurations are being pushed and created in SD-WAN Manager. As the configurations are being pushed, you can see the progress bar. Once the upload is complete, you can see the summary of the uploaded configurations. · You can use the ‘Configuration Groups’, ‘Feature Profiles’, and ‘Policy Groups’ quick links to view the new constructs in your SD-WAN Manager. · In the case of an error or mistake, rollback is also available at this step. Performing a rollback removes all of the constructs pushed to the SD-WAN Manager during this workflow/session. |
Post-Conversion
Your new constructs are now ready to use. Execute the steps in the ‘Existing Deployments’ section to migrate your devices to the newly converted configuration groups.
Considerations
- The conversions provided by the tool are meant to serve as guidance. Please analyze and test before deploying in a production environment.
- The tool does not consider the device-agnostic capability of configuration groups. Users can analyze their templates before selecting which to convert or analyze the converted configuration groups and associate devices accordingly to benefit from the device-agnostic capability.
- Variable names and global values from legacy constructs are copied over to the newly converted constructs.
- The tool does not push configuration to devices. After performing the conversions, the user is responsible for detaching devices from templates and associating them to the new configuration groups.
20.12 Considerations
|
No. |
Item Description |
|
1 |
DNS config needs to be pushed via CLI Add-on Profile when deploying Configuration Group on Edge running version lower than 17.12. |
|
2 |
The creation of Topology requires the selection of sites instead of choosing an area defined in NHM. |
|
3 |
The Create Configuration Group workflow does not create a VPN512 and an interface in this VPN, in the WAN profile. If you need this, you can create this manually by editing the Configuration group. |
|
4 |
Ability to copy/duplicate Feature profiles, policy not supported. A set of Python scripts can accomplish this task, and is located: |
|
5 |
A Policy Object profile must be associated with the Configuration Group before creating any Feature parcel related to Policy Configuration (Localized Policies). Example: ACL |
|
6 |
Import CSV for interface variables inserts semi-colons into the string and fails |
|
7 |
AppQoE Optimization (TCP Opt and DRE) and Loss Correction (FEC and Pkt Dup) configuration continue to use legacy templates/policies. Configurable via CLI Profile in Configuration/Policy Groups as well. (20.14 in UI Parcel) |
|
8 |
Cloud OnRamp for SaaS continues to use the legacy Templates/Policies. |
|
9 |
TrustSec / SGT supported with CLI Profile only |
|
10 |
UC Voice / DSP Farm / SRST supported with CLI Profile only (20.13 onwards in UI Parcel) |
Related Information
- Cisco SD-WAN and Cloud Networking YouTube Channel: https://www.youtube.com/@CiscoSDWANandCloudNetworking
- UX2.0 - Operational Simplification: 1. Configure a Single Router Site: https://www.youtube.com/watch?v=98z-d3knd
- Cisco Technical Support & Downloads
Revision History
| Revision | Publish Date | Comments |
|---|---|---|
1.0 |
16-Aug-2024 |
Initial Release |
Contributed by
- Prashanth RaghavendraTechnical Marketing
- Alexandria MuenchTechnical Marketing
- Brad EdgeworthEnterprise Networking and Software Sales
Contact Cisco
- Open a Support Case

- (Requires a Cisco Service Contract)
 Feedback