Introduction
This document describes how to transfer files between a remote cEdge and a local vManage through CLI.
Prerequisites
Requirements
Cisco recommends that you have knowledge of these topics:
- Cisco Software-Defined Wide Area Network (SD-WAN)
- Basic Linux
Components Used
This document is based on these software and hardware versions:
- cEdge version 17.5.1
- vManage version 20.5.1
The information in this document was created from the devices in a specific lab environment. All of the devices used in this document started with a cleared (default) configuration. If your network is live, ensure that you understand the potential impact of any command.
Background Information
You can transfer files between a remote cEdge and a local vManage through CLI in two ways:
- Retrieve files from a remote cEdge to a local vManage file system.
- Push files from vManage to cEdge through vManage CLI.
In order to transfer the files from one location to another, it becomes a difficult task. The most common reasons are these:
- cEdge file system is not accessible from the outside.
- No FTP/TFTP/SFTP is available or reachable.
- No physical access to the router to copy files directly to a USB or massive storage.
However, the SD-WAN solution provides the ability to use control connections to secure copy files between the vManage and a remote cEdge.
The transfer can be done from cEdge bootflash file system to the local user home directory in vManage or vice-versa. Examples of files are:
- Admin-tech
- Cisco IOS® XE images
- Bin trace logs
- Packet captures
- Txt files
vManage runs the Viptela OS and has 2 modes in CLI:
- Viptela CLI: contains all Viptela functionality
- vShell: UNIX shell in the device
Copy a File From a cEdge Through vManage CLI
Note: In this section, all commands are issued from vManage to retrieve files from a remote cEdge to vManage local directory.
Option 1. Viptela CLI
Command syntax:
The command is read as, use netconf port in VPN 0 to retrieve source_file_name from cEdgeSystemIP into destination_directory_in_vManage with cEdge username.
request execute vpn 0 scp -P 830 USERNAME@cEdgeSystemIP:/<source_file_name> <destination_directory_in_vManage>
Example:
Connect to vManage CLI and run the Viptela request, execute the command in VPN 0 along with Secure Copy Protocol (SCP) command to start the copy.
vmanage# request execute vpn 0 scp -P 830 admin@192.168.10.1:/bootflash/vmanage-admin/cEdge-20211229-023316-admin-tech.tar.gz /home/admin/
The authenticity of host '[192.168.10.1]:830 ([192.168.10.1]:830)' can't be established.
RSA key fingerprint is SHA256:R8KekCx/giwjCqR5woDm+sodjF5kvU7QxnUexoE1xAw.
Are you sure you want to continue connecting (yes/no/[fingerprint])? yes
Warning: Permanently added '[192.168.10.1]:830' (RSA) to the list of known hosts.
admin@192.168.10.1's password:
cEdge-20211229-023316-admin-tech.tar.gz 100% 13MB 4.8MB/s 00:02
Option 2. vShell CLI
Example:
Connect to vManage CLI, change mode to vShell, and run the SCP command in Linux format.
vmanage# vshell
vmanage:~$ scp -P 830 admin@192.168.10.1:/bootflash/vmanage-admin/cEdge-20211229-023316-admin-tech.tar.gz /home/ericgar/
admin@192.168.10.1's password:
cEdge-20211229-023316-admin-tech.tar.gz 100% 13MB 4.7MB/s 00:02
Verify
Change mode from Viptela CLI to vShell in vManage and verify that the file is copied correctly.
vmanage# vshell
vmanage:~$ ls -l
total 12976
-rw------- 1 ericgar users 13285905 Dec 29 21:21 cEdge-20211229-023316-admin-tech.tar.gz
Send a File to a cEdge Through vManage CLI
Note: In this section, all commands are issued from vManage to send files from vManage local directory to a remote cEdge storage.
Command syntax:
The command is read as, use netconf port in VPN 0 to copy source_file_name into /bootflash/vmanage-admin/ at cEdgeSystemIP with username.
request execute vpn 0 scp -P 830 <source_file_name> username@cEdgeSystemIP:/bootflash/vmanage-admin/
Option 1. Viptela CLI
Example:
Connect to vManage CLI and run the Viptela request, execute the command in VPN 0 along with SCP syntax to start the copy.
vmanage# request execute vpn 0 scp -P 830 /home/admin/packet_capture_cEdge.pcap admin@192.168.10.1:/bootflash/vmanage-admin/
admin@192.168.10.1's password:
packet_capture_cEdge.pcap 100% 13MB 3.8MB/s 00:03
Option 2. vShell CLI
Example:
Connect to vManage CLI, change the mode to vShell, and run the SCP copy in Linux format.
vmanage# vshell
vmanage:~$ scp -P 830 /home/ericgar/packet_capture_cEdge.pcap admin@192.168.10.1:/bootflash/vmanage-admin/
admin@192.168.10.1's password:
packet_capture_cEdge.pcap 100% 13MB 3.8MB/s 00:03
Verify
Connect to the cEdge CLI and display the content of bootflash/vmanage-admin/ to verify the file is copied correctly:
cEdge#dir bootflash:/vmanage-admin/
Directory of bootflash:/vmanage-admin/

1498499 -rw- 13285905 Dec 29 2021 16:29:27 -06:00 packet_capture_cEdge.pcap
Note: The destination directory in the cEdge must always be bootflash:vmanage-admin, since that is the only directory that has to write permissions for transfers, otherwise, the transfer fails.
vmanage# request execute vpn 0 scp -P 830 /home/admin/packet_capture_cEdge.pcap admin@192.168.10.1:/bootflash/
admin@192.168.10.1's password:
scp: /bootflash//packet_capture_cEdge.pcap: Permission denied
Note: In case the file in root bootflash or any other directory is needed, a direct move of it with a command is not possible; instead, copy the file to the desired destination and then delete the original one.
Copy a File from vManage to Local Computer
Option 1. Linux/Mac Terminal
Command syntax:
The command is read as: copy source_file_name from vManage into local_destination_pathwith vManage username.
scp vManageUsername@PublicIp:<source_file_name> <local_destination_path>
Example:
Connect to your local Linux/Mac terminal and run the SCP command to copy the file to your desired directory.
adminIT@cisco:~$ scp admin@10.88.244.25:packet_capture_cEdge.pcap /Users/adminIT/Downloads/
viptela 20.5.1

Password:
packet_capture_cEdge.pcap 100% 13MB 3.6MB/s
Note: It is recommended that the file to fetch is in the user home directory, otherwise, the directory permissions need to be verified.
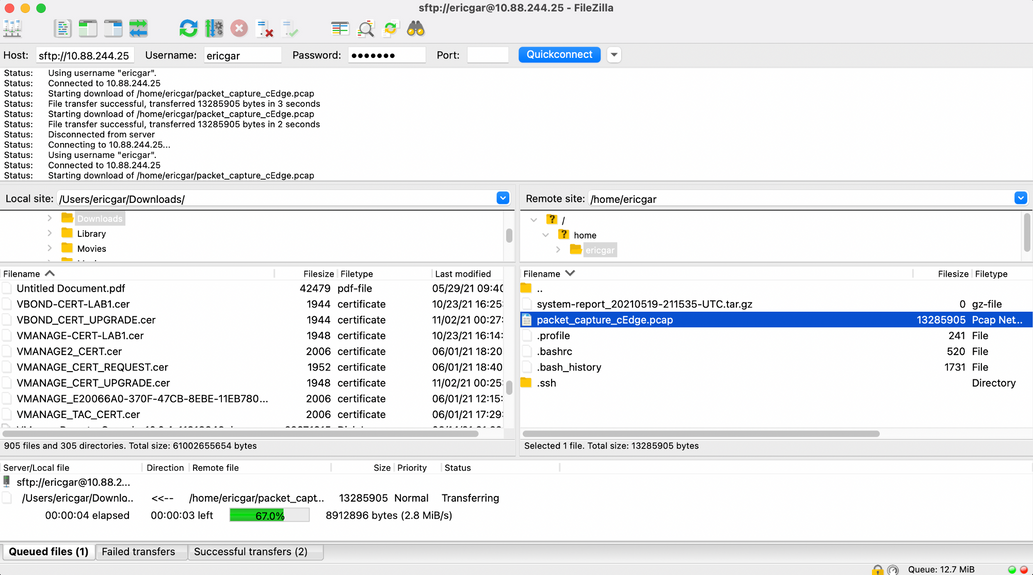
Option 2. FileZilla or Any Other FTP or SFTP Client
Connect with:
- SFTP as protocol or port 22
- vManage URL, Public IP or Private IP (If vManage is On-Prem)
- Use valid username and password
On the right, the files in the vManage user home directory are listed. Just drag and drop to the local destination on the left where you want to transfer the file, as shown in the image.

Related Information


 Feedback