Introduction
This document describes the configuration for remote server access with LDAP Protocol in our Unified Computing System Manager Domain (UCSM).
Prerequisites
Requirements
Cisco recommends knowledge of these topics:
Unified Computing System Manager Domain (UCSM)- Local and Remote authentication
Lightweight Directory Access Protocol (LDAP)
Microsoft Active Directory (MS-AD)
Components Used
The information in this document is based on these software and hardware versions:
Cisco UCS 6454 Fabric Interconnect- UCSM version 4.0(4k)
Microsoft Active Directory (MS-AD)
The information in this document was created from the devices in a specific lab environment. All of the devices used in this document started with a cleared (default) configuration. If your network is live, ensure that you understand the potential impact of any command.
Background Information
Lightweight Directory Access Protocol (LDAP)
is one of the core protocols developed for directory services which securely manages users and their access rights to IT resources.
Most directory services still use LDAP today, although they can also use additional protocols like Kerberos, SAML, RADIUS, SMB, Oauth, and others.
Configure
Before You Begin
Log intoCisco UCS Manager GUIas an administrative user.
Create a Local Authentication Domain
Step 1. In the Navigation pane, click the Admin tab.
Step 2. On the Admin tab, expand All > User Management > Authentication
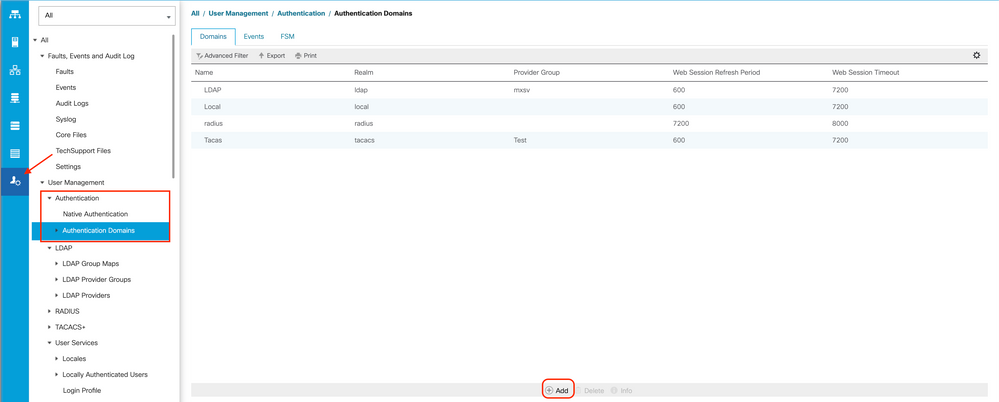
Step 3. Right-click Authentication Domains and select Create a Domain.
Step 4. For the Name field, type Local.
Step 5. For the Realm, click the Local radio button.
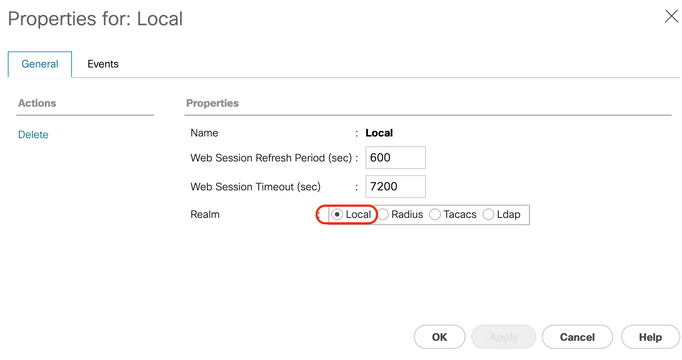
Step 6. Click OK.
Create an LDAP Provider
This sample configuration does not include steps to configure LDAP with SSL.
Step 1.In the Navigation pane, click the Admin tab.
Step 2. On the Admin tab, expand All > User Management > LDAP.
Step 3. In the Work pane, click the General tab.
Step 4. In the Actions area, click Create LDAP Provider

Step 5. In the Create LDAP Provider page of the wizard, input the appropriate information:
- In the
Hostnamefield, type the IP address or hostname of the AD server.
- In the
Order field, accept the lowest-available default.
- In the
BindDN field, copy and paste the BindDN from your AD configuration.
For this sample configuration, the BindDN value is CN=ucsbind,OU=CiscoUCS,DC=mxsvlab,DC=com.
- In the
BaseDN field, copy and paste the BaseDN from your AD configuration.
For this sample configuration, the BaseDN value is DC=mxsvlab,DC=com.
- Leave the
Enable SSL check box unchecked.
- In the
Port field, accept the 389 default.
- In the
Filter field, copy and paste the filter attribute from your AD configuration.
Cisco UCSuses the filter value to determine if the user name (provided on the logon screen by Cisco UCS Manager) is in AD.
For this sample configuration, the filter value is sAMAccountName=$userid, where $useridis the user name to enter in the Cisco UCS Manager login screen.
- Leave the
Attribute field blank.
- In the
Password field, type the password for the ucsbind account configured in AD.
If you need to go back into the Create LDAP Provider wizard to reset the password, do not be alarmed if the password field is blank.
The Set: yes message that appears next to the password field indicates that a password has been set.
- In the
Confirm Password field, retype the password for the ucsbind account configured in AD.
- In the
Timeout field, accept the 30 default.
- In the
Vendor field, select the radio button for MS-ADfor Microsoft Active Directory.
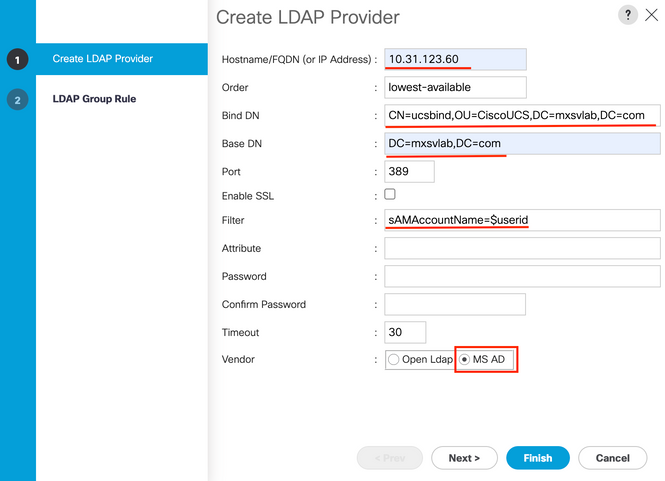
Step 6. Click Next
LDAP Group Rule configuration
Step 1. On theLDAP Group Rule page of the wizard, complete the next fields:
If the Group Recursion is set to Non-Recursive, it limits UCS to a search of the first level, even if the search does not locate a qualified user.
- In the
Target Attribute field, accept thememberOf default.
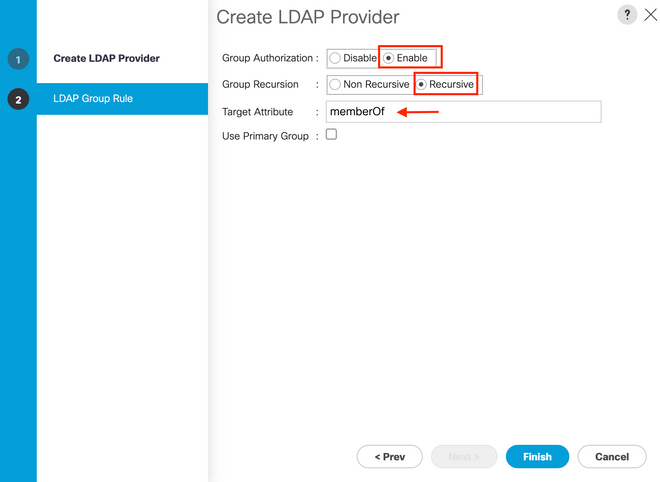
Step 2. Click in Finish.
Note: In a real-world scenario, you would most likely have multiple LDAP providers. For multiple LDAP providers, you would repeat the steps to configure the LDAP Group Rule for each LDAP provider. However, in this sample configuration, there is only one LDAP provider, so this is not necessary.
The IP address for the AD server is displayed in the Navigation pane under.
Create an LDAP Provider Group
Step 1. In the Navigation pane, right-click LDAP Provider Groups and select Create LDAP Provider Group.
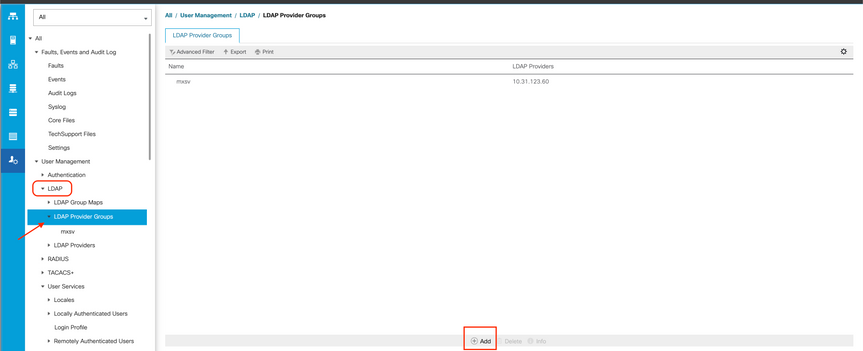
Step 2. In the Create LDAP Provider Group dialog box, fill the information appropriately:
- In the
Name field, enter a unique name for the group such as LDAP Providers.
- In the
LDAP Providers table, choose the IP address for your AD server.
- Click the >> button to add the AD server to your
Included Providers table.
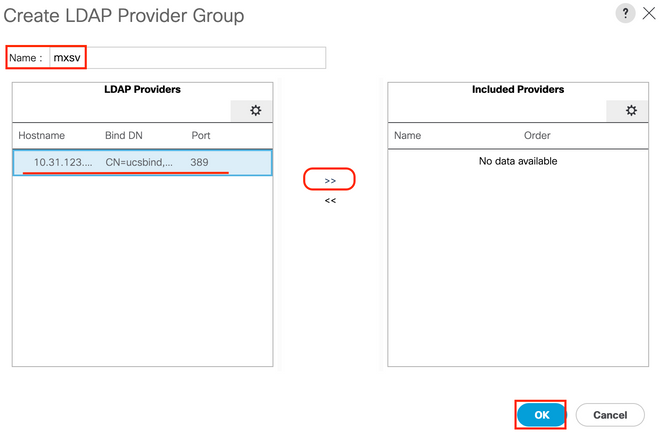 Step 3. Click OK.
Your provider group appears in the LDAP Provider Groups folder.
Create an LDAP Group Map
Step 1. In the Navigation pane, click the Admintab.
Step 2. On the Admin tab, expand All > User Management > LDAP.
Step 3. In theWork pane, click Create LDAP Group Map.
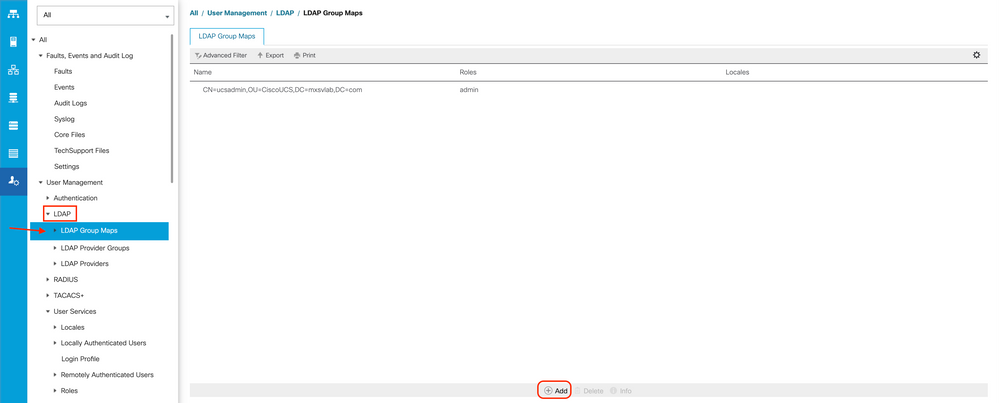
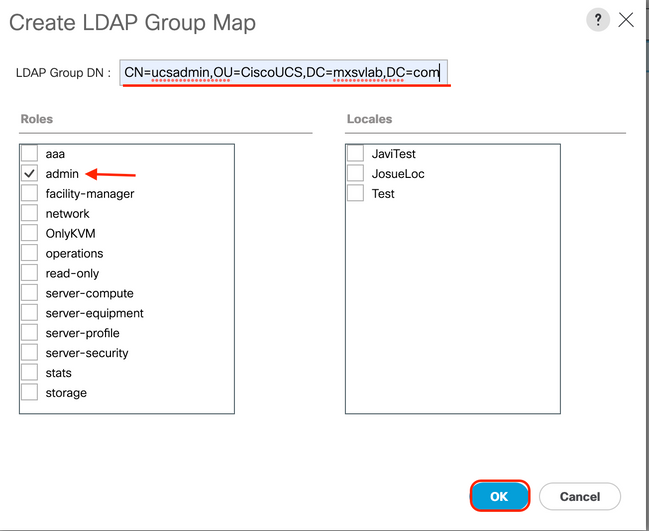
Step 4. In the Create LDAP Group Map dialog box, fill the information appropriately:
- In the
LDAP Group DN field, copy and paste the value that you have in the AD server configuration section for your LDAP group.
The LDAP Group DN value requested in this step maps to the distinguished name for each of the groups you created in AD under UCS Groups.
For this reason, the Group DN value entered in Cisco UCS Manager must match exactly with the Group DN value in the AD server.
In this sample configuration, this value is CN=ucsadmin,OU=CiscoUCS,DC=sampledesign,DC=com.
- In the
Roles table, click the Admin check box and click OK.
Click the check box for a role indicates that you want to assign admin privileges to all users who are included in the group map.
Step 5. Create new LDAP group maps (use the information you recorded earlier from AD) for each of the remains roles in the AD server that you want to test.
Next: Create your LDAP authentication domain.
Create an LDAP Authentication Domain
Step 1. On the Admin tab, expand All > User Management > Authentication
Step 2. Right-click Authentication Authentication Domains and select Create a Domain.
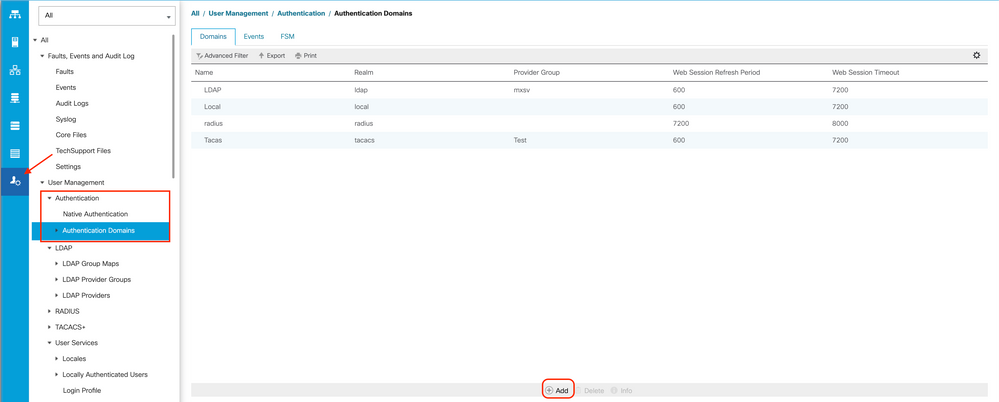
Step 3.In the Create a Domain dialog box, complete the next:
- In the
Name field, type a name for your domain such as LDAP.
- In the
Realm area, click the Ldap radio button.
- From the
Provider Group drop-down list, select the LDAP Provider Group previously created and click OK.
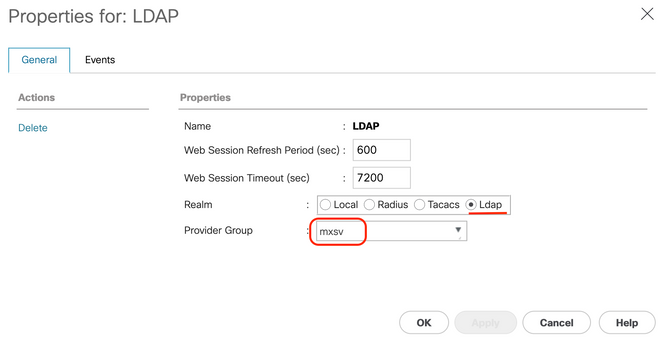
The authentication domain appears under Authentication Domains.
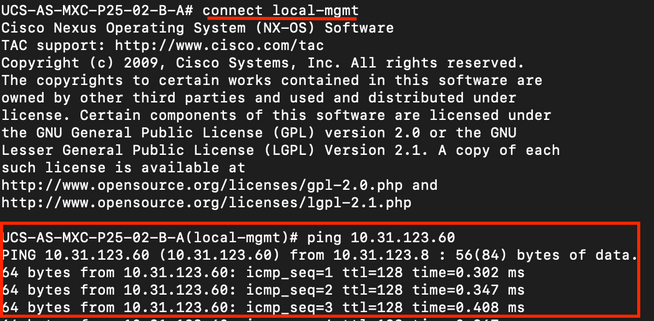
Verify
Ping to LDAP Provider IP or FQDN:
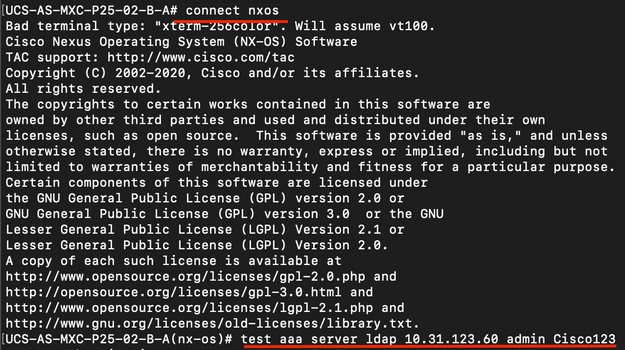
To test authentication from NX-OS, use the test aaa command (only available from NXOS).
We validate the configuration of our server:
ucs(nxos)# test aaa server ldap <LDAP-server-IP-address or FQDN> <username> <password>
Common LDAP Issues.
- Basic configuration.
- Wrong password or invalid characters.
- Wrong port or Filter field.
- No communication with our provider due to a Firewall or Proxy rule.
- FSM is not 100%.
- Certificate problems.
Troubleshoot
Verify UCSM LDAP configuration:
You must ensure that the UCSM has implemented the configuration successfully because the status of the Finite State Machine (FSM) is shown as 100% complete.
To verify the configuration from the command line of our UCSM:
ucs # scope security
ucs /security# scope ldap
ucs /security/ldap# show configuration
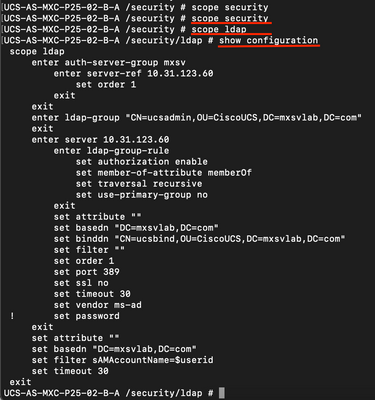
ucs /security/ldap# show fsm status

To verify the configuration from the NXOS:
ucs# connect nxos
ucs(nxos)# show ldap-server
ucs(nxos)# show ldap-server groups
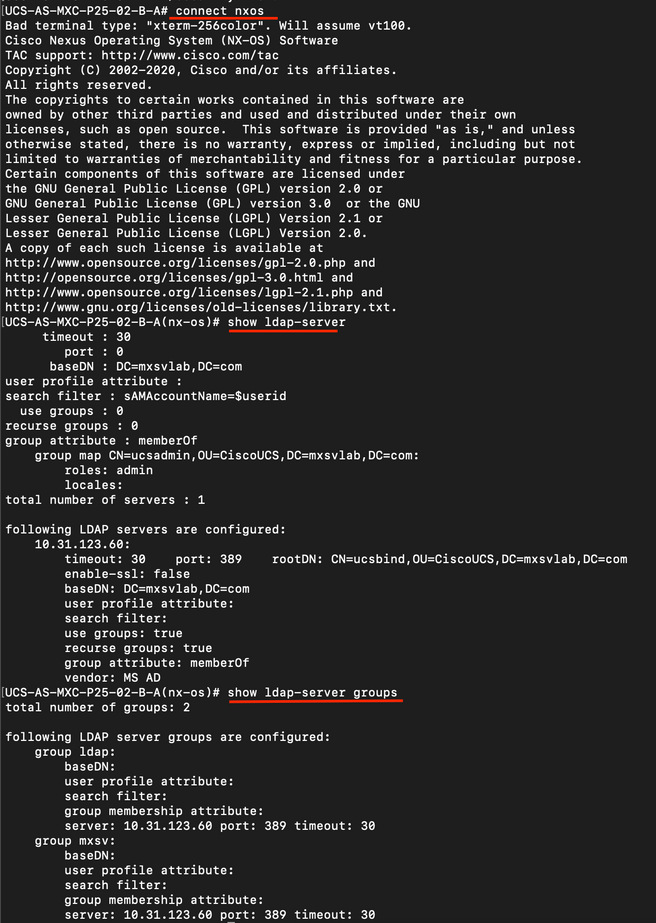
The most effective method to see errors is to enable our debug, with this output we can see the groups, the connection, and the error message that prevents communication.
- Open an SSH session to FI and login as a local user and change to NX-OS CLI context and start the terminal monitor.
 ucs # connect nxos

 ucs(nxos)# terminal monitor
- Enable debug flags and verify the SSH session output to the log file.
 ucs(nxos)# debug aaa all <<< not required, incase of debugging authentication problems

 ucs(nxos)# debug aaa aaa-requests

ucs(nxos)# debug ldap all <<< not required, incase of debugging authentication problems.

ucs(nxos)# debug ldap aaa-request-lowlevel

ucs(nxos)# debug ldap aaa-request
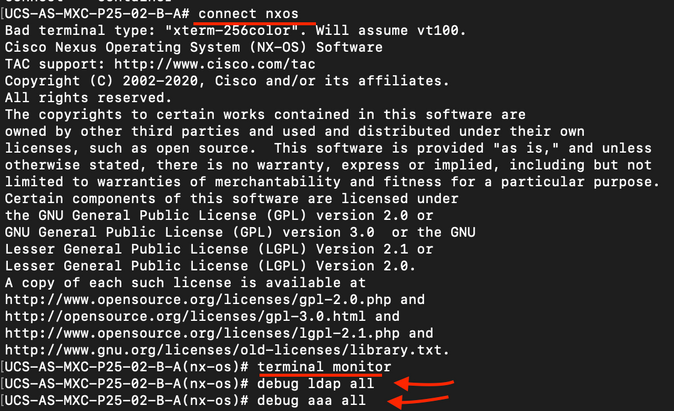
- Now open a new GUI or CLI session and attempt to log in as a remote ( LDAP ) user.
- Once you received a login failure message, turn off the debugs.
Related Information


 Feedback