TMS Phone Books Troubleshoot Guide
Available Languages
Download Options
Bias-Free Language
The documentation set for this product strives to use bias-free language. For the purposes of this documentation set, bias-free is defined as language that does not imply discrimination based on age, disability, gender, racial identity, ethnic identity, sexual orientation, socioeconomic status, and intersectionality. Exceptions may be present in the documentation due to language that is hardcoded in the user interfaces of the product software, language used based on RFP documentation, or language that is used by a referenced third-party product. Learn more about how Cisco is using Inclusive Language.
Contents
Introduction
This document describes how to troubleshoot different issues with Cisco TelePresence Management Suite (TMS) phone books.
Prerequisites
Requirements
Cisco recommends that you have knowledge of these topics:
- Cisco TMS
- Cisco TelePresence Endpoints
- Microsoft Internet Information Services (IIS)
Components Used
The information in this document is based on these software and hardware versions:
- Cisco TMS Version 14.x and 15.x
- TC and CE software endpoints
The information in this document was created from the devices in a specific lab environment. All of the devices used in this document started with a cleared (default) configuration. If your network is live, make sure that you understand the potential impact of any command.
Related Products
This document can also be used with these hardware and software versions:
- Cisco TelePresence Endpoints MX-Series, C-Series, SX-Series, EX-Series, Room Kit devices, and MXPs
- Cisco Jabber Video for TelePresence (Movi)
Background Information
The TMS phone books are accessible with the use of HTTP or HTTPS based on which protocol is enabled in IIS on the Microsoft Windows server. The system must be added in TMS in order to get the phone book (corporate directory). For newer systems, the phone book search is a live communication, and the data is not stored on the system. TMS must be up and it must accept connections in order for phone books to work.
TMS Phone Book Directories
Global Directory
The Global Directory is a file stored on the codec where the entries cannot be changed via the remote control. The file is transmitted by HTTP/HTTPs to all endpoints that subscribe to one or more phone books in Cisco TMS. Multiple phone books are merged into one phone book. If they contain more than 400 entries, only the first 400 are shown on the endpoint.
The file is transmitted to the endpoint on the intervals set in the Administrative Tools > Configuration > General Settings > Phone Books Update Frequency field.
This only works on endpoints that support the globdir.prm (Not supported on TC or CE software endpoints).
Corporate Directory
The Corporate Directory is an XML service on the Cisco TMS server that allows the endpoint to retrieve the phone books directly from the server every time the phone book button on the endpoint is pressed. It allows for a hierarchy of phone books and multiple phone numbers on every entry. The Corporate Directory is also searchable.
System Phone Book Types
Navigate to Administrative Tools > Configuration > General Settings in order to select your system phone book type. You can:
- Use centralized TMS phone books only (corporate phone book)
- Use both centralized and downloaded phone books (both)
- Use global phone books downloaded to systems only (global phone book)
Cisco recommends that you opt for the corporate phone book or both, because the downloaded phone book is only supported by legacy TANDBERG endpoints.
The default setting is both, which makes the global directory available should the corporate directory live search fail.
Ports Used for TMS Phone Books
The endpoints access the TMS Phonebook service with either port 80 (HTTP) or port 443 (HTTPs). Verify that these ports are allowed on the Microsoft Windows Server firewall and any network firewall that might be in the path.

Endpoint Phone Book Server Configuration
Once a system is added to TMS, it should receive a set of management settings that contains the feedback address, external management address, and the phonebook address. The address on the system can be checked from the Web Interface of the system, xAPI (xConfiguration //phonebook), or from the User Interface on the system.
The address pushed out to the endpoint is determined by what is configured in TMS at Administrative Tools > Configuration > Network Settings under Advanced Network Settings for Systems on Internal LAN. If the TMS Server IPv4 Address field is configured and the field is empty, then the IP Address is used, but if both fields are populated, the Fully Qualified Domain Name (FQDN) is preferred and used.

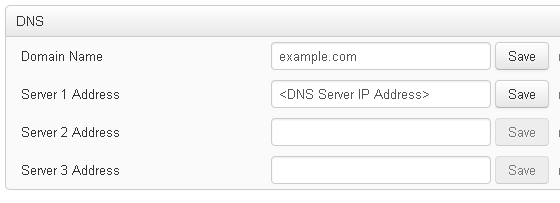
When you check the phone book URL, it is important to notice if the <TMSaddress> is a FQDN or an IP address. If it is an FQDN, the endpoint must also have a valid Domain Name Server (DNS) configured. If DNS is not configured on the endpoint, it is not able to resolve the FQDN in order to retrieve phone books. Refer to the Check Endpoint DNS Configuration section for steps to verify the DNS.
Note: Make sure the IP address is correct. Sometimes customers have recently moved TMS from one server to another, they have another lab TMS, or a rogue TMS might exist.
Check the Address with the Web Interface
Within the web interface of the endpoint, navigate to Configuration > System Configuration > Phonebook Server. Verify that the phone book settings are correct. Most importantly, the URL should match this format: http://<TMSaddress>/tms/public/external/phonebook/phonebookservice.asmx.
Check the Address with Secure Shell (SSH)
Here is how you check the address with SSH:
xConfiguration //phonebook
*c xConfiguration Phonebook Server 1 ID: "default"
*c xConfiguration Phonebook Server 1 Type: TMS
*c xConfiguration Phonebook Server 1 URL: "http://<TMSaddress>/tms/public/external/
phonebook/phonebookservice.asmx"
Test Phone Book Request from the Endpoint
The quickest way to determine connectivity is to SSH into the endpoint using admin credentials and run the following command:
xcommand Phonebook Search Phonebook Type: Corporate
In a working scenario, this will return one of two results, depending on the number of phonebooks assigned to the endpoint.
If one phonebook:

If Multiple Phonebooks are applied, the result will instead list the phonebook folders:
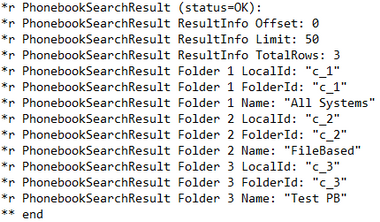
This command will also identify any connectivity issues. As examples:
- If no phonebooks are assigned to the endpoint in TMS:

- If unable to contact the Phone Book Service:

If there is an authentication configuration issue in IIS on the server hosting TMS:

If pointing at 'http or https://<TMSFQDN>/tms/public/external/phonebook/phonebookservice.asmx.' it will show you if there is a possible DNS resolution issue:

Check Endpoint DNS Configuration
Check the DNS Configuration with SSH

Check the DNS Configuration with the Web Interface
Within the web interface of the endpoint, navigate to Configuration > System Configuration > Network.
Determine if the Phone Book Service is Reachable
From a User PC, complete these steps:
- Within the endpoint, navigate to Configuration > System Configuration > Phonebook Server, and copy the TMS phone book URL configured on the endpoint.
- Paste the URL into a browser window.
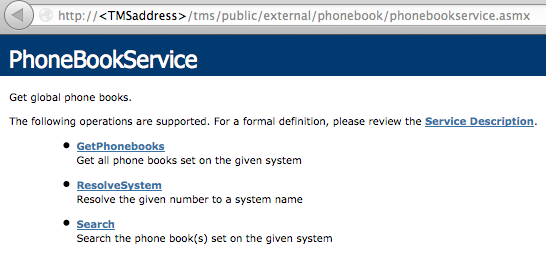
If you see the page shown in the image, it means that the phonebook service is reachable. If you do not see this page, verify that the computer you test on does not have any network restrictions to access the address.
If you see an Unauthorized, then there might be an issue with IIS, which is discussed further in this document.
From the Root of the endpoint, enter: curl http://<TMS IP Address>/tms/public/external/phonebook/phonebookservice.asmx
TMS Phone Book and Phone Book Source
All TMS phone books are built off of phone book sources.
Go to Phone Books > Manage Phone Book Sources in order to manage your phone book sources.
Currently TMS phone book sources consist of:

- Cisco TMS Endpoint
- Manual List
- Active Directory
- H.350 Directory and H.350 User Directory
- File-Based Phone Book
- Gatekeeper
- Other TMS Phone Book
- Cisco TMS Provisioning Directory
- System Local Phone Book
- Cisco TMS-Managed Cisco Unified CM
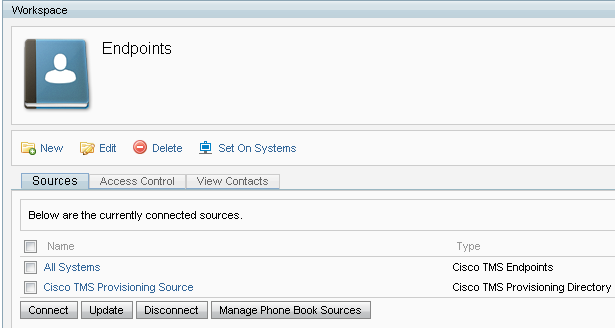
Once a phone book source has been created, you connect it to a phone book. The phone book you connect the source to will be the phone book you set on devices. You can connect multiple phone books to multiple phone book sources
Verify Contacts and Phone Book is Set on System
Verify Contacts
Check the phone book source and verify that contacts and contact methods exist.
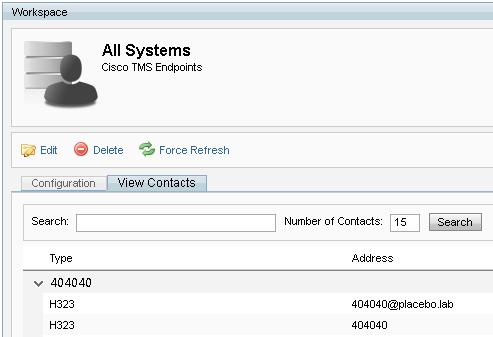
Check that the phone book is connected to the phone book source and verify that the same contacts and contact methods exist. The phone book you connect the source to will be the phone book you set on devices.
Note: Endpoints and Jabber Video for TelePresence (Movi) see what is populated in the phone book, not the phone book source. Be alert for differences between the two.
Phone Book Set on System
Make sure the phone books have been set on the system. Go to Phone Books > Manage Phone Books > Select the Phone Book and select Set on Systems.
A list of the systems appears on the right under Selected Systems.
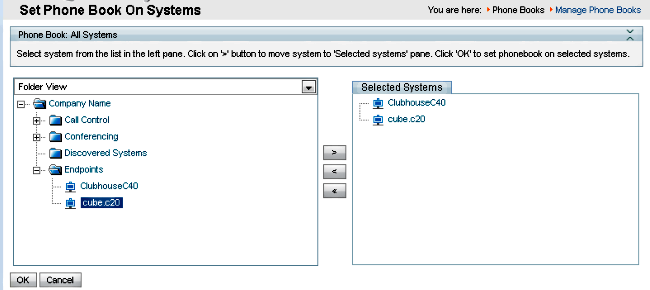
Jabber Video for TelePresence (Movi) and Phone Books
Note: The client must be authenticated in order to receive phone books. The VCS/Expressway zone in which it registers must either be Check Credentials or Treat as Authenticated.
The users receive the phone book through the VCS/Expressway Series and not from TMS.
Access Control
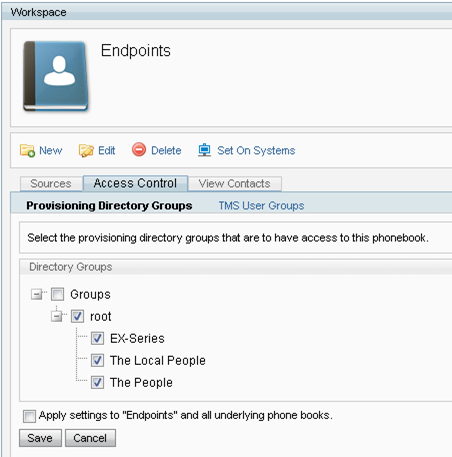
The account groups must be given access control to the phone book in order to search it.
Even if the Top-Level is checked, expand it, and verify that the sub-levels are checked. If only new users do not receive phone books, it is possible they are part of a new group that is not checked within the Access Control tab.
Provisioning Configuration
- In TMS Systems > Provisioning > Users, verify that the Video Address Pattern is configured.
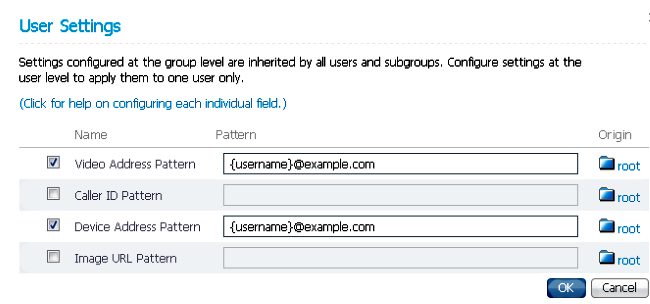
- Check the configuration template assigned to the Jabber Video for TelePresence (Movi) user for the phone book Server URI configuration.

Duplicate Entries
Be cautious if you connect multiple phone books to a single phone book, because this can cause duplicate entries to appear on endpoints or with the Jabber Video for TelePresence (Movi) client if the connected sources contain the same phone book entries.
Phone Book Routing
Be aware of this setting in case some endpoints do not get some of the phone book entries that are seen in other endpoints.
In Administrative Tools > Configuration > General Settings, there is a setting called Route Phone Book Entries. Yes is the default setting, which means that endpoints only display addresses that they are capable of dialing. For example, on an H.323-only endpoint, ISDN numbers and Session Initiation Protocol (SIP) addresses are not displayed. No means that the endpoints display all addresses and numbers in the phone book regardless of their dialing capabilities.
401 Unauthorized - Troubleshoot IIS
One of the most common phone book issues is caused by a misconfiguration in IIS. Anonymous Authentication must be enabled for the public folder in IIS for the endpoints to be able to retrieve phone books. If this is not enabled, the endpoints are challenged for authentication they are unable to provide.
In order to determine if the endpoint is challenged for authentication, SSH into the endpoint and query for the phone book with xcommand Phonebook Search Phonebook Type: Corporate. If the endpoint is challenged for authentication, you will see '<Authentication fail>' (HTTP code=401) as seen in this image.

Check IIS Settings
- Open a Remote Desktop Protocol (RDP) session with the TMS server.
- Open the IIS Manager .
- Expand Default Website.
- Expand TMS.
- Select public.
- Select

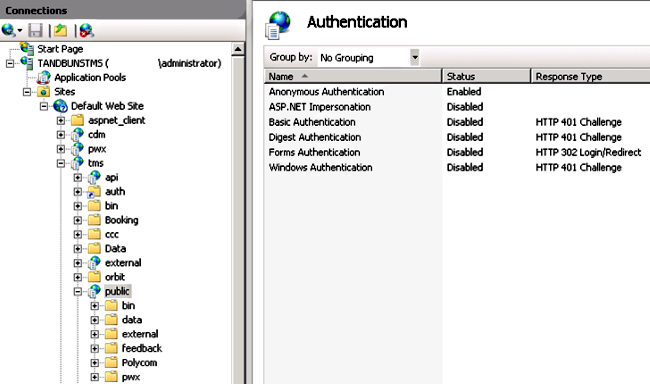
- Verify that Anonymous Authentication is enabled, and enable if it is not already.
Use a Network Capture
Analyze Phonebook Data in Wireshark
The phone book search starts with a search request to the phone book service on TMS which TMS responds to and includes the search result in the response if everything works.
You can run the trace on the TMS server or on the endpoint if the endpoint supports tcpdump. Let the trace run and access the phonebook via the web interface or from the User Interface. You should see a search request come in on the TMS server.

Following this TCP stream, you will see two primary components of the XML:
First, the endpoint will identify itself, for example:
<Search>
<Identification>
  <SystemName>RoomKit</SystemName>
  <MACAddress>08:96:ad:5a:f4:f4</MACAddress>
  <IPAddress>14.49.31.33</IPAddress>
  <IPAddressV6 type="Local">fe80::a96:adff:fe5a:f4f4</IPAddressV6>
  <ProductType>Cisco Codec</ProductType>
  <ProductID>Cisco Webex Room Kit</ProductID>
  <SWVersion>ce9.9.0.3a4afe323b0</SWVersion>
  <SerialNumber>FOC2108NFRA</SerialNumber>
</Identification>
Next, you'll see the details of the request:
<CaseSensitiveSearch>false</CaseSensitiveSearch>
      <SearchPath/>
      <SearchString/>
      <SearchType>Free</SearchType>
      <Scope>SubTree</Scope>
      <MaxResult>50</MaxResult>
      <RangeInclusive>false</RangeInclusive>
    </Search>
<Note: Detail values will change depending on the request made. The request above was made using the ssh command 'xcommand Phonebook Search PhonebookType: Corporate' from the endpoint.>
The response from the TMS Server should be a 200 OK. Otherwise you can troubleshoot based on the different message you receive.

The 200 OK response will contain the relevant entries from the phone books assigned to the endpoint in TMS. In the request above, the endpoint had a single phone book assigned in TMS, and the response looks like this:
<SearchResponse xmlns="http://www.tandberg.net/2004/06/PhoneBookSearch/">
    <SearchResult>
        <Name />
        <Id />
        <Entry>
            <Name>HDX8000</Name>
            <Id>e_92750</Id>
            <Route>
                <CallType>384</CallType>
                <Protocol>H323</Protocol>
                <Restrict>Norestrict</Restrict>
                <DialString>hdx8000</DialString>
                <Description>hdx8000 (H.323)</Description>
                <SystemType>Polycom HDX 8000 HD</SystemType>
            </Route>
            <IsLast>false</IsLast>
            <IsFirst>true</IsFirst>
            <BaseDN />
            <SystemType>Polycom HDX 8000 HD</SystemType>
        </Entry>
        <Entry>
            <Name>SX10</Name>
            <Id>e_92749</Id>
            <Route>
                <CallType>384</CallType>
                <Protocol>SIP</Protocol>
                <Restrict>Norestrict</Restrict>
                <DialString>sx10@example.com</DialString>
                <Description>sx10@example.com (SIP)</Description>
                <SystemType>Cisco TelePresence SX10</SystemType>
            </Route>
            <IsLast>false</IsLast>
            <IsFirst>false</IsFirst>
            <BaseDN />
            <SystemType>Cisco TelePresence SX10</SystemType>
        </Entry>
        <NoOfEntries>7</NoOfEntries>
        <FolderExists>true</FolderExists>
    </SearchResult>
</SearchResponse>
Phone Book Request/Response Logging in TMS
TMS 15.8 introduced the capability to log all phone book requests, and their responses. By default this logging is disabled but can be enabled in two ways.
1. By modifying the web.config file located, by default at "C:\Program Files (x86)\TANDBERG\TMS\wwwTMS\Public\web.config" and modifying this section:
<logger name="Tandberg.TMS.Phonebook.PhonebookRequestResponse" additivity="false">
<level value="OFF" />
Change the level value from 'OFF' to 'DEBUG'
2. This can also be done more easily using the TMS Log Collection Utility by checking the following:
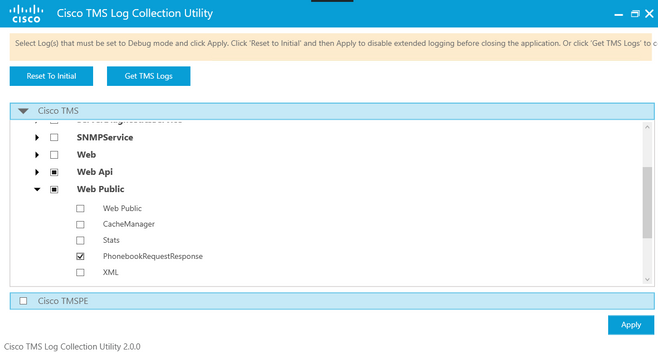
Once a phone book request hits the TMS application, the log will be written. The default location for this file is "C:\Program Files (x86)\TANDBERG\TMS\data\Logs\TMSDebug\log-phonebook-request-response.txt"
An example of this output:
Incoming Request
2020-01-08 09:30:54,856|PhoneBookService [ec3eaf80-f519-4573-9e68-3d98ab494d0b] REQUEST : Identification = 14.49.31.33,Scope = SubTree,Start Time = 1/8/2020 9:30:54 AM,Start From Id = "",End At Id = "",Max Result = 50,Search String = "",Search Path = "",Range Inclusive = False,Case Sensitive Search = False,Search Type = Free,Starts With = "",
Outgoing Response
2020-01-08 09:30:55,121|PhoneBookService [ec3eaf80-f519-4573-9e68-3d98ab494d0b] RESPONSE : 14.49.31.33 <?xml version="1.0" encoding="utf-16"?><Catalog xmlns:xsd="http://www.w3.org/2001/XMLSchema" xmlns:xsi="http://www.w3.org/2001/XMLSchema-instance"><Name /><Id /><Entry><Name>HDX8000</Name><Id>e_92750</Id><Route><CallType>384</CallType><Protocol>H323</Protocol><Restrict>Norestrict</Restrict><DialString>hdx8000</DialString><Description>hdx8000 (H.323)</Description><SystemType>Polycom HDX 8000 HD</SystemType></Route><Route><CallType>384</CallType><Protocol>H323</Protocol><Restrict>Norestrict</Restrict><DialString>1001</DialString><Description>1001 (H.323)</Description><SystemType>Polycom HDX 8000 HD</SystemType></Route><Route><CallType>384</CallType><Protocol>H323</Protocol><Restrict>Norestrict</Restrict><DialString>14.49.31.35</DialString><Description>14.49.31.35 (H.323)</Description><SystemType>Polycom HDX 8000 HD</SystemType></Route><IsLast>false</IsLast><IsFirst>true</IsFirst><BaseDN /><SystemType>Polycom HDX 8000 HD</SystemType></Entry><Entry><Name>SX10</Name><Id>e_92749</Id><Route><CallType>384</CallType><Protocol>SIP</Protocol><Restrict>Norestrict</Restrict><DialString>sx10@example.com</DialString><Description>sx10@example.com (SIP)</Description><SystemType>Cisco TelePresence SX10</SystemType></Route><IsLast>false</IsLast><IsFirst>false</IsFirst><BaseDN /><SystemType>Cisco TelePresence SX10</SystemType></Entry><IsLast>false</IsLast><IsFirst>false</IsFirst><NoOfEntries>7</NoOfEntries><FolderExists>true</FolderExists></Catalog>
Note that this is very similar to the POST and 200 OK seen in a packet capture. However, this will be the same, whether using HTTP or HTTPS. Whereas the capture will be unreadable if HTTPS is used.
Contributed by Cisco Engineers
- Adam WamsleyCisco TAC Engineer
- Magnus OhmCisco TAC Engineer
- Jason ShupeCisco TAC Engineer
Contact Cisco
- Open a Support Case

- (Requires a Cisco Service Contract)
 Feedback