Introduction
This document describes how to migrate a TMS SQL database from one SQL server to another.
Prerequisites
Requirements
Cisco recommends that you have knowledge of these topics:
- TMS (Cisco TelePresence Management Suite)
- TMS Tools
- SQL server
- SQL Server Management Studio
Components Used
The information in this document is based on these software and hardware versions:
- TMS 15.3
- SQL server 2012
- SQL Server Management Studio
The information in this document was created from the devices in a specific lab environment. All of the devices used in this document started with a cleared (default) configuration. If your network is live, ensure that you understand the potential impact of any command.
Background Information
You will need Console/RDP access to the TMS server and SQL account credential with sysadmin server role. The process will take a minimum of 1 hour downtime.
Configure
Follow the steps in order to successfully migrate the TMS SQL Database from one SQL server to another.
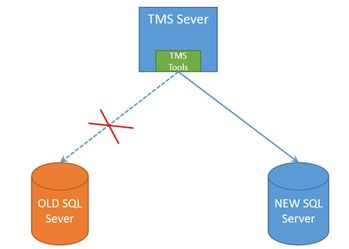
Network Diagram
The following image provides an example of the migration process:
Step 1. Stop the TMS Application Services, including IIS and WWW
In order to locate and stop the services, access the TMS server via console or RDP connection, and run the command services.msc in the Command Propmpt. Within the list of services, locate the ones below and right click on each of them, in order to stop it:
- TMSDatabaseScannerService
- TMSLiveService
- TMSPLCMDirectoryService
- TMSSchedulerService
- TMSServerDiagnosticsService
- TMSSnmpService
- World Wide Web Publishing Service (W3SVC)
- IISADMIN (optional)
Caution: Before moving further, ensure that all of the required services are stopped.
Step 2. Take a backup of the TMSNG Database from the existing SQL Server
In order to create a backup of the current SQL Database follow the procedure.
1.Login to SQL Server Management Studio with the sa credential (or, use the credential which has the sysadmin access to the database).
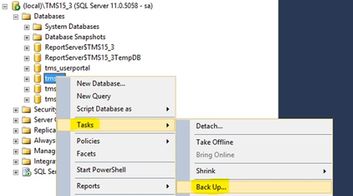
2. Locate the database for which you want to create a backup (for example tmsng, tmspe) and right click on it to select Tasks > Back up.
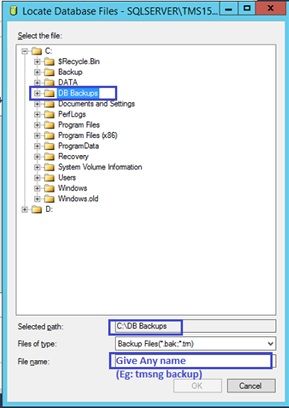
3. A new window will open. You must remove the existing path and add a new path, where the new back up file will be saved. Backup type should be set as Full.
- Click on the button Remove in order to remove the existing path
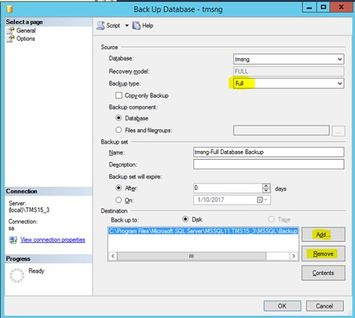
- Click on the Add button in order to add a new path for the new back up file
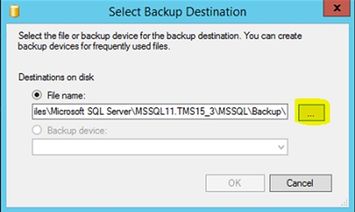
- Navigate to the new location and enter a name for the File name. Click on OK
- A new message will pop up once the back up is completed successfully
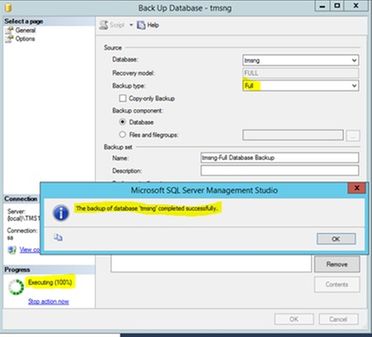
4. Follow the same process for the database of TMSPE (optional).
Step 3. Restore the back up to the new SQL Server
In order to apply the back up of the Database to the new SQL server, perform the procedure below.
Caution: Ensure that the TMS server and new SQL server have the same time (timezone) configured.
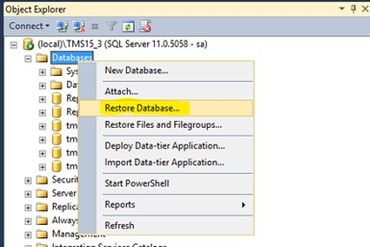
1. Open SQL Server Management Studio and right click on Databases. Select Restore Database and a new window will open.
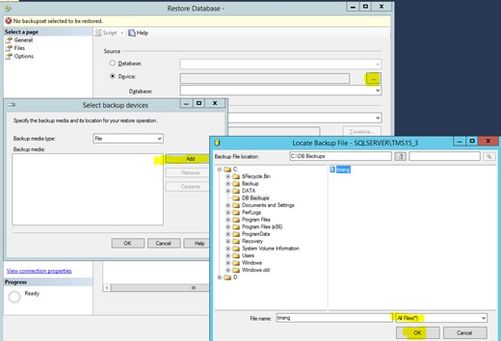
2. You must select a source device. Click on the button to the right of the Device field and click on Add at the new pop up window. Select the folder and the back up file, and then click OK.
Step 4. Change the connection setting from the old SQL server to the new SQL server
1. Access TMS Server using either console or RDP connection.
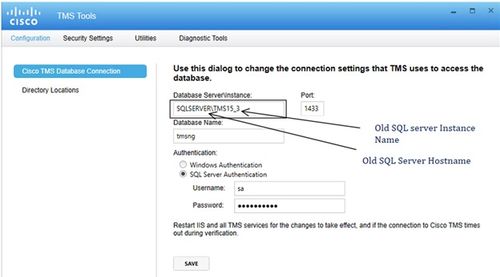
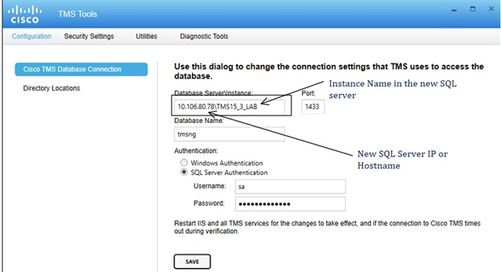
2. Open TMS Tools and navigate to Configuration > Cisco TMS Database Connection.
3. At the field Database Server\instance you must enter the new connection details for the SQL server.
- Example before the change of the connection details of the old SQL server
- Example after the change of the connection details to the new SQL server
Step 5. Start all of the services, which were stopped earlier at step 1
In order to locate and start the services, access the TMS server via console or RDP connection, and run the command services.mscin the Command Prompt. Within the list of services, locate the ones below and right click on each of them, in order to start it:
- TMSDatabaseScannerService
- TMSLiveService
- TMSPLCMDirectoryService
- TMSSchedulerService
- TMSServerDiagnosticsService
- TMSSnmpService
- World Wide Web Publishing Service (W3SVC)
- IISADMIN (optional)
Verify
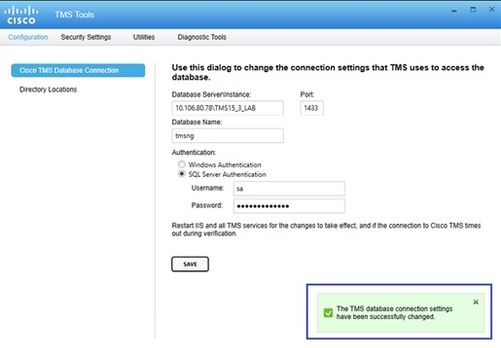
After the successful change of the connection details to reflect the new SQL server, you would see the message “The TMS database connection settings have been successfully changed” in green.
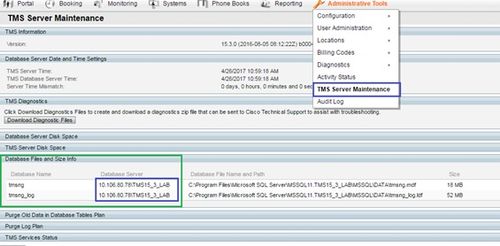
In order to see the new SQL server information, navigate to the TMS Web GUI > Administrative Tools > TMS Server Maintenance and expand the section Database Files and Size Info.
Troubleshoot
There is currently no specific troubleshooting information available for this configuration.
