BYOD Feature of Cisco Prime IP Express - White Paper
Available Languages
Download Options
Bias-Free Language
The documentation set for this product strives to use bias-free language. For the purposes of this documentation set, bias-free is defined as language that does not imply discrimination based on age, disability, gender, racial identity, ethnic identity, sexual orientation, socioeconomic status, and intersectionality. Exceptions may be present in the documentation due to language that is hardcoded in the user interfaces of the product software, language used based on RFP documentation, or language that is used by a referenced third-party product. Learn more about how Cisco is using Inclusive Language.
Contents
Introduction
This white paper explains the functionality and configuration of BYOD feature of Cisco Prime IP Express (CPIPE) system. Cisco Prime IP Express BYOD registration portal is an easy to handle self-service web portal for registering and managing devices. It is integrated with DHCP, CDNS of Cisco Prime IP Express. The methodology, architecture, and BYOD configuration required for this system is documented in detail. Using this white paper as a guide, you can configure BYOD for registering and managing the devices.
Problem Statement
All IP networks face a common set of problems. These are similar to those faced by Boston College prior to the development of its automated Internet sign-on system, such as the need to:
-
Provide hands-off, user-driven configuration of computers with correct IP addresses and network settings.
-
Configure large numbers of computers in short span of time
-
Acquire information about the computers being configured on the network
-
Control access to IP network resources
-
Collect information to assist troubleshooting network and security events
BYOD Feature-Functional Overview
You can use BYOD feature of Cisco Prime IP Express system to address each of the problems mentioned above as it provides comprehensive solutions for employees to use their own IP-enable devices in a well-managed and secure way. It effectively eliminates the challenges of the IT administrators to onboard and track the personal and corporate devices. Some of the advantages of this feature are:
-
Provides a hands-off, user-driven configuration of device with correct IP addresses and network settings.
-
Configures large number of devices in a short span of time.
-
Acquires information about the devices being configured on the network.
Cisco Prime IP Express DHCP network automatically redirects the users to the BYOD registration portal when the users try to connect BYOD device first time because the users must register their devices by using their existing Active Directory credentials. During the registration, information about the users' device, like its MAC address/DUID and other metadata are captured through auto-detection or manual entry. This information is used to map the users to their devices and track the IP activity for auditing and compliance. The BYOD registration portal is integrated with DHCP of Cisco Prime IP Express.
User's Perspective:
The BYOD Feature provides simple process to activate device and access to Cisco Prime IP Express (CPIPE) network for the end users. The procedures are:
-
Connect the device to the network
-
Request for a http from a browser
-
You are automatically redirected to the BYOD registration page
-
Registration page populates the device details and prompts you for user credentials
-
Provide Credentials, such as a username, password
-
Accept Terms Of Service
-
Click Register button
-
Wait for few seconds, device will reboot.
This process normally takes only about three minutes. When complete, the device is activated and client is created in DHCP server.
Administrator's Perspective:
This system is an easy to use self-service web portal and replaces many time-consuming and error-prone processes. Managing of this self-service system is very simple.
-
Install Cisco Prime IP Express Web Server
-
Configure a BYOD (DHCP, CDNS servers)
-
Instruct users how to register their devices
-
Instruct users how to use the user login page to manage devices
Functional Architecture
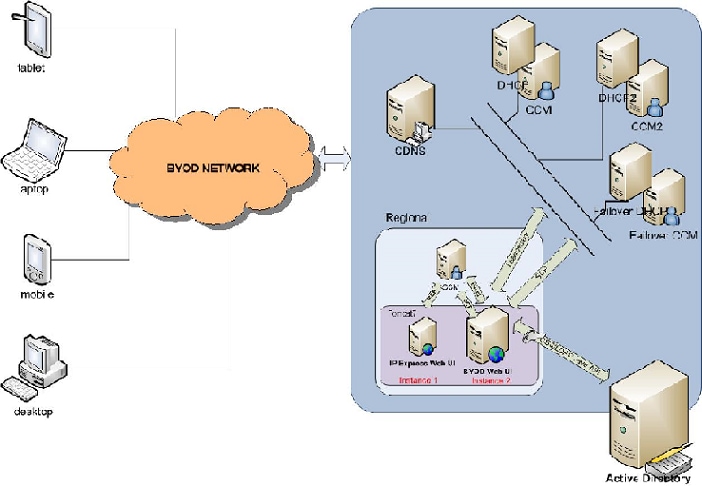
The architecture of this feature requires minimum four major components, a local DHCP server, a CDNS server, a regional server and an Active directory. In the regional server, new tomcat instance runs to support BYOD. Standard CDNS server is configured with Domain redirect rule with ACL list, which ensures that all the HTTP queries from specific range of address are resolved to the BYOD Web Server address. Shown below is the functional architecture diagram.
Process Flow
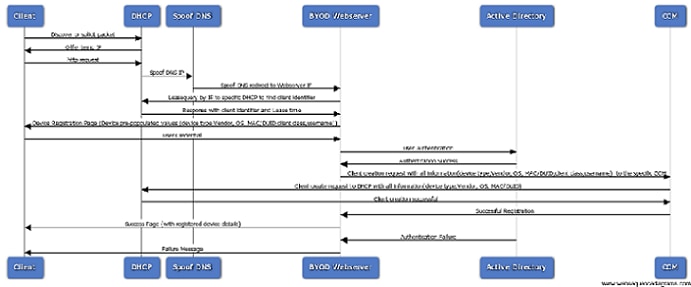
The below diagram describes the process flow of web UI, when a user/client connects the BYOD to the network.
-
When a client connects a new device to the network, the DHCPDISCOVER/SOLICIT packet is sent to DHCP.
-
The DHCP offers temporary IP and returns option 6 for DHCPv4 or option 23 for DHCPv6 with CDNS server address.
-
Client sends DNS resolve query to the CDNS server.
-
The CDNS domain redirect rule provides BYOD Web Server IP for unregistered BYOD device and redirects to the device registration page.
-
The BYOD web server takes the client IP from the http header data and checks the matching subnet/prefix to find the client DHCP server address.
-
If the matching subnet/prefix is not found, SCP request is sent to the regional CCM to find the DHCP server which has served this client and updates the subnet/prefix information in the BYOD in-memory.
-
Sends lease query with address (as per RFC 4388 for DHCPv4 and as per RFC 5007 for DHCPv6) to the corresponding DHCP server to get the client identifier (Device id) and populates in the device registration page along with other details, like device vendor, operating system etc.
-
Client provides Active Directory credentials and submits the login form.
-
The BYOD web server authenticates the credentials against Active Directory.
-
On successful authentication, BYOD web server sends SCP request to DHCP cluster or failover pair to create client entry (client class name, authenticate until, device type, Vendor, OS, MAC/DUID, username) in the DHCP Client database. If LDAP is configured, the client will be created only in LDAP database.
-
Finally BYOD web server sends the successful registration message to the client with the details of all the devices which are registered by him/her.
-
If the authentication fails, the BYOD web server responds back to the client with failure authentication message.
BYOD Configuration
To build the system for supporting BYOD feature, you must modify the Cisco Prime IP Express configuration from its out-of-the-box settings to enable some of the server's advanced features. You can easily accomplish this process (BYOD configuration setup) using the BYOD setup wizard in Cisco Prime IP Express Regional server.
For information on how to install Cisco Prime IP Express, refer Cisco Prime IP Express Install Guide.
For more information on how to use the GUI, refer Quick Start Guide and User's Guide.
You can find all other Cisco Prime IP Express production documentation at: http://www.cisco.com/c/en/us/support/cloud-systems-management/prime-ip-express/tsd-products-support-series-home.html
BYOD Setup Wizard
The following sections explain the BYOD setup wizard work flow in the Cisco Prime IP Express Regional server. The overall process involves configuring both the DHCP and the CDNS servers. For simple setup, default client is used for unregistered BYOD devices, while for complex setup; client-class-lookup-id and client-lookup-expression are used. Details are provided in user documentation/deployment guide.
DHCP Configuration
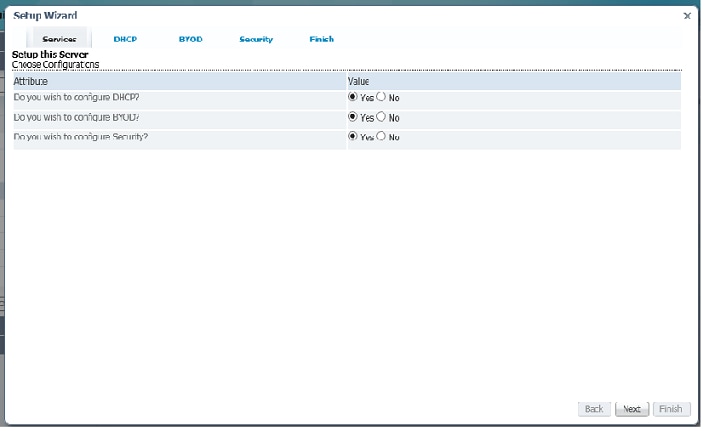
To configure DHCP server, complete the steps below:
-
Select value No for Failover.
-
Select value Yes for DHCPv4.
-
Select value No for DHCPv6 and then click Next.
-
DHCPv4 Setup Wizard page opens.
-
Click Add Scope Templates to create scope.
-
Enter the scope template name in the Name box, and then click Add DHCP Scope Template button.
-
Click Save to save the scope template, and then click Next to move to the next page.
-
Enter (concat "byod-" subnet) in the Scope Name Expression text box.
-
Enter (create-range first-addr last-addr) in the Range Expression text box and the click Save to save the page. Click Next.
-
Click Add Subnet to create subnet.
-
Enter subnet IP in the Address text box, for example 10.76.206.0, and then click Add Subnet button.
-
Click the Push icon to push the subnet to the local cluster.
-
From the Cluster or Failover drop-down list select the local cluster host name to which you want to push the subnet.
-
Select the scope template from the Scope Template drop-down list.
-
Click Push Subnet button.
-
Move to BYOD Setup page by clicking next.
BYOD Configuration
You can use BYOD Setup page to capture the details for CDNS server configuration for creating domain redirect rule (spoof DNS) and lease time for the unregistered devices.
-
The policies and client classes mentioned below are created in the regional server and further used in the setup wizard pages:
BYOD Policy name: BYOD_Unregistered.
-
Add DHCPv4 dhcp-lease-time option (51) and set DHCPv6 valid-lifetime and preferred-lifetime.
-
Select domain name server option 6 for DHCPv4 and option 23 for DHCPv6.
BYOD client class name: BYOD_Registered
-
Set selection criteria for excluded - BYOD_Unregistered.
BYOD client class name: BYOD_Unregistered.
-
Set selection criteria -BYOD_Unregistered.
-
Set Policy -BYOD_Unregistered.
-
-
To configure BYOD, follow the steps below...
-
Select the CDNS server from the drop-down list.
-
Specify the time for the unregistered client and click
-
Click Next, to move to Policies page.
-
Click the Push icon, select the local cluster host name from the Available list and add it to the destination clusters by using back arrows, and then click the Push Data to Clusters button.
-
Close the View Push Data Report by clicking Close button.
-
Click Next to move to Client Classes page and click the Push icon, and then click the Push Data to Clusters button.
-
Close the View Push Data Report by clicking Close button and click Next to move to Scope Creation page.
-
Specify the percentage in the text box under Value to define the IP range for the unregistered client. By default the value is 10.
-
Click Next to move to Report page, this page shows IP range assigned to the particular client with other details such as Scope, Cluster, Subnet, and IP Range as shown below in the figure.
-
Click Next to move to https configuration page.
-
Regional Server-Https Configuration
The setup wizard page can be used for Https configuration; these details are required for BYOD Web Server.
To configure the Https, follow the step below:
-
Upload the Keystore file using Choose File button and enter the keystore password in the Keystore Password text box, click Upload button, and then click Next to move to Reload Server Page.
Reloading the Servers
Once configuration is complete, the reload server page can be used to reload the DHCP server, CDNS server and BYOD Web Server,
To do so, follow the steps below:
-
Specify value in Yes or No to restart BYOD web server, CDNS web server and DHCP Servers/Failover pair, click Reload Servers button, and then click Next, Security page opens.
-
Choose the authentication type value Active Directory from the Value drop-down list.
-
Click Save and Next and move to Active Directory Page, and then click Save.
-
Enter the IP Address, Hostname and Port for example IP=10.76.206.5, hostname= tmh2-chn-cnrent-AD1 and port= 389 in their respective text boxes, and then click Add Address.
-
Enter the domain name CPIPE.COM in the Domain text box.
-
Click Next, Successfully Configured pages opens. Click Finish to complete the configuration setup process.
Device Registration Page
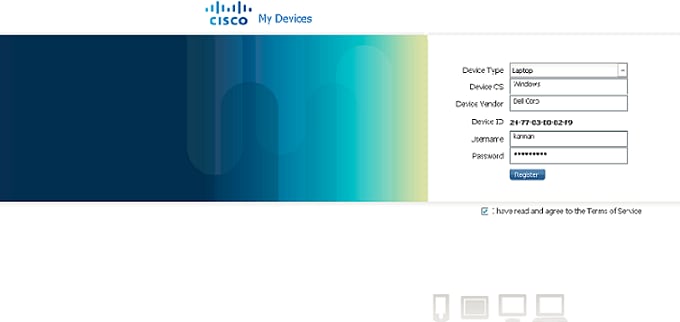
Device registration page allows users to register their devices. In this page, some fields such as Device Type, Device OS, Device Vendor and Device/ MAC ID are pre-populated and also allows user to edit the details. However users need to enter their credentials such as:
The Page
-
Username
-
Password
-
Terms Of Service
Activation Success Page
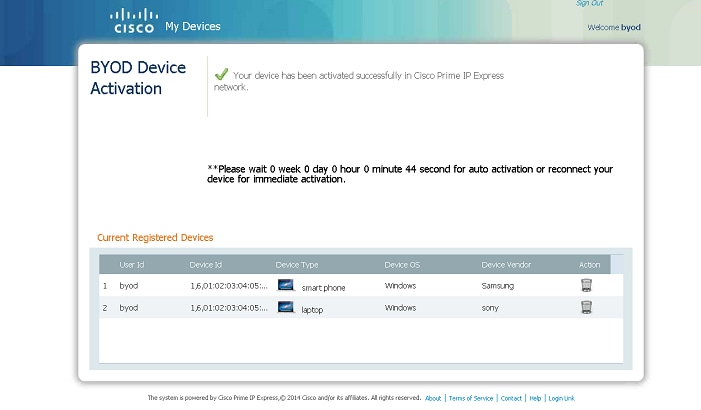
On successful registration, activation success page displays the message with lease time for automatic activation and reconnect message of immediate effect as shown below in the figure.Activation success page also displays the list of currently and previously registered devices for the same user. User can delete a device by clicking the delete icon.
User login page to manage devices
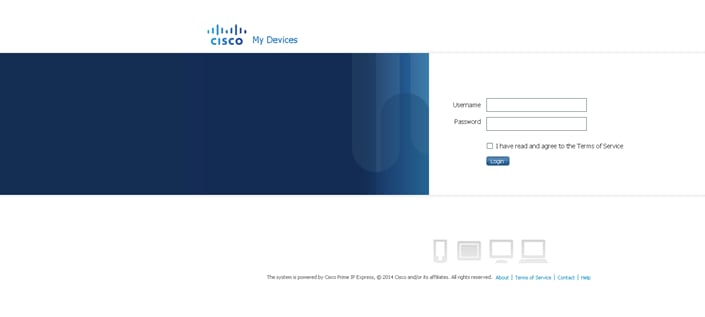
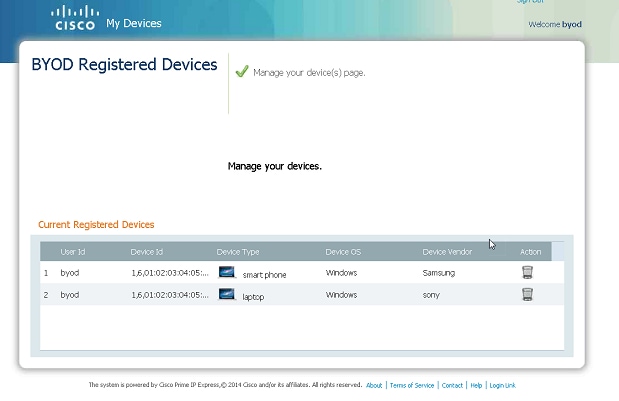
The user login page allows users to delete their registered devices. To login to User Login page, users need to provide their login credentials, such as Username, Password and also need to accept the Terms of Service. On successful login BYOD Registered Devices page opens. This page is used to manage registered devices, like deleting device.
-
Username
-
Password
-
Terms Of Service
Lookup Expression
Lookup expression identifies whether the device is an existing device or unregistered. It determines client-class for the client-class-lookup-id attribute of the DHCP server and the server executes this expression on every incoming packet to determine the client class of the packet. It returns a string (client-class name for the packet, or the distinguishing string indicating that no client-class value was considered for the client request) as per the specified expression value. Lookup expression is to ensure that each client receives its appropriate class of service across the same network.
Setting Up Lookup Expression
After BYOD is configured, the lookup expression can be set up by following the steps given below:
-
Enter Expert mode by clicking Expert.
-
Open List/Add DHCP Client Classes page, (Navigation: Design > DHCP Settings > Client Classes)
-
Create or select an already created class in the Client Classes pane on the left.
-
On the Edit DHCP Client Class created client page, under Create New Embedded Policy, enter expression in client-lookup-id and override-client-id for example, (request option "relay-agent-info" "remote-id") in the client-lookup-id text box and (request option "relay-agent-info" "remote-id") in the override-client-id text box.
-
Click Save to save the settings.
-
Open the Manage Server Page (Navigation: Operate > Servers > Manage Servers)
-
Click Local DHCP Server link in the Manage Servers pane on the left.
-
Click Edit Local DHCP Server tab.
-
Enter the created client class name in the client-class-lookup-id text box.
-
Restart Local DHCP server to make these changes effective.
LDAP Client Create Support
The BYOD Web Server enables "LDAP client create" support when IP Express DHCP server is enabled with LDAP client option.
If DHCP server is enabled with client-look-up in the LDAP then Regional Server LDAP configuration is required for BYOD to create client in LDAP.
To create and configure LDAP client in regional server, follow the steps given below:
-
Enter Expert mode by clicking Expert.
-
Open List/Add LDAP Remote Servers page, (Navigation: Deploy > DHCP > LDAP)
-
Click Add LDAP icon in the LDAP pane on the left, Add DHCP LDAP Server window opens.
-
Enter the LDAP name and hostname in the name and hostname text boxes, and then click Add DHCP LDAP Server. DHCP LDAP server gets added with the given name in the LDAP pane on the left.
-
Click the newly added LDAP link in the LDAP pane on the left, Edit LDAP Remote Server page opens, in this page name and hostname are auto-populated.
-
Enter addr, port values, and username and password in the respective text boxes.
-
Set the value for "enable" True.
-
Set the value for "can-create" enabled.
-
Set the value for "can-query" enabled.
-
Set the value for "can-update" enabled.
-
Under Query, enter the "Search Path" value.
-
Under Query, enter the "Search Path" value.
-
Under Query, keep the default value SUBTREE for "search-scope"
-
Under Create Settings, enter the "dn-create-format" value
-
Under Create Settings, enter the "create-dictionary" value
-
Under Create Settings, enter the create-object-classes value
-
Click Save to save the settings.
-
Open the Manage Servers page. (Navigation: Operate > Servers > Manage Servers)
-
Click Local BYOD Web Server link in the Manager Servers pane on the left.
-
Restart the Local BYOD Web Server by clicking Restart Server icon to make the changes effective.
DHCP Fingerprint
A DHCP fingerprint is a unique identifier to identify specific operating system or device type.
BYOD Web Server reads the "dhcp_fingerprints.conf" and it has a "HashMap" of fingerprints (PRL) and OS description.
From the DHCPv4 lease query reply, BYOD Web server gets the user-defined attribute value on the lease and finds the appropriate OS (description value) and OS number. Using OS number it finds the appropriate class definition and the description of class provides device type information.
If OS Vendor and Device Type cannot be identified using fingerprint file, http header user-agent data is used. Pattern matching is done with the primary file which has the list of OS.
To configure DHCP Finger Print, follow the steps given below:
-
Enter Expert mode by clicking Expert.
-
Open List/Add DHCP Extensions page, (Navigation: Deploy > DHCP > Extensions)
-
Click Add Extensions icon in the Extensions pane on the left, Add DHCP Server Extension window opens.
-
Enter the Extension "name", "lang", "file" and "entry" value in the respective text boxes.
-
Click Add DHCP Server Extension, and then click Save to save the settings, new extension is added.
-
Click the Extension link in the Add Extension pane on the left, Edit DHCP Extension page opens.
-
Click "Attach Extension Points" icon on the right, Extension Points window opens as shown below in the figure.
-
Under Attach Extension Points, select post-packet-decode, and then click Save as shown below in the figure.
-
Or click the DHCP Extension Points tab and then select Attach drop-down list against "post-packet-decode". This window can also be used for de-attaching the attached extension.
-
Open the Manage Servers page, (Navigation: Operate > Servers > Manage Servers)
-
Click Local DHCP Server link in the Manager Servers pane on the left.
-
Restart the Local DHCP Server by clicking Restart Server icon to make the changes effective.
Note: Fingerprint should be configured only in Local server.
Theme Configuration
This page allows BYOD admin to edit the look and feel of the BYOD web server pages by editing the theme attributes such as specific colors or color code and logo/background images to match with their own brands.
There are two types of themes, non-customizable-default Cisco theme and other is customizable.
To configure theme, follow the steps given below:
-
Enter Expert mode by clicking Expert.
-
Open List/Add Custom Theme page, (Navigation: Deploy > BYOD > Theme)
-
Click Add Theme icon in the Theme pane on the left, Add Custom Theme window opens.
-
Enter the theme name, background color, login page title font color and page title font color in the respective text boxes..
-
Click Add Custom Theme, next page opens with the details you provided.
Note: You can use this page to upload Background Image, Common Page Header Image, Login Page Logo and Common Page Logo.
-
Click the Background Image Browse button, and then click Upload to upload an image for background.
-
Repeat the same procedure to upload images for common page header image, login page log and common page logo.
-
Click Save to save the settings.
Content Page
The Content page allows the BYOD admin to configuring messages such as Register/Login Page Message, About Content, Terms of Services, Contacts and Help specific to the customer.
When user enters the content and submits or uploads (.html) files (the form). It generates specific html files for each attribute inside the BYOD web content directory with specific file name, and the content-links point to the specific html files.
The entered content is placed in between the html paragraph tag to make sure the content is displayed in the same format as it was entered.
To configure content page, follow the steps given below:
-
Enter Expert mode by clicking Expert.
-
Open Content page, (Navigation: Deploy >BYOD > Content)
-
Enter the contents for Register/Login Page Message Content, About Content, Terms of Services Content, Contact Content and Help Content in their respective text boxes.
-
Or click the respective Browse and Load buttons to import the contents.
-
Click Save to save the settings.
Glossary
The list given below describes the acronyms for the terms which are used throughout the document.
BYOD: Bring Your Own Device
AD: Active Directory
CPIPE: Cisco Prime IP Express
DHCP: Dynamic Host Configuration Protocol
CDNS: Caching Domain Name System
ACL: Access Control List
SCP: System Configuration Protocol
CCM: Central Configuration Manager
RFC: Request For Command
DUID: DHCP Unique Identifier
LDAP: Lightweight Directory Access Protocol
Revision History
| Revision | Publish Date | Comments |
|---|---|---|
1.0 |
11-Nov-2020 |
Initial Release |
Contact Cisco
- Open a Support Case

- (Requires a Cisco Service Contract)
 Feedback