Introduction
This document describes the steps required to replace a faulty catalyst switch in an Ultra-M setup.
This procedure applies for an Openstack environment using NEWTON version where ESC does not manage Cisco Prime Access Registrar (CPAR) and CPAR is installed directly on the VM deployed on Openstack.
Background Information
Ultra-M is a pre-packaged and validated virtualized mobile packet core solution designed to simplify the deployment of VNFs. The servers that are part of the Ultra-M setup are connected to three different types of switches :
- Catalyst Switch
- Leaf Switch
- Spine Switch
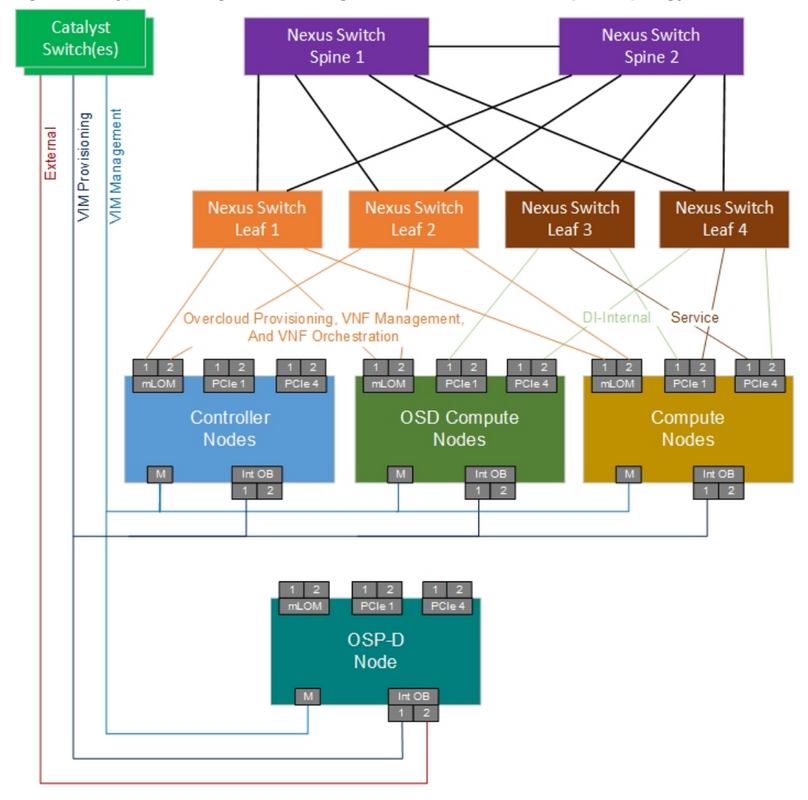
The network topology of a Ultra-M setup is as shown in the image:

Note: The Network topology is only a representation, the connections between the switches might slightly vary, it depends upon the solution deployed.
This document is intended for the Cisco personnel who are familiar with Cisco Ultra-M setup and Catalyst Switch operations.
Abbreviations
| VNF |
Virtual Network Function |
| CAT |
Catalyst Switch |
| MOP |
Method of Procedure |
| LAN |
Local Area Network |
| FTP |
File Transfer Protocol |
| TFTP |
Trivial File Transfer Protocol |
| CIMC |
Cisco Integrated Management Controller |
Workflow of the MoP
This image shows the high level workflow of the replacement procedure.

Catalyst Switch in UltraM Setup
In an UltraM setup, CAT Switch handles these three networks :
- Managment network - Connects CIMC port of the UCS Servers and Mgmt port of the Nexus Switches.
- Openstack Provisioning Network - Connects LAN1 port of all the UCS servers.
- External network - Connects to the next hop switch.
Every rack in an UltraM setup has one CAT Switch to handle the above three networks for the devices present in the rack. Since there is only one CAT switch per rack and there is no redundancy to the CAT switch. During the replacement of a faulty CAT switch the networks handled by the CAT switch is impacted. However, none of the service level traffic is carried by these networks there would not be any service impact during the replacement procedure.
Prerequisite
Step 1. Take a backup of the configuration file from the CAT switch through FTP/TFTP before it proceeds with the switch replacement.
AL03-3850-POD2-01#copy running-config tftp:
Address or name of remote host []? 10.10.10.10
Destination filename [al03-3850-pod2-01-confg]? running-config-backup

!!
1030 bytes copied in 2.489 secs (395 bytes/sec)
Step 2. Check the current software version, which runs in the switch and make a note of it.
AL03-3850-POD2-01#show version
Cisco IOS Software, IOS-XE Software, Catalyst L3 Switch Software (CAT3K_CAA-UNIVERSALK9-M), Version 03.06.06E RELEASE SOFTWARE (fc1)
Technical Support: http://www.cisco.com/techsupport
Copyright (c) 1986-2016 by Cisco Systems, Inc.
Compiled Sat 17-Dec-16 00:22 by prod_rel_team

<snip>

Switch Ports Model SW Version SW Image Mode
------ ----- ----- ---------- ---------- ----
* 1 56 WS-C3850-48T 03.06.06E cat3k_caa-universalk9 INSTALL
Configuration register is 0x102
Step 3. Check the current license entitlement.
AL03-3850-POD2-01#show license right-to-use
 Slot# License name Type Count Period left
----------------------------------------------------------
 1 ipbase permanent N/A Lifetime

License Level on Reboot: ipbase
Step 4. Make a note of the physical cables connected to the switch and also the port status.
AL03-3850-POD2-01#show int status

Port Name Status Vlan Duplex Speed Type
Gi1/0/1 Connected to CIMC connected 105 a-full a-1000 10/100/1000BaseTX
Gi1/0/2 Connected to CIMC connected 105 a-full a-1000 10/100/1000BaseTX
Gi1/0/3 Connected to CIMC connected 105 a-full a-1000 10/100/1000BaseTX
Gi1/0/4 Connected to CIMC connected 105 a-full a-1000 10/100/1000BaseTX
Gi1/0/5 Connected to CIMC connected 105 a-full a-1000 10/100/1000BaseTX
Gi1/0/6 Connected to CIMC connected 105 a-full a-1000 10/100/1000BaseTX
Gi1/0/7 Connected to CIMC connected 105 a-full a-1000 10/100/1000BaseTX
Gi1/0/8 Connected to CIMC connected 105 a-full a-1000 10/100/1000BaseTX
Gi1/0/9 Connected to tools notconnect 105 auto auto 10/100/1000BaseTX
Gi1/0/10 Connected to tools connected 105 a-full a-1000 10/100/1000BaseTX

<snip>
Switch Replacement Procedure
Step 1. Install the new switch in the rack and connect the cables to the switch as noted. The steps for switch installation can be found in this link:
Catalyst 3850 Switch Hardware Installation Guide
Step 2. Do the Express Setup to enter the initial IP information. This action enables access to the switch through the IP address for further configuration. The steps for performing Express setup can be found in the link below:
Catalyst 3850 Switch Getting Started Guide
Step 3. Check the software version of the CAT switch and upgrade/downgrade to the previous software version as per the link given:
Catalyst 3850 Series Switch Upgrade, Management, and Recovery Techniques
Step 4. Check the license level of the new CAT switch and confirm it is as per the old license settings.
AL03-3850-POD2-01#show license right-to-use
 Slot# License name Type Count Period left
----------------------------------------------------------
 1 ipbase permanent N/A Lifetime

License Level on Reboot: ipbase
Step 5. Transfer the configuration backup to the new switch.
AL03-3850-POD2-01#copy tftp: running-config
Address or name of remote host []? 10.10.10.10
Source filename []? running-config-backup
Destination filename [running-config]?

Accessing tftp://10.10.10.10/running-config-backup...

Loadingrunning-config-backup from 10.10.10.10 (via FastEthernet0/0): !
[OK - 1030 bytes]

1030 bytes copied in 9.612 secs (107 bytes/sec)
Step 6. Reload the switch after the backup configuration is loaded.
AL03-3850-POD2-01#reload
Step 7. Once the switch is up, check the port status and confirm it is as before.
AL03-3850-POD2-01#show int status
