Introduction
This document describes the process to generate a Certificate Signed Request (CSR) to create customized Certificates for servers managed by Intersight.
Prerequisites
Requirements
Cisco recommends that you have knowledge of these topics:
- Intersight
- Third-Party Certificates
- OpenSSL
Components Used
The information in this document is based on these software and hardware versions:
- Cisco UCS 6454 Fabric Interconnect, firmware 4.2(1m)
- UCSB-B200-M5 blade server, firmware 4.2(1c)
- Intersight software as a service (SaaS)
- MAC Computer with OpenSSL 1.1.1k
The information in this document was created from the devices in a specific lab environment. All of the devices used in this document started with a cleared (default) configuration. If your network is live, ensure that you understand the potential impact of any command.
Background Information
In Intersight Managed Mode, the Certificate Management policy allows you to specify the certificate and private key-pair details for an external certificate and attach the policy to servers. You can upload and use the same external certificate and private key-pair for multiple Intersight Managed Servers.
Configure
This document uses OpenSSL in order to generate the files required to obtain the certificate chain and the private key-pair.
|
Step 1.
|
Create the .cnf file which has all the details of the certificate (it must include the IP addresses for the IMC connection to the servers).
|
|
Step 2.
|
Create the private key and the .csr files through OpenSSL.
|
|
Step 3.
|
Submit the CSR file to a CA in order to sign the certificate. If your organization generates its own self-signed certificates, you can use the CSR file in order to generate a self-signed certificate.
|
|
Step 4.
|
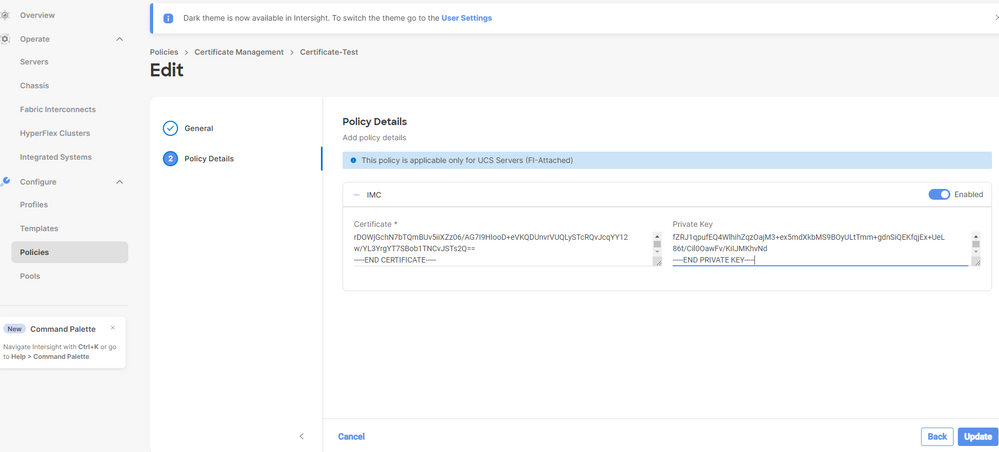
Create the Certificate Management Policy in Intersight and paste the Certificate and Private Key-pair chains.
|
Create the Configuration File (.cnf)
Use a file editor in order to create the configuration file with a .cnf extension. Fill in the settings based on your organization details.
[ req ]
default_bits = 2048
distinguished_name = req_distinguished_name
req_extensions = req_ext
prompt = no
[ req_distinguished_name ]
countryName = US
stateOrProvinceName = California
localityName = San Jose
organizationName = Cisco Systems
commonName = esxi01
[ req_ext ]
subjectAltName = @alt_names
[alt_names]
DNS.1 = 10.31.123.60
IP.1 = 10.31.123.32
IP.2 = 10.31.123.34
IP.3 = 10.31.123.35
Caution: Use the Subject Alternate Name(s) in order to specify additional host names or IP addresses for your Server(s). Not configuring it or excluding it from the uploaded certificate can result in browsers blocking access to the Cisco IMC interface.
Generate a Private Key (.key)
Use openssl genrsa in orderto generate a new key.
Test-Laptop$ openssl genrsa -out cert.key 2048
Verify the file named cert.key is created through the ls -la command.
Test-Laptop$ ls -la | grep cert.key
-rw------- 1 user staff 1675 Dec 13 21:59 cert.key
Generate CSR
Use openssl req -new in order to request a .csr file using the private key and .cnf files created earlier.
Test-Laptop$ openssl req -new -key cert.key -out cert.csr -config cert.cnf
Use ls -la in order to verify the cert.csr
Test-Laptop$ ls -la | grep .csr
-rw-r--r-- 1 user staff 1090 Dec 13 21:53 cert.csr
Note: If your organization uses a Certificate Authority (CA), you can submit this CSR in order to get the certificate signed by your CA.
Generate the Certificate File
Generate the .cer file with x509 code format.
Test-Laptop$ openssl x509 -in cert.csr -out certificate.cer -req -signkey cert.key -days 4000
Use ls -la in order to verify the certificate.cer
Test-Laptop$ ls -la | grep certificate.cer
-rw-r--r-- 1 user staff 1090 Dec 13 21:54 certificate.cer
Create the Certificate Management Policy in Intersight
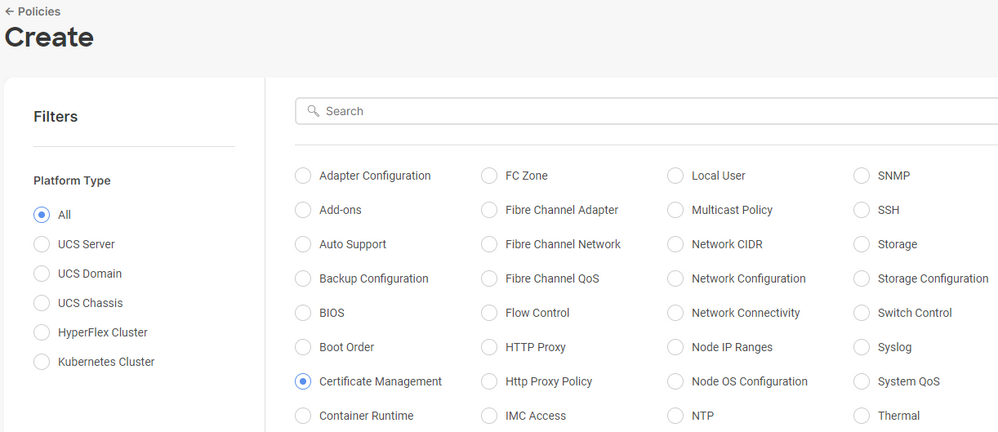
Login to your Intersight account, navigate to Infrastructure Service, click the Policies tab, and then, click Create Policy.

Filter by UCS Server and choose Certificate Management.

Use the cat command In order to copy the contents of the Certificate (certificate.cert file) and the key file (cert.key file) and paste them onto the Certificate Management Policy in Intersight.
Test-Laptop$ cat certificate.cert
Test-Laptop$ cat cert.key

Verify that the policy is created with no errors.

Add the Policy to a Server Profile
Navigate to the Profiles tab and modify a server profile or create a new profile and attach additional policies if required. This example modifies a service profile. Click edit and continue, attach the policy, and deploy the server profile.

Troubleshoot
If you need to check the information within a Certificate, CSR, or Private Key, use the OpenSSL commands as mentioned.
In order to check CSR details:
Test-Laptop$ openssl req -text -noout -verify -in cert.csr
In order to check the Certificate details:
Test-Laptop$ openssl x509 -in cert.cer -text -noout


 Feedback