Manage Device Configuration Files from Network Devices with EPNM
Available Languages
Download Options
Bias-Free Language
The documentation set for this product strives to use bias-free language. For the purposes of this documentation set, bias-free is defined as language that does not imply discrimination based on age, disability, gender, racial identity, ethnic identity, sexual orientation, socioeconomic status, and intersectionality. Exceptions may be present in the documentation due to language that is hardcoded in the user interfaces of the product software, language used based on RFP documentation, or language that is used by a referenced third-party product. Learn more about how Cisco is using Inclusive Language.
Contents
Introduction
This document describes how Evolved Programmable Network Manager (EPNM) can manage backup configuration files for devices from its central location.
Background Information
- This document has been written based on EPNM version 6.1.1
- For systems running version 5.1.x, the Cisco bug ID CSCvz12497 applies and prevents editing of Device Configuration Backup-External job from the job Dashboard
Obtain the configuration backup files
The process to store backups from the devices in the EPNM database is called "Configuration Archive" and can be adjusted to run periodically.
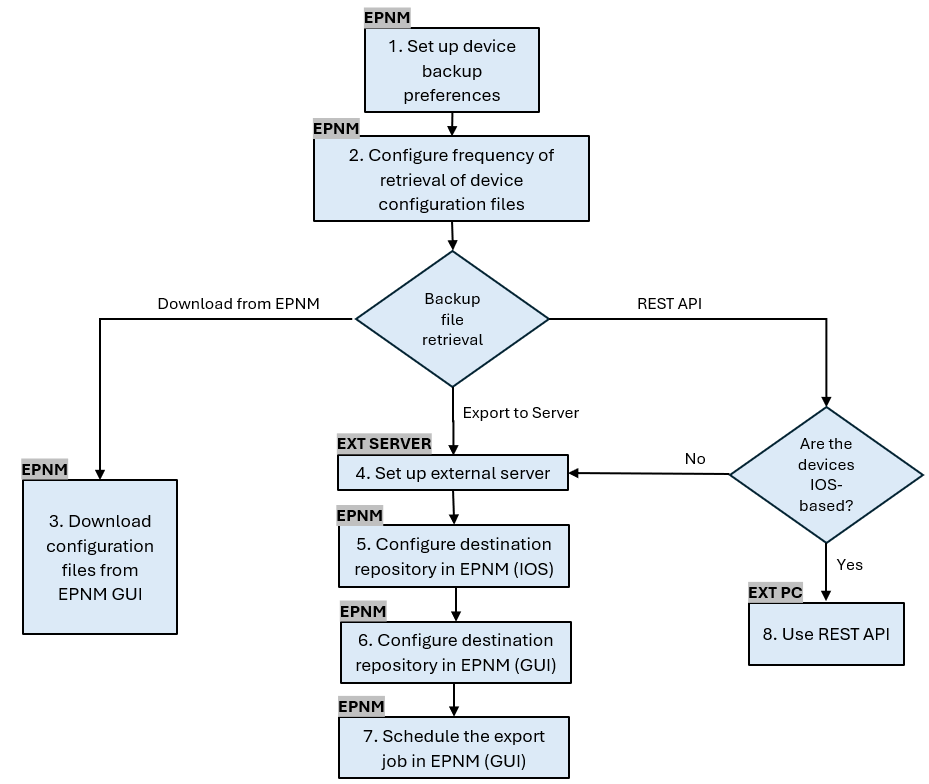
The block diagram shows the steps to configure the EPNM to obtain the backup files from the network devices and the 3 options to retrieve these files from EPNM.
In Step 1, it is defined the overall preferences on how to handle the collection of the configuration files by EPNM. You can choose for example how many configuration files are kept per device and whether or not a backup is triggered when there is a configuration change.
After that, in Step 2 it is configured how often the EPNM polls the network devices to get their configuration files.
Once the files are in EPNM database, there are 3 options to retrieve them:
- Download the configuration file from EPNM directly (Step 3 in the block diagram)
- Export the configuration files to an external server, in which case it is necessary to set up the external server and configure it as a repository in EPNM (Steps 4, 5, 6, and 7)
- Retrieve the configuration files using REST API (Step 8). This method does not work for NCS2000 devices, which use configuration files in database format
1. Set up device backup preferences
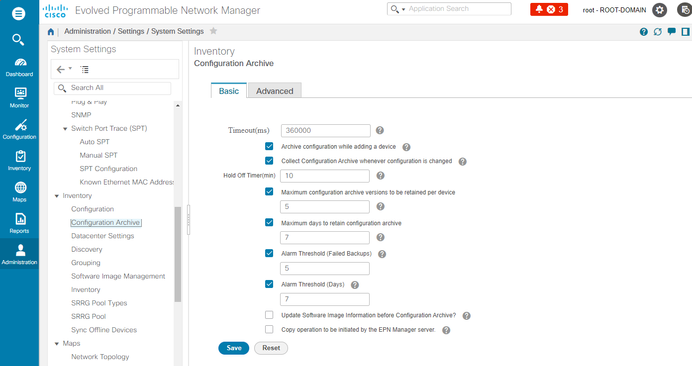
This defines the default behaviors for archive collection, such as when archiving is triggered, the number of files that are retained per device and whether or not to automatically create a backup configuration file as soon as a device is added to the network.
Procedure
| Step 1 |
Under Administration > Settings > System Settings, then under Inventory > Configuration Archive, define the default behaviors for archive collection.
|
2. Configure frequency of retrieval of device configuration files
In this step, it is defined how often the EPNM grabs the configuration files from the devices in the network. The number of files that are kept in the database depends on what was defined in item 1 -Set up device backup preferences.
Procedure
| Step 1 |
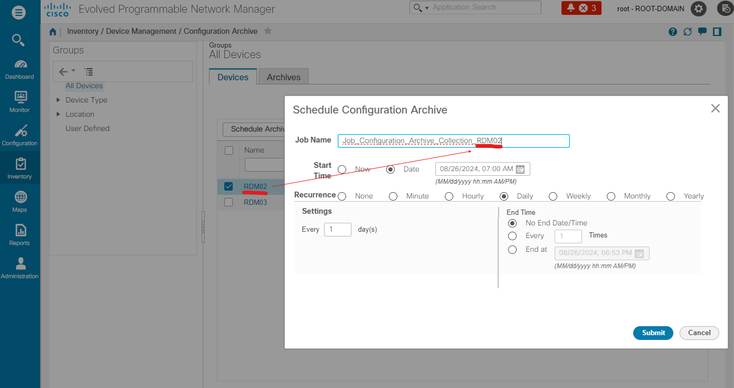
Define the parameters for Archive Collection: Choose Administration > Device Management > Configuration Archive, then under the Devices tab select the device for which the configuration needs to be collected, click the Schedule Archive Collection and complete the schedule settings in the Recurrence area. You can select several devices at once (and define a generic name for the collection) or create one job per device (and specify a name for the job that relates to the device itself as shown in the picture). If the operation is to be performed on a large number of devices, schedule the archiving for a time that is least likely to impact production.
|
| Step 2 |
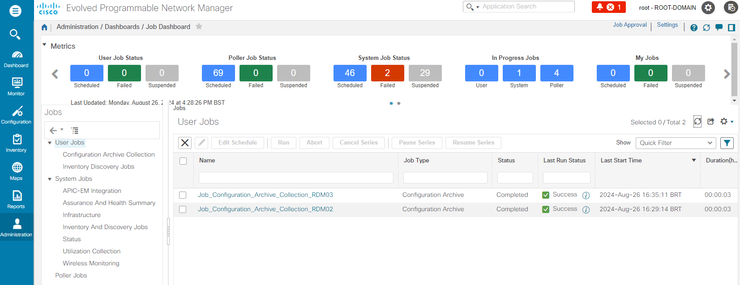
Check the Configuration Archive Collection job: Each time the archive collection is triggered, a Configuration Archive Collection job is created and associated to that process, and you can check its status under Administration > Dashboards > Job Dashboard, then go to User Jobs > Configuration Archive Collection. Using one job per device makes it easier to troubleshoot the Configuration Archive Collection job if the collection archive fails for a particular node:
|
| Step 3 |
Check for any failures: Failures on Configuration Archive Collection can have different reasons. Some examples (that apply for the NCS2000) are listed in the Section Troubleshooting Configuration Archive collection later in this procedure. |
3. Download configuration files from EPNM
Procedure
| Step 1 |
Choose Inventory > Device Management > Configuration Archive |
| Step 2 |
Select the check box next to the device you want to download the configuration file. |
| Step 3 |
In the Export Latest Archives drop-down list, select one of the options to download the configuration files:
The Unsanitized option appears based on the user permission set in Role Based Access Control (RBAC). This is irrelevant for NCS2000 backup files since they are not text-based files. This procedure prompts you to download a .zip file containing the Startup-configuration Running-configuration or Database configuration, depending on what is supported by the device. |
4. Set up external server
The supported repositories are FTP, SSH FTP (SFTP) and Network File System (NFS). In the example, it is assumed that an SFTP server is built with a CentOS Linux release 8 server. The procedure to create the server is outside the scope of this article.
5. Configure destination repository in EPNM (Cisco IOS)
In this step, the parameters of the external server are defined in EPNM cars shell.
Procedure
| Step 1 | Log in to the server as the Cisco EPN Manager CLI admin user. See Establish an SSH Session With the Cisco EPN Manager Server. |
| Step 2 |
In EPNM, enter configuration mode: |
| Step 3 |
Create the repository in EPNM for the user sftpuser: This example is for backing up the device configurations via SFTP on an external server.
|
| Step 4 |
You can test if the repository is accessible at the external server by using the show command: |
| Step 5 |
If the EPNM system is configured in High Availability, repeat Step 3 in the non-active server. |
6. Configure destination repository in EPNM (GUI)
In this step, the parameters of the external server are defined in the EPNM GUI.
Procedure
| Step 1 |
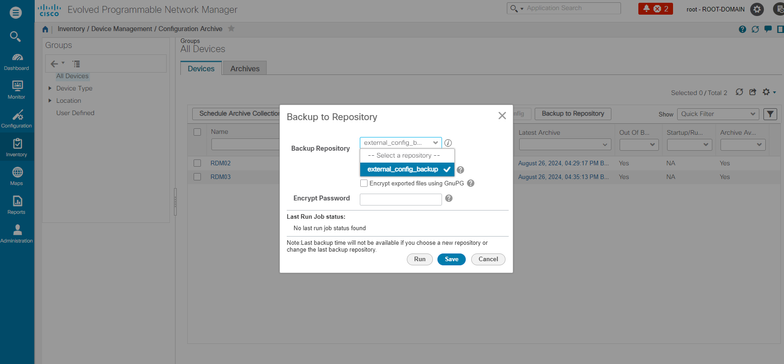
Choose Inventory > Device Management > Configuration Archive, then click the Backup to Repository button at the Devices tab. From the Backup to Repository drop down list, select external_config_backup repository, which was configured previously in the Configure Repository section:
There are also 2 checkboxes in the Backup Repository window:
|
| Step 2 |
Optionally, click Run to start the export process immediately. Otherwise, to schedule and define the recurrence, see item 7. Schedule the export job in EPNM GUI later in this procedure. Each time this process is triggered, a Device Config Backup-External job is created and associated to that process, and you can check its status under Administration > Dashboards > Job Dashboard, then going under System Jobs > Infrastructure. |
7. Schedule the export job in EPNM GUI
In this step, the job to export the configuration files to the external server is defined in the EPNM GUI.
Procedure
| Step 1 |
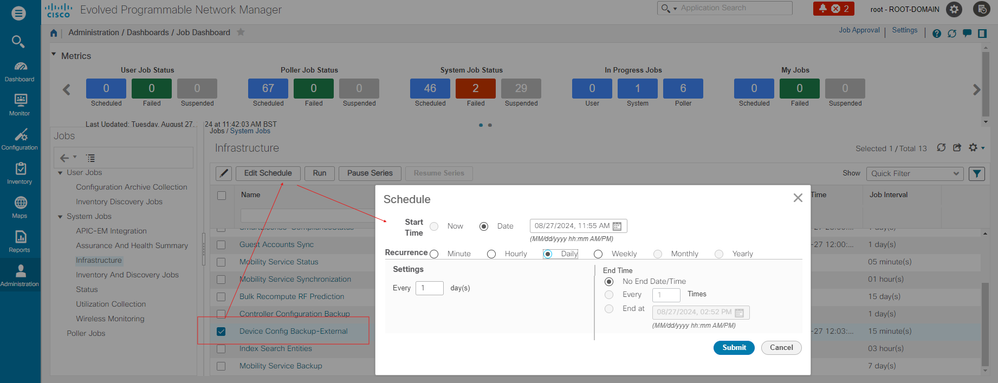
Choose Administration > Dashboards > Job Dashboard, then go to System Jobs > Infrastructure. |
| Step 2 |
Click the check box next to Device Config Backup-External, click on the Edit Schedule button and fill out the schedule.
|
| Step 3 |
Click the Submit button. |
| Step 4 |
Check if the job completed successfully by clicking on the Device Configuration Backup-External hyperlink.
|
8. Use REST API to get the configuration files
Several options of services for configuration files are available, (for example, diff, bulk export and version operations). In this section it is shown a basic example of how to retrieve the backup files based on device with ip address x.x.x.x
First, you need to query the device to obtain the field for the desired configuration file. This can be done using the GET Configuration Versions endpoint [2]:
GET https://<epnm_ip>/webacs/api/v4/data/ConfigVersions?.full=true&deviceIpAddress=x.x.x.xNotice from the JSON response that both the startup-configuration and the running-configuration are available for this device. Also diff Type in this case is OUT_OF_SYNC, which means that this version is different if compared with previous version of the configuration file:
{
"queryResponse": {
"@last": 0,
"@first": 0,
"@count": 1,
"@type": "ConfigVersions",
"@domain": "ROOT-DOMAIN",
"@requestUrl": "https://<epnm_ip>/webacs/api/v4/data/ConfigVersions?.full=true&deviceIpAddress=x.x.x.x",
"@responseType": "listEntityInstances",
"@rootUrl": "https://<epnm_ip>/webacs/api/v4/data",
"entity": [
{
"@dtoType": "configVersionsDTO",
"@type": "ConfigVersions",
"@url": "https://<epnm_ip>/webacs/api/v4/data/ConfigVersions/5029722742",
"configVersionsDTO": {
"@displayName": "5029722742",
"@id": 5029722742,
"comments": "Archived By Job Name: Job_Configuration_Archive_Collection_10_10_00_021_AM_8_28_2024, Run Id: 6333919609",
"createdAt": "2024-08-28T13:10:07.112Z",
"createdBy": "root",
"deviceIpAddress": "x.x.x.x",
"deviceName": "CBR8",
"diffType": "OUT_OF_SYNC",
"fileInfos": {
"fileInfo": [
{
"fileId": 5029723744,
"fileState": "STARTUPCONFIG",
"fileType": "TEXT"
},
{
"fileId": 5029723743,
"fileState": "RUNNINGCONFIG",
"fileType": "TEXT"
}
]
},
"isFirst": true,
"isLast": true,
"outOfBand": true
}
}
]
}
}Then you can download the configuration file using the file ID from the previous step. If you want to download the running config you can use the endpoint:
GET https://<epnm_ip>/webacs/api/v4/op/configArchiveService/extractUnsanitizedFile?fileId=5029723743The response contains the running-configuration in text format.
{
    "mgmtResponse": {
        "@domain": "ROOT-DOMAIN",
        "@requestUrl": "https://<epnm_ip>/webacs/api/v4/op/configArchiveService/extractUnsanitizedFile?fileId=5029723743",
        "@responseType": "operation",
        "@rootUrl": "https://<epnm_ip>/webacs/api/v4/op",
        "extractFileResult": [
            {
                "fileData":"!\n! Last configuration change at 18:12:00 EDT Sun Aug 25 2024 by rtp1\n!\nno issu config-sync policy bulk prc\nversion 16.12\nservice timestamps debug datetime msec\nservice timestamps log datetime localtime show-timezone\nservice password-encryption\nservice internal\nservice udp-small-servers\nservice sequence-

<snip>

tcp\nnetconf-yang\nnetconf-yang cisco-ia snmp-community-string testing-mib-yang\nnetconf-yang ssh port 57000\nrestconf\nend"
            }
        ]
    }
}
Remember that NCS2000 configuration files cannot be retrieved by this method due to its different format (DATABASE).
Troubleshoot Configuration Archive collection
Timeout
Related error message:Backup Database from device using https failed. Socket timeout during execution of HTTP request: Read timed out
Root Cause: Timeout occurs before EPNM is able to obtain the database from the device.

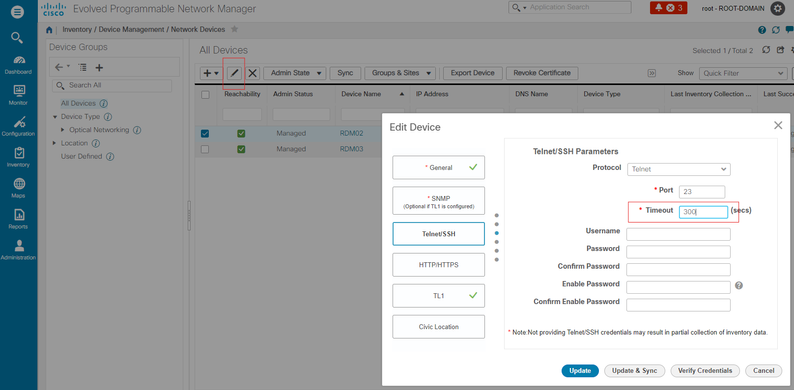
The Configuration Archive task uses the Device CLI Timeout value for each fetching activity. A single Configuration Archive task entails 1 to 5 files. Consequently, the overall job timeout value is determined using the logic: Overall job timeout = Number of files*Device CLI Timeout. To configure a CLI timeout value, choose Inventory > Device Management > Network Devices, click the edit device icon, select the Telnet/SSH option, and then enter a value in the Timeout field.
EMS not enabled as "Secure" in NCS2000
Related error message:"Backup Database from device using https failed. Failed to establish telnet connection to device- Cause : Connection refused or timed-out."
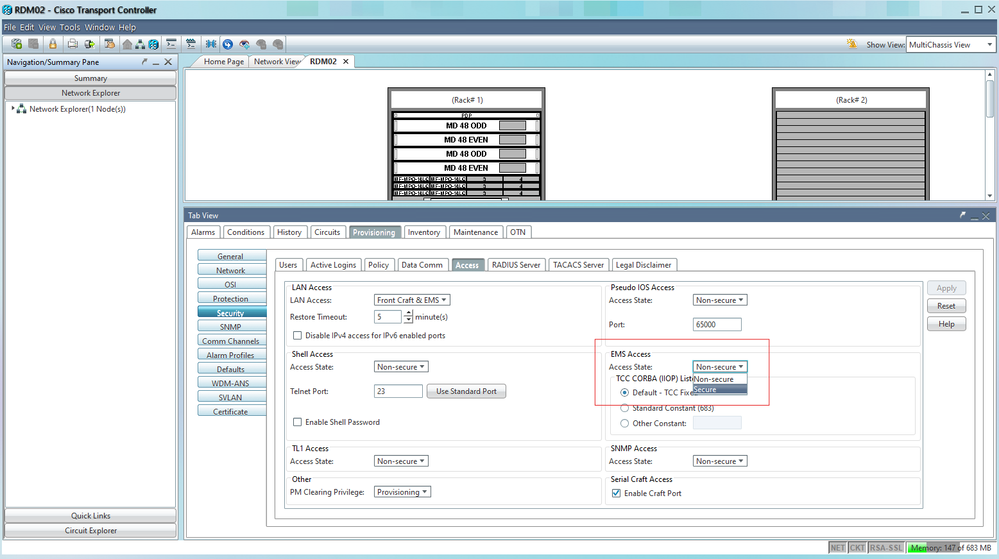
Root Cause:EMS Access parameter in NCS2000 (access to it is done via CTC tool) is set to Non Secure. It is necessary to set it up as Secure.

In order to fix it, access the NCS2000 using the CTC tool, go to Node view, Provisioning tab, Security, then Access tab and change the Access State under EMS Access to Secure.
Device ID not found
Related error message: “Device archive(s) could not be found. Device(s) can have an invalid ID or can have been deleted from the system.”
Root cause: if the NCS2000 device has been deleted in EPNM, its device ID in the EPNM database changes. However, the Configuration Archive Collection job still refers to the old ID, and therefore it fails. The workaround is to delete and recreate the Configuration Archive Collection job for the related device.
Conclusion
This document described with some detail how to access configuration files from network devices that are stored in EPNM database.
Three options were given to access the files: via EPNM directly, export to an external server and via REST API. Those methods can be used to automate tasks that can be executed by systems connected to the northbound interface of EPNM. Some troubleshooting tips were also given for the retrieval of the configuration files from the devices.
References
[1] EPNM Configuration guide
[2] EPNM REST API online reference
https://<EPNM IP Address>/webacs/api/v1/index?_docs
Revision History
| Revision | Publish Date | Comments |
|---|---|---|
1.0 |
06-Sep-2024 |
Initial Release |
Contributed by Cisco Engineers
- Angelo Pinelli
Contact Cisco
- Open a Support Case

- (Requires a Cisco Service Contract)

 Feedback